PeoplePro is a software that will you to manage the people in your company or organization in a
effective way that can assure a competitieve advantage in your buisness. The system is designed in such
a
way that can maximize employee performnace . We believe that this software is suitable for managing the
people within a workplace to achieve the organization’s mission and reinforce the culture.This user
friendly
software is fully responsive and has many features. Hopefully this software will be ul to manage
your
workplace to functionate to it's full potential.
The docs is written in a chronological order . There are some dependencies that need to be
maintained
properly in a sequential order . Please try to follow that . You can also seach using the search bar for
a specific
query.
SERVER REQUIREMENT
The software is built on most popular PHP framework Laravel (Version-10). The minimum
requirements for running the software is listed below .Please do check if your server matches those
requirements
PHP = 8.1.0
BCMath PHP Extension
Ctype PHP Extension
Fileinfo PHP Extension
JSON PHP Extension
Mbstring PHP Extension
OpenSSL PHP Extension
PDO PHP Extension
Tokenizer PHP Extension
XML PHP Extension
Please note if you try to install the application on any other server say LiteSpeed or IIS, you
may get undesirable result. We do not recommend you to use other server than Apache or Nginx. Also
we do not provide support for installation in server other than Apache. Please follow the installation process,
below. Do not use php artisan serve command. And lastly we don't provide support in the localhost (except online server).
If you need local machine support, you have to pay extra $50.
INSTALL
Localhost
If you are installing on localhost, please keep in mind that you’ll need Internet for installation. After installation, you can use PeoplePro without Internet.
We suggest you use XAMPP for localhost. You can use other solutions like WAMP, MAMP etc. as well and installation process for all of them are same. Create a folder inside htdocs folder inside your XAMPP installation. Now copy the zip folder you downloaded from Codecanyon to htdocs folder and unzip it there. Rename it to whatever you want. Say, you have named it- ‘my-folder’.
Now start your XAMPP (or whatever you are using) and go to your browser and access PeoplePro from your browser like- localhost/my-folder/.
Online Hosting
Upload the zip folder you downloaded from Codecanyon to your hosting and unzip it. Please make sure you configure your web hosting’s settings, so that it shows hidden files and folders. This is to ensure that if you copy/move the contents from the unzipped folder to any other location, you copy all the files including ‘.htaccess’, ‘.env’ files which are necessary for the proper functioning of the software.
Now you can access the folder where you have PeoplePro from your browser.
Now follow the installation process below.
Step 1
Please read the license arrangement before proceeding.
You need to accept and continue for going to
the next step.
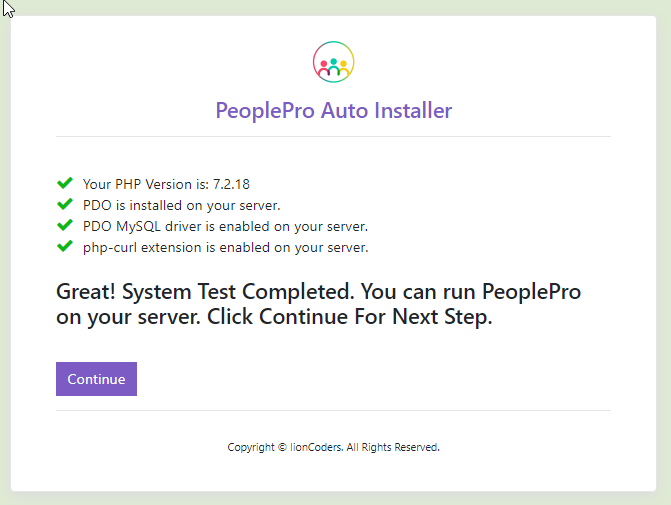
Step 2
The system will automatically check for the server requirements. If all the requirements are
fulfilled,
You can proceed for further action.
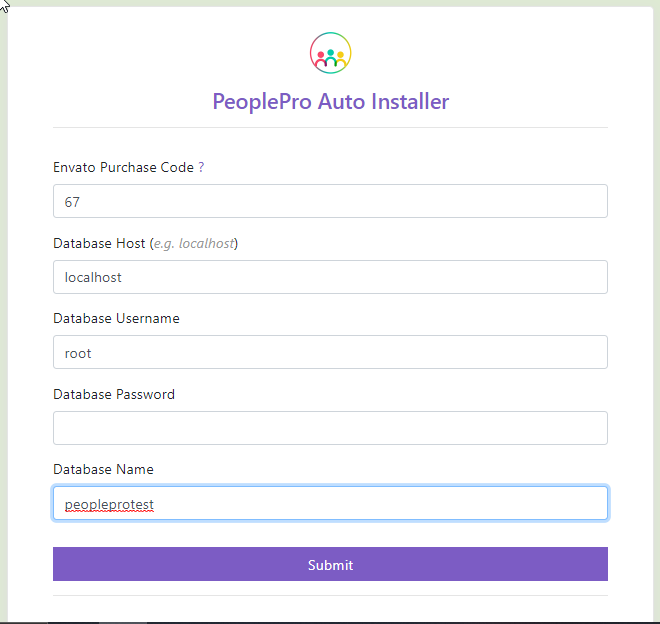
Step 3
You have to fill up the form with correct information.
Please input the purchase code.
Input your database host e.g(localhost).
Your database username e.g(root).
your
database password (if any).
The database name that you have already created.
Click on submit.
The system wil automatically import the database. This is a
batch process,please wait patiently while the action is processing.
Step 4
Congratulations! You have successfully installed PeoplePro. Note : your project folder contains 'install' folder, then please delete
the folder.
Help with installation
We can help you install on any cpanel based hosting for as little as $15. You can send the money via paypal to tarik_17@yahoo.co.uk. Contact us at support@lion-coders.com with you hosting details and payment proof and we'll take care of the rest.
Please note - If you are installing on localhost, we'll charge $50 for anydesk/teamviewer support(installation).
Error
If you face a "Fatal error: Maximum execution time of ** seconds exceeded",
Do not worry, the software is installed properly. Note : After installtion, please go to asset folder from root directory and then check a 'install' folder still exits or not, if exists then delete it.
After successful installation you can login with
username:admin
password:admin
Common Errors
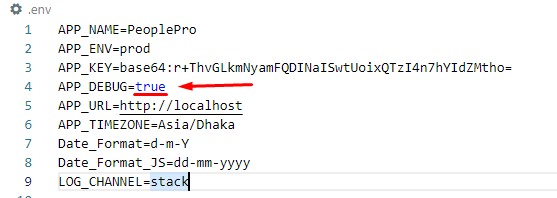
If you face 500 server error after installing the software please update your php version to 7.4 or later. If you still get 500 error after updating php version, please open your '.env' file and change the value of 'APP_DEBUG' to true. You'll find '.env' file in the root folder (salepro) And then go to the page again where you were getting 500 server error. You should see description of actual error now. Please take a screenshot and send it over along with your cpanel access details, so that we can look into it.
SOFTWARE UPDATE
UPDATE with Existing Data
You can update the software very easily by following 4 steps:
Rename your previous database like peoplepro-backup.sql.
Delete the project folder and reinstall it
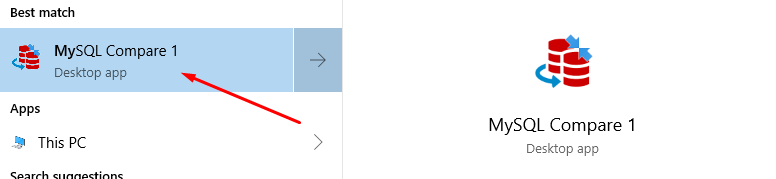
Merge your present database with previous one with
MySQL Compare. If you are
// a linux user you can use Navicat to merge database.
After that delete the new database and rename the previous one with present database name like
peoplepro-backup.sql to peoplepro.sql.
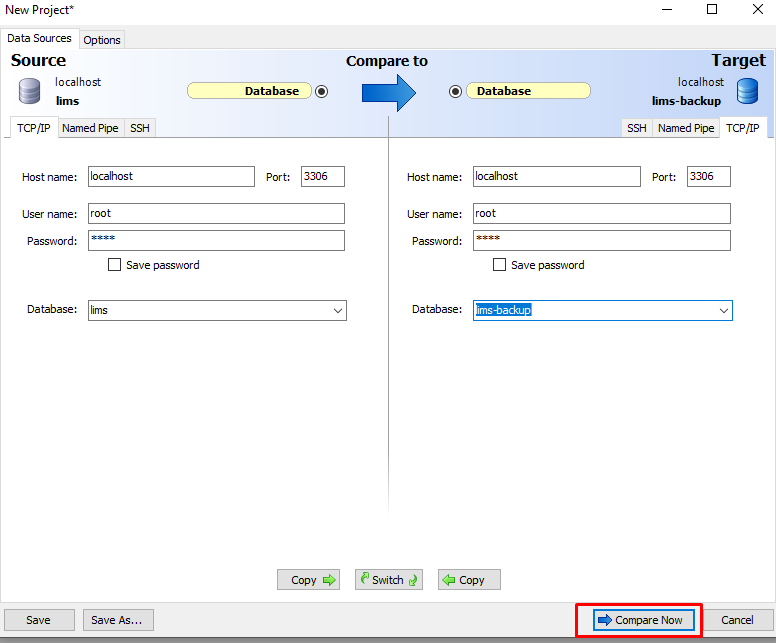
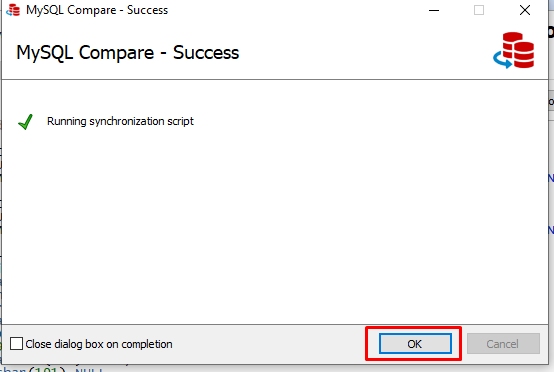
Please follow the following spanshots carefully to merge database:
Open the software.
Select your source and target database and click compare now.
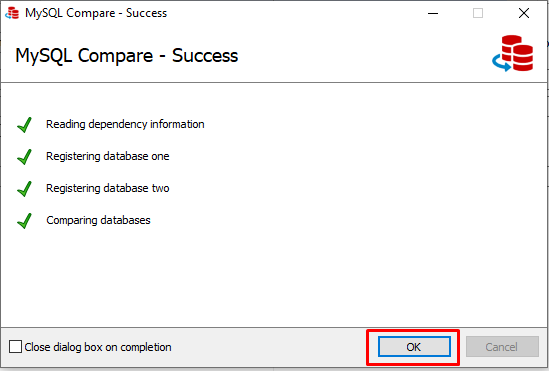
After comparing successfully two database click ok.
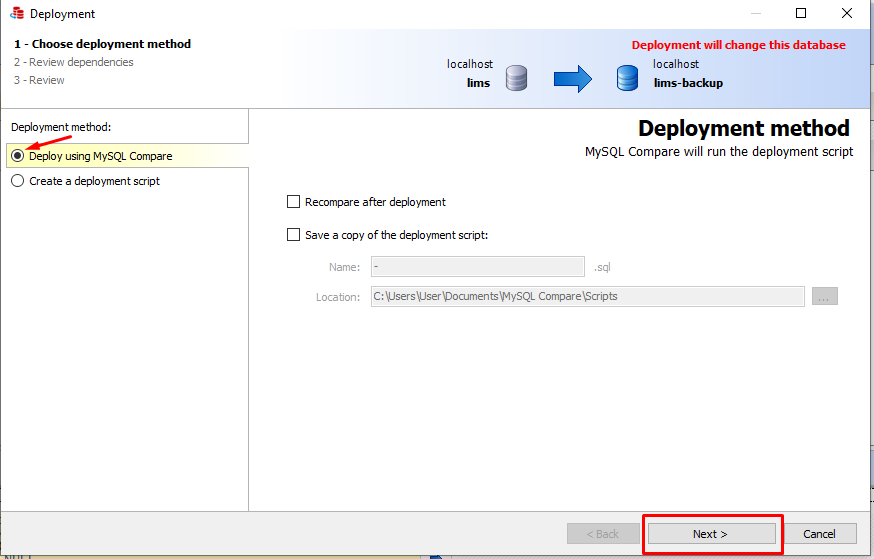
Then select the checkbox and click Deployment Wizard.
Uncheck the Recompare after deployment checkbox and click next.
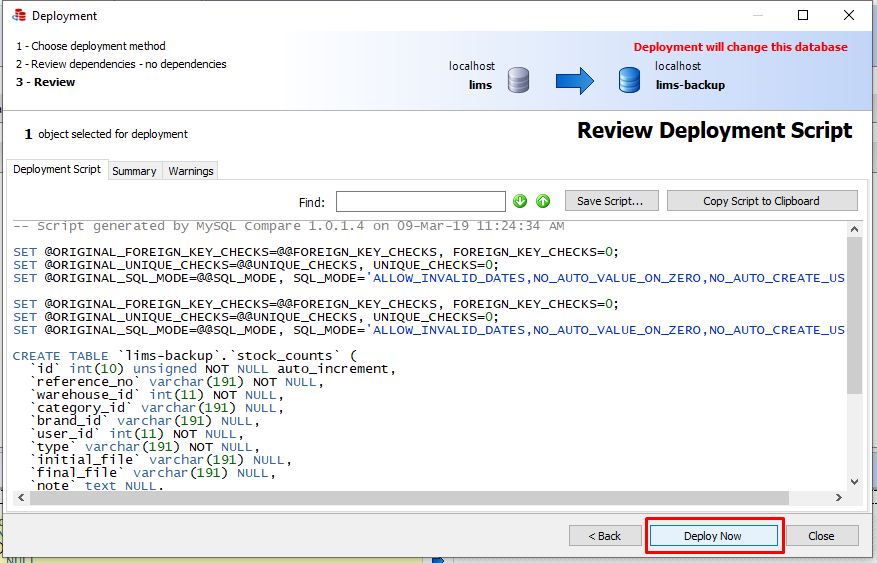
Click Deploy now.
Click Ok.
Thats all! You have just updated the database. Now follow step 4 as we described earlier.
UPDATE without Existing Data
You can update the software very easily by following 2 steps:
Delete your previous database.
Delete the project folder and reinstall it
Still facing problem? Don't worry! We can update your software for USD 15. Please contact us at
support@lion-coders.com.
Log In
After installation go to the project/root url.Then you will be prompt to login.
The login credentials provided below are for initial usage only - do not forget
to update your password after first successful login.
Username ::: admin
Password ::: admin
After successful login you will be redirected to the admin dashboard.
Admin DASHBOARD
The system offers an informative,interactive and user friendly admin dashboard.
The dashboard shows summarized information about the organization in a nutshell.
This is the logo of your site.You can update/change it from General Settings under
Customize Settings
This is the name of your organization.You can update/change it from General
Settings under Customize Settings
View the software in full screen mode
Notifications
Lanuage :Change Locale/Language
Employees :Total Active employees in your company/organization
Attendance :Number of present and ansent employee
Total Leave :Total active Leave
Total Expense :Total Expense till date of the organization
Total Deposit :Total Deposit till date of the organization
Total Salaries Paid :Total salaries paid till date
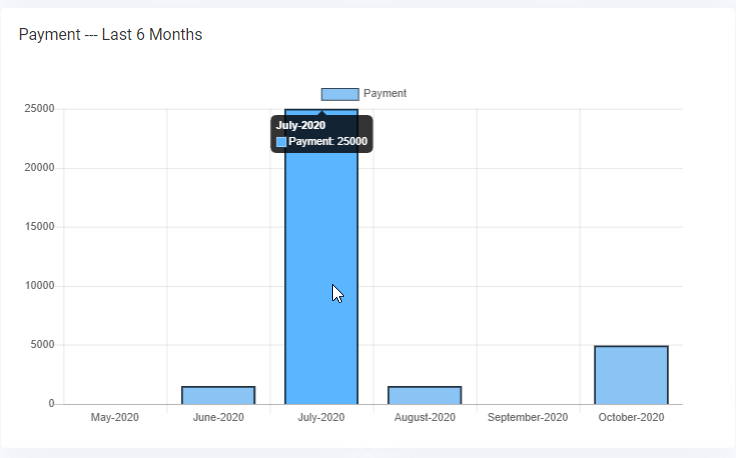
Payment-last six month
This is graph will show you the amount of money that has been spent as a payment to the employees for
the last
six month.
Employee Department
The doughnut chart will give you a visual information about the employee and their departments.
You can hover over the doughnut chart for more details.
Employee Designation
This pie chart will give you a visual information about the employee and their designations.
You can hover over the pie chart for more details.
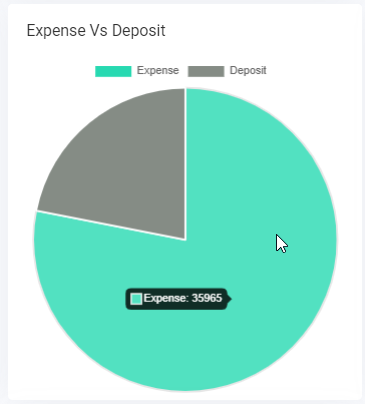
Expense Vs Deposit
This is the expense vs deposit pie chart. You can have a quick idea about the total expense vs total
deposit at a glance.
For more information hover over the pie chart.
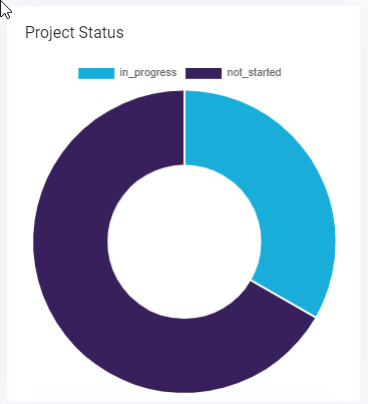
Project Status
The doughnut chart will give you a visual information about the project status of your organization.
You can hover over the doughnut chart for more details.
Announcement
This section will show the latest published announcements.
Open Ticket
This section will show information about the tickets that are open.
Completed Project
The projects that has been Completed will be shown here.
All of them are clickable.
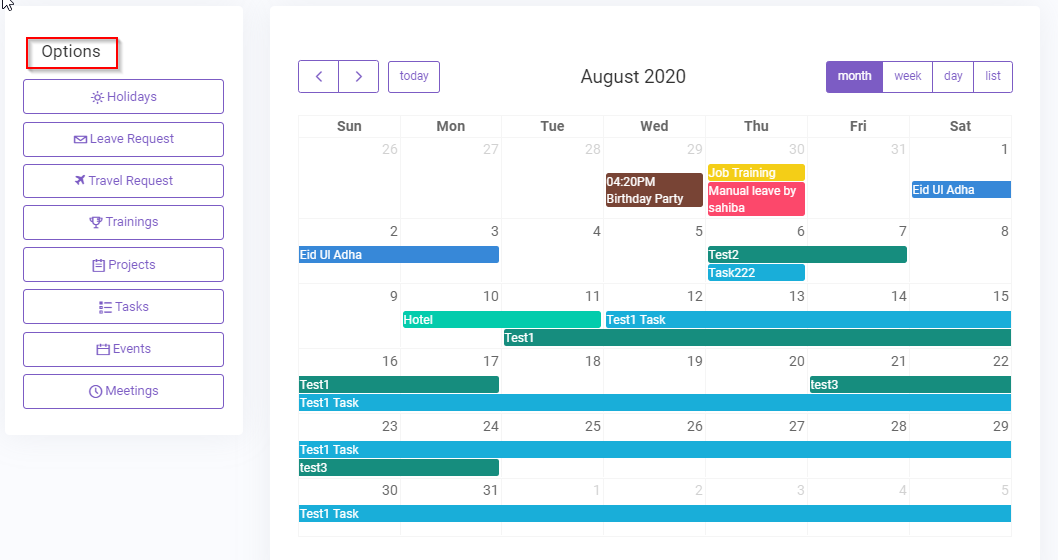
Calendar
The Calendar will display all the events in a calendar view. Admin can also add a new event from the
options (1).
The events are clickable . You can click on a event to view details.
If you set your meeting status Ongoing, then it will display in Calender.
Empty Database
After first time login you may want to delete the preloaded data. For that, click on (1), then click on
empty database. All the
preloaded data will be deleted from the database except few mandatory record that is essential for
running the software properly. Note: This is a batch process, so the action will take some time. Please wait
patiently.
*** This action is irreversible, if you have your own data/record in the database, this
action will delete all of them.
This action is recommended only for the first time, unless you are sure about what you are doing.
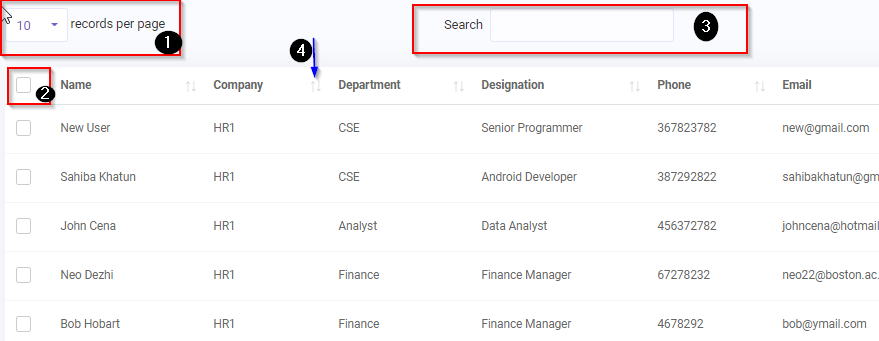
Datatable Options
DataTables is a table enhancing plug-in that offers sorting, paging and filtering
abilities . In this software, datatable is used as a toll for showing data.
Here are some of the features and usage for datatable :::
you can select how many records to be shown in a single page (10,25 or all).Default is 10
Selector: You can select all the records/rows and perform action like print to
pdf/csv/print or delete multiple rows
Search: Search the records/rows using keywords
Sorting: Sort columns
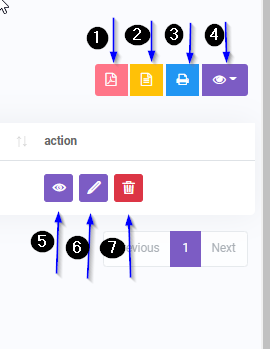
You can export the records to a pdf using this button
You can export the records to a csv using this button
You can print the records using this button
You can hide/show specific columns using this button
View details of a specific record
Edit/Update a specific record
Delete a specific record
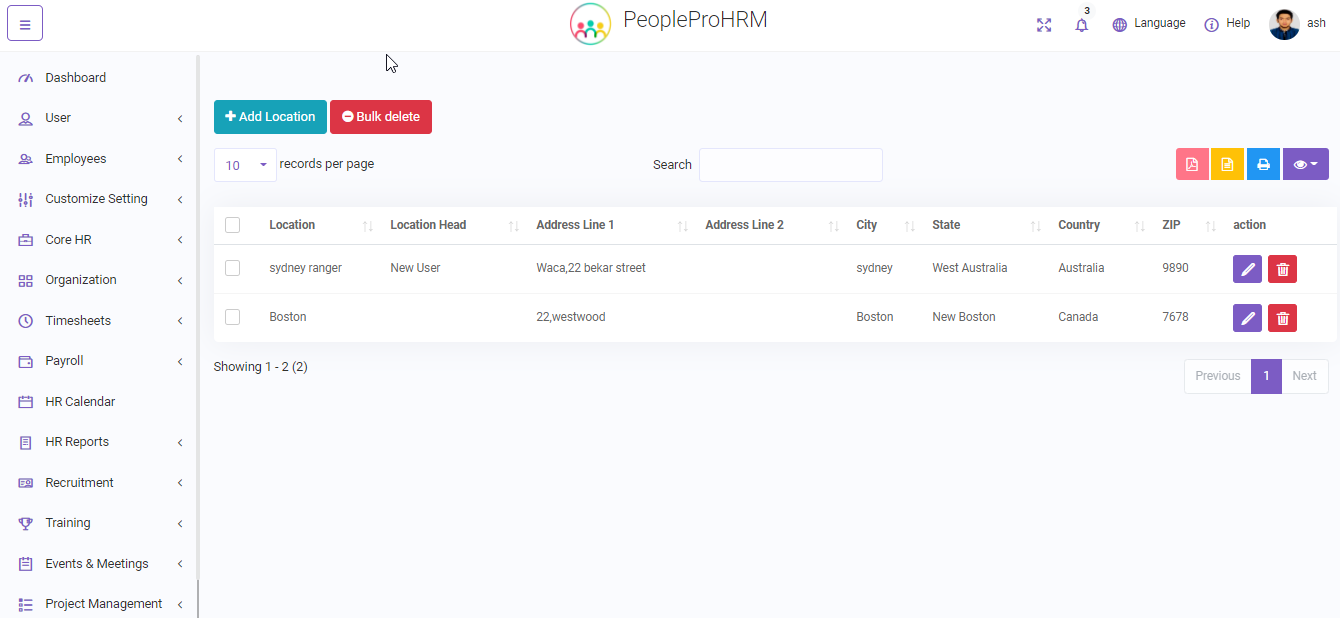
Location
Organization -> Location.
PeoplePro provides an easy to use location module system, where administrator can add multiple
locations, and
under one location administrator can add companies.Later on, Administrator can edit /
update or delete any location information.
Company
Organization -> Company.
Administrator can add multiple companies, and under a company different departments can be
added.Administrator can edit /
update or delete any company information.
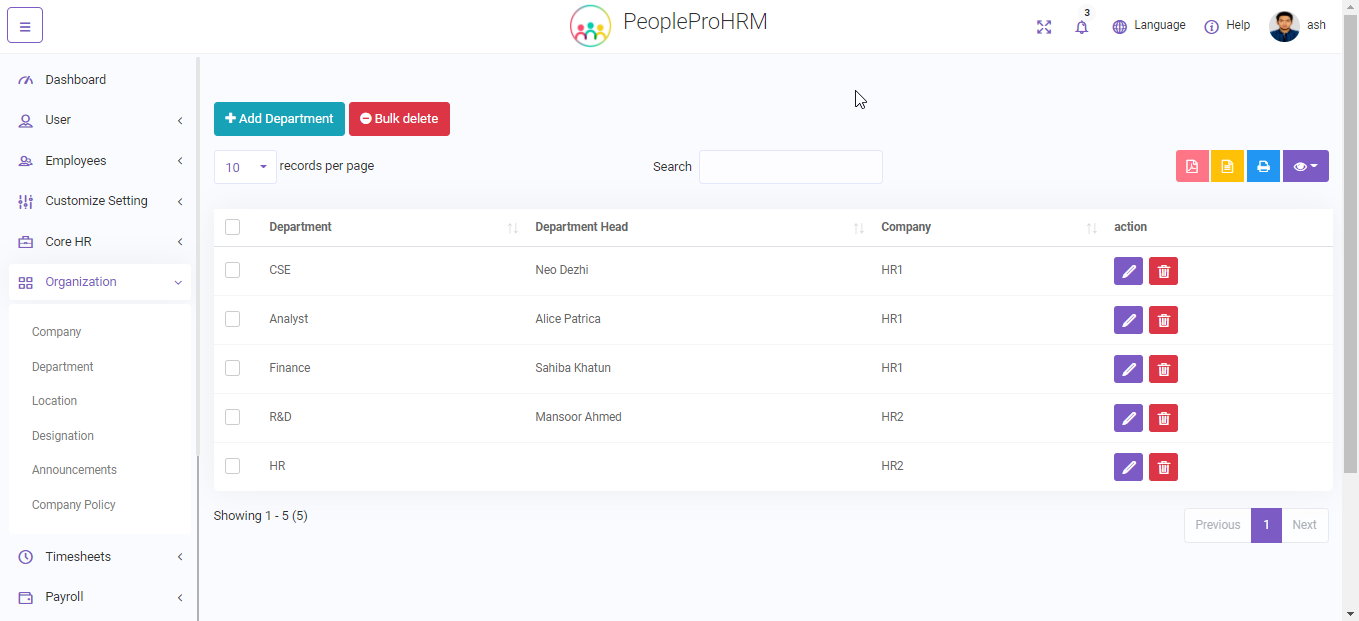
Department
Organization -> Department.
Multiple departments can be added under a company.Administrator can edit /
update or delete any department information.
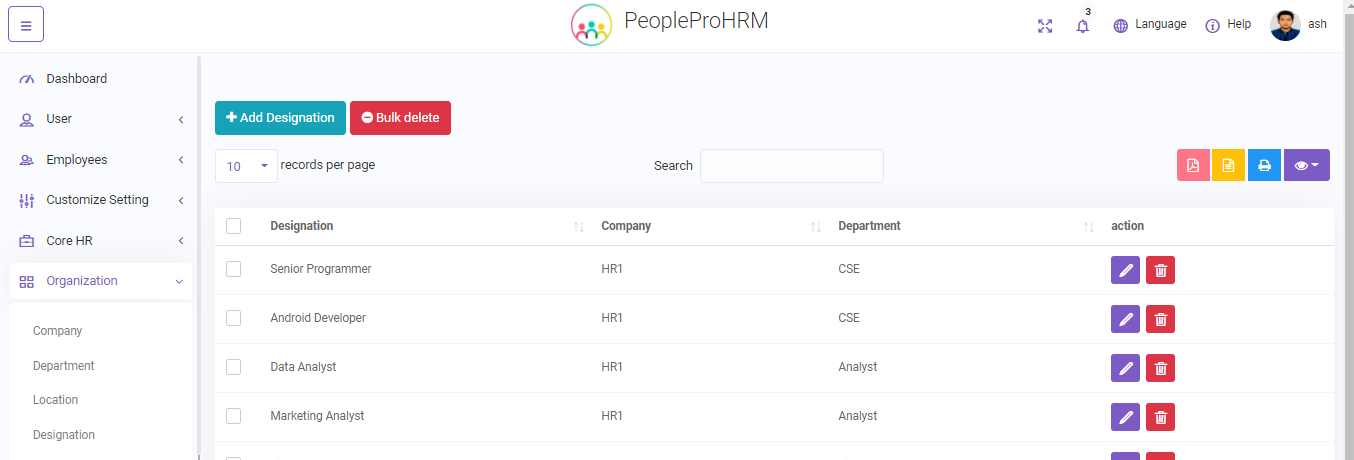
Designation
Organization -> Designation.
Multiple designation can be added under a company's department.Administrator can edit /
update or delete any designation information.
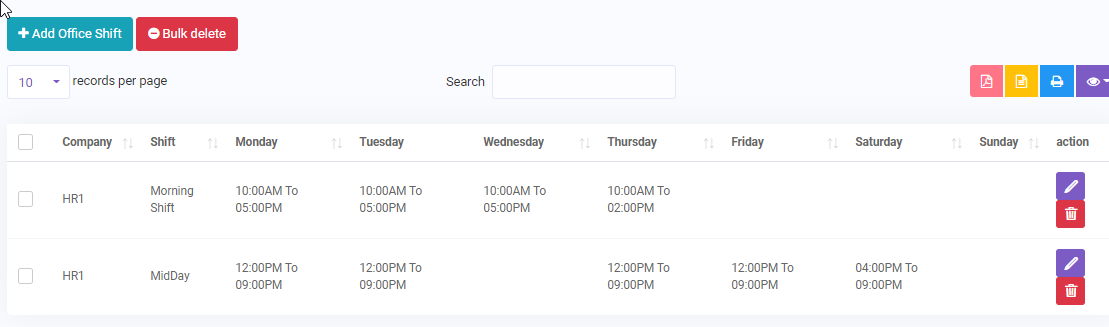
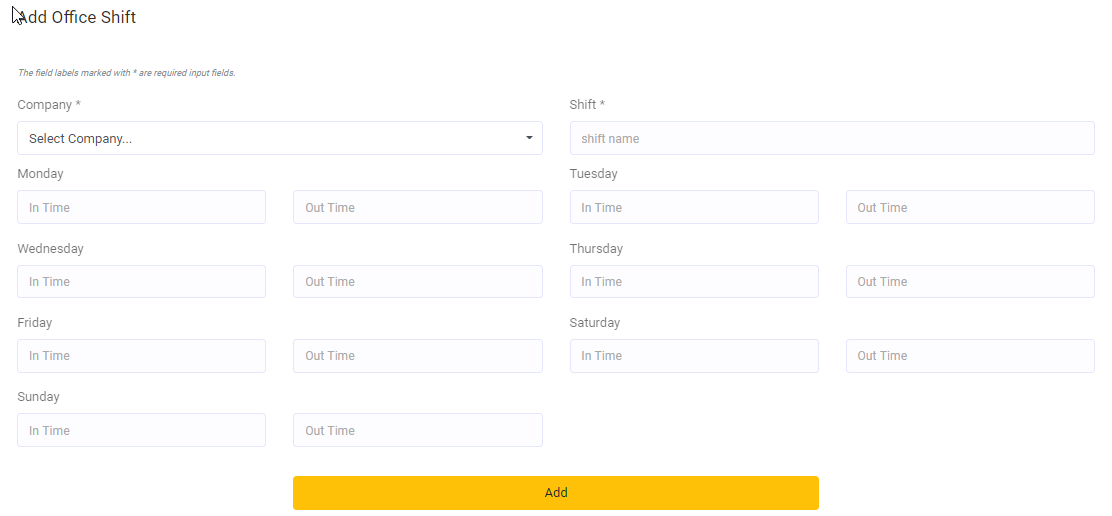
Office Shift
Timesheets -> Office Shift.
The list of office shift/shifts of a company.You can assign one or multiple office shifts and
office timing under this module.
Add Office Shift
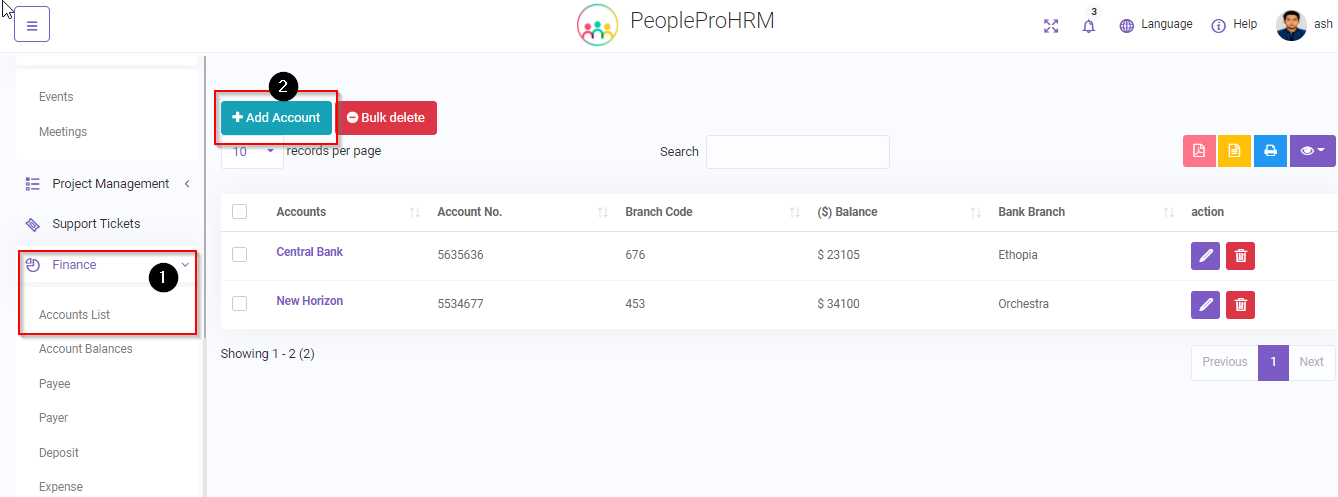
Account List
Finance -> Account List.
You can view/add/edit/delete account details using this module .
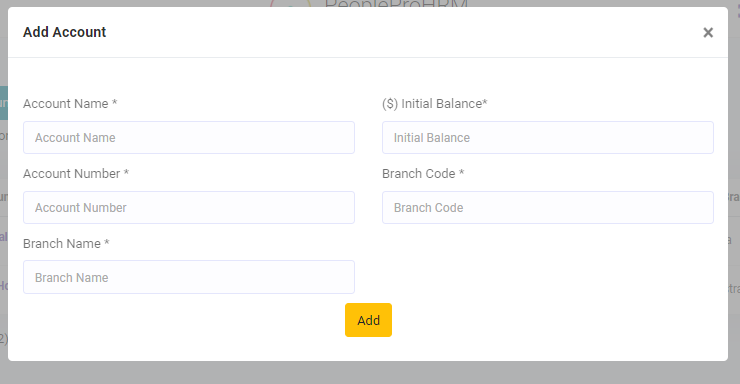
Add Account
You can add account details using this module .
This is mandatory for using payroll and finance module.
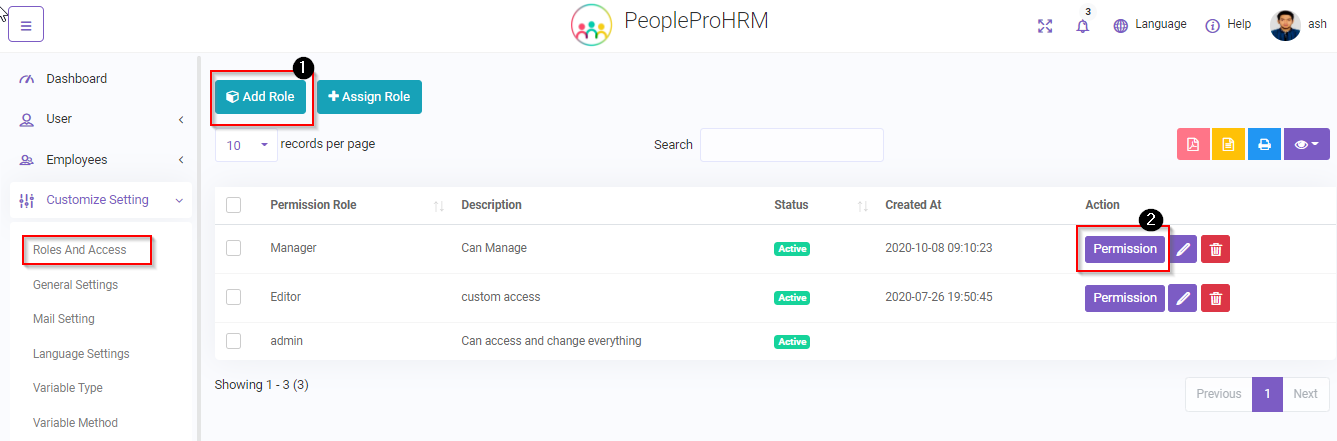
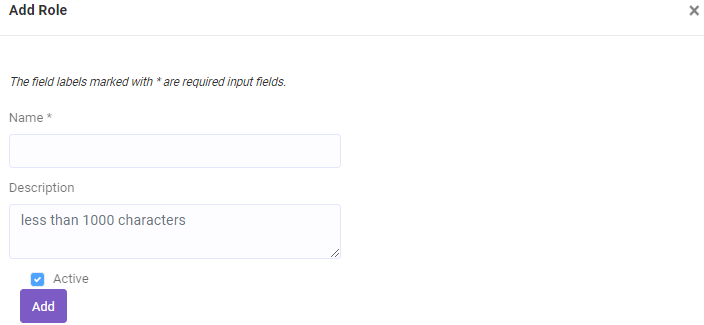
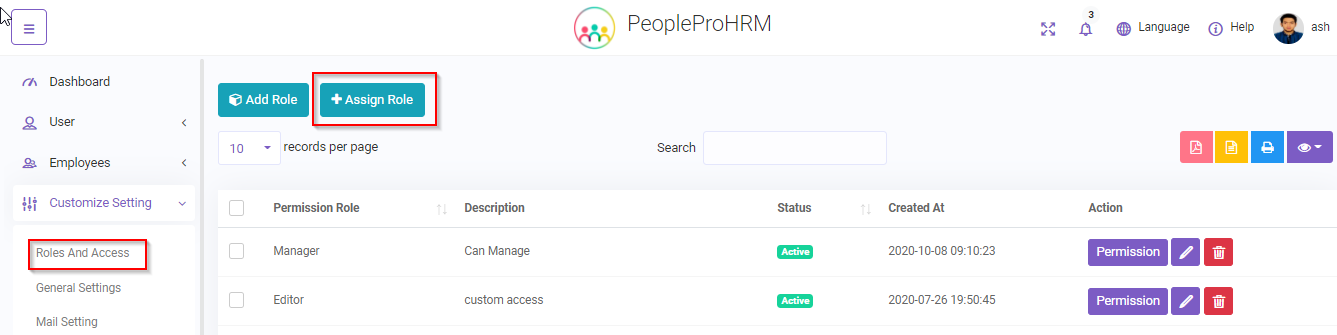
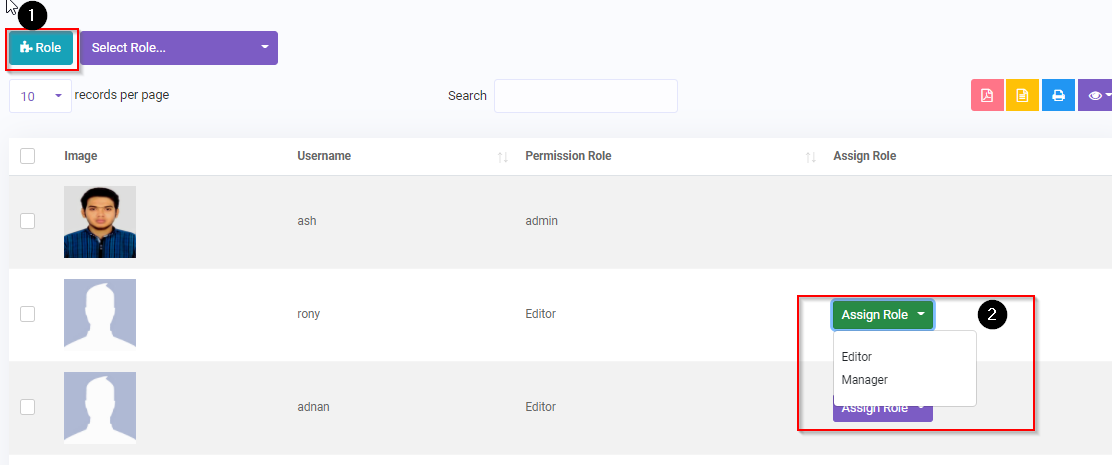
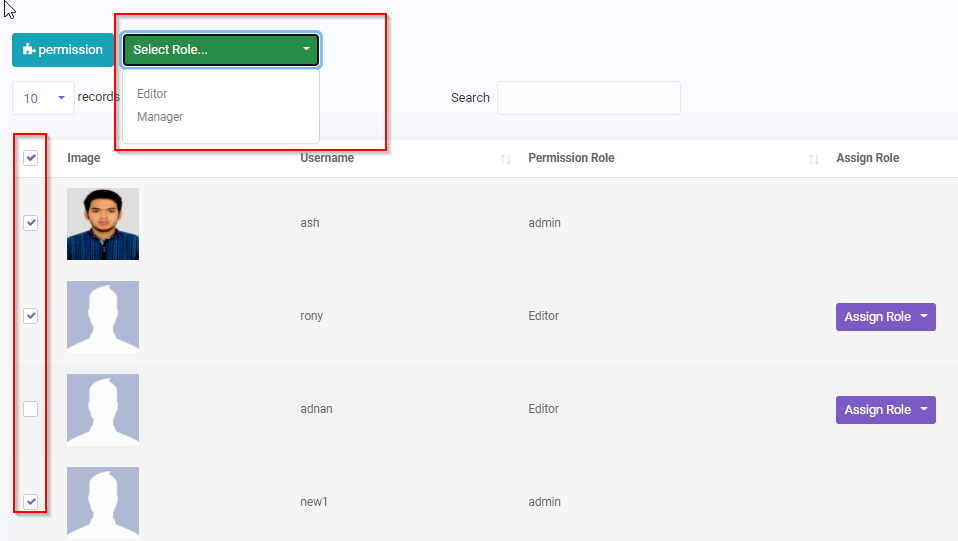
Roles & Access
To add/manage role and their associate permissions you have to go to Roles and Access
under Customize Setting module.
Add Role(1)
To add a new role for example like manager,editor etc. Then under this role you can set specific
permissions that the role can access .
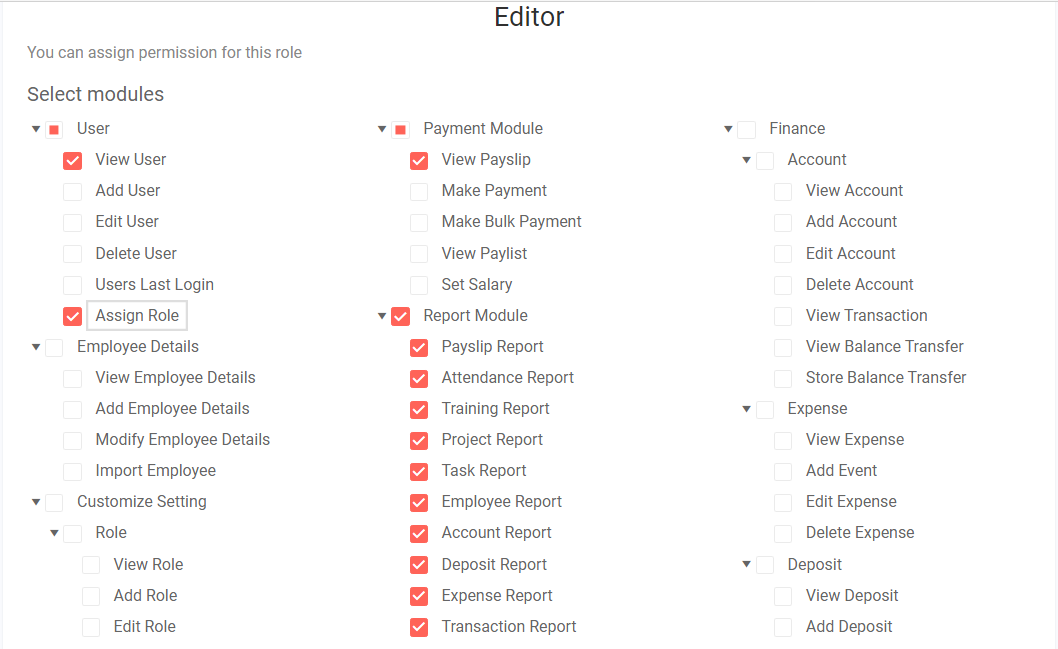
Permission(2)
Set up permissions for the selected role.
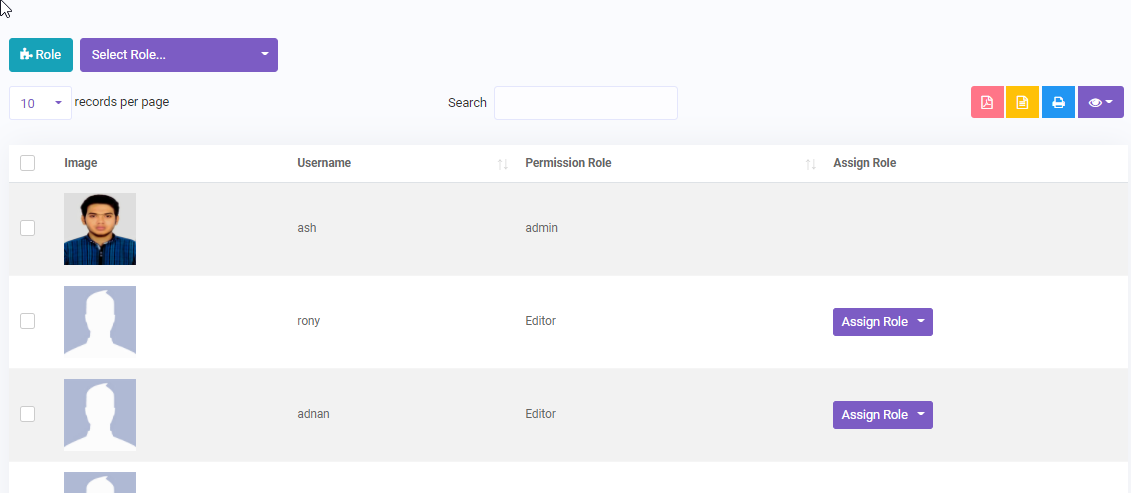
Assign Role
Assigning role to a user .By default, admin can access everything.If you want to limit specific user
some
resources or permissions you can add new role and assign that role to that particular user.
Role :Go Back To Role Page
Assign Role :Assign Role to a user
Select multiple user using checkbox and then assign a role to them.
General Setting
Customize Setting -> General Setting.
You can set App site title, site logo, currency, currency Format, timezone , date format and default
Bank
that will be used thoroughout the app.The changes will reflect immediately. Selecting a default bank is mandatory.You can add bank from Finance ->
Account List
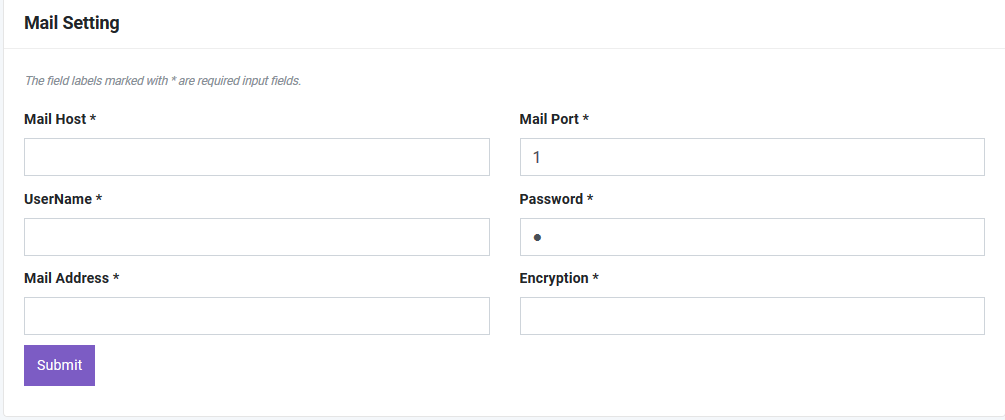
SETUP MAIL SERVER
To add mail functionality you have to setup mail server first. To do this go to
Mail Setting under Setting module. You have to fill up the following
information.
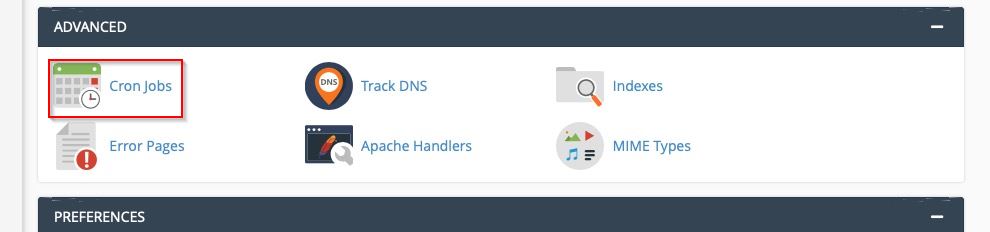
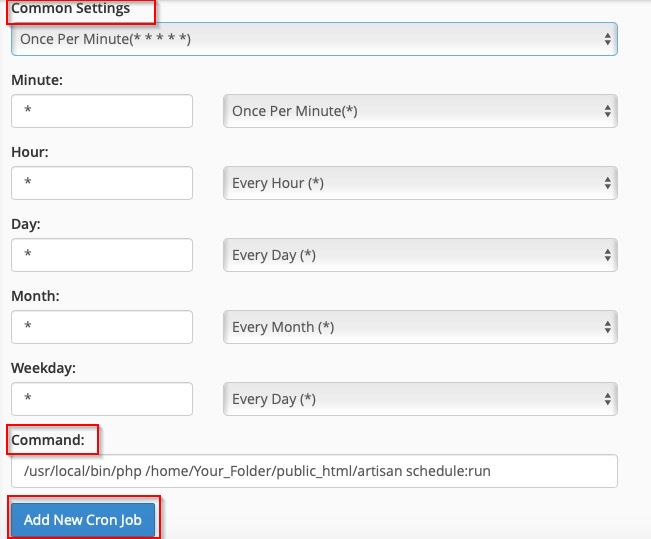
SETUP cron job
You must set up a cron job setting on your server in order to get certain mail notification
like document expiry remainder and many more. Please follow the below steps to do so :
On your hosting c-panel go to the advance section and click on the cron jobs.
Then under common settings section select the option of- Once Per Minute
then on command field set the path. It should be something like this :
/usr/local/bin/php /home/your_project_folder/html/artisan schedule:run
Then click on add new cron job.
That's all.
Note :If you face any issues while setting up cron jobs,please contact support.
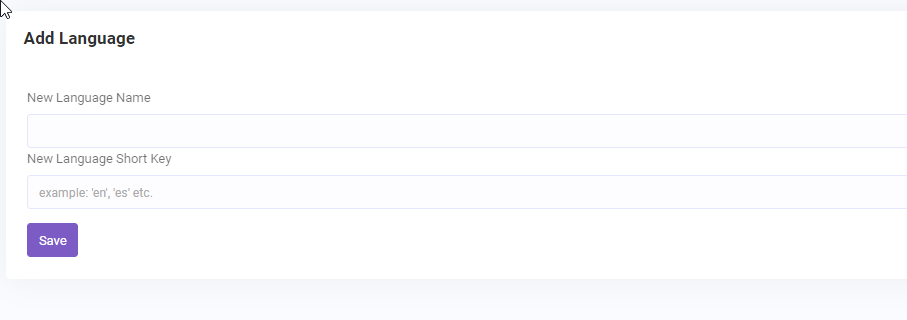
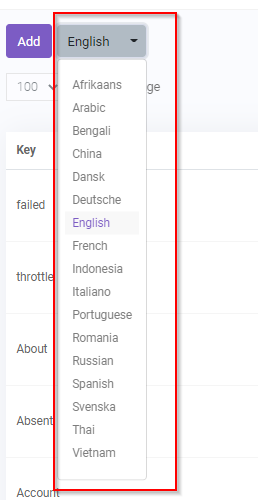
Language Setting
Customize Setting -> Language Setting.
Our system offers an extensive way of customizing your app with language or locale setting.You can
easily
customize/change any word or phrase the way you want your user to see . Moreover you can add a new
language
and then can create word or phrase of that language .
Add (2)::You can add a new language
You have to fill the language name and language short key to add the new language.
Language Selector (3)::You can select the language that you want to change/update
from the dropdown
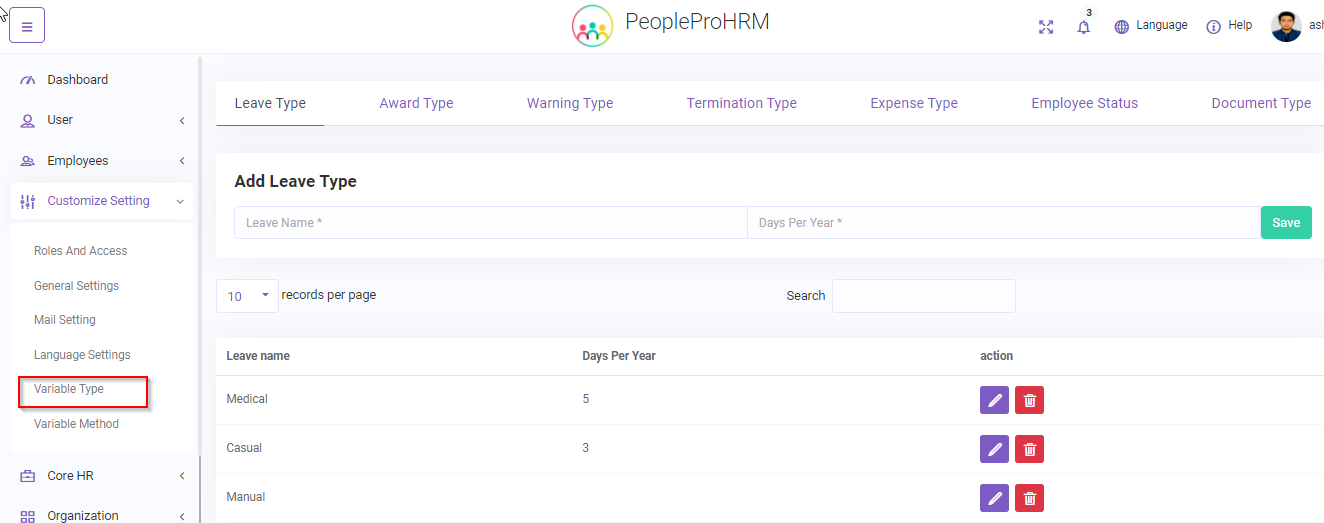
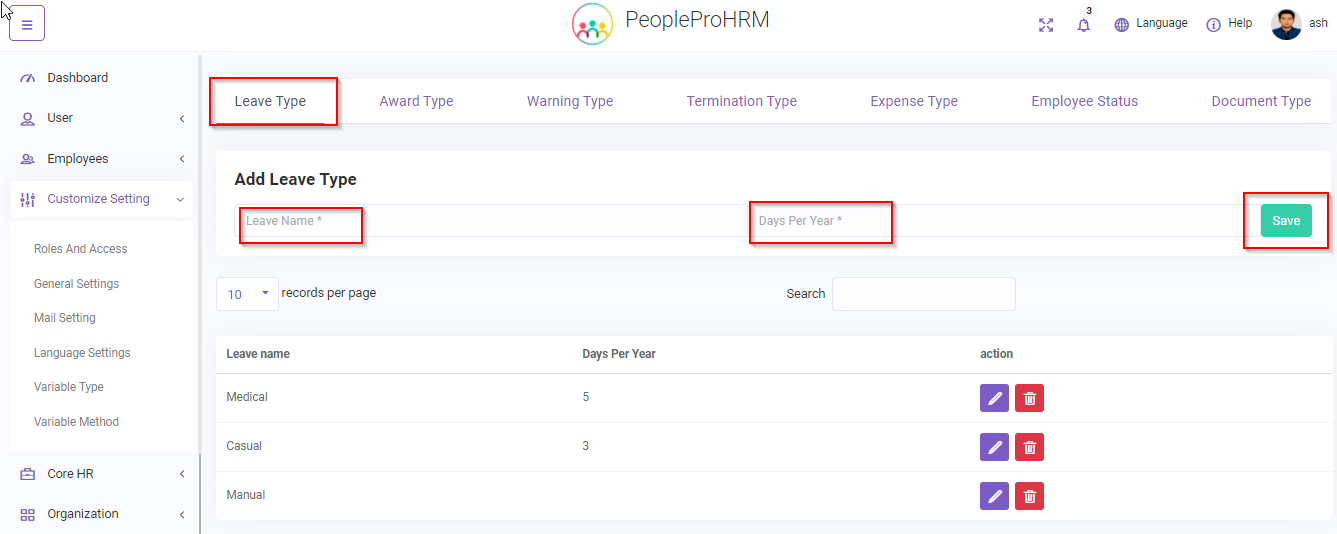
Variable Type
Customize Setting -> Variable Type.
Here you have to add different variable type that will be needed when adding new records.For example,In
order to
add leave record for an employee leave type is needed.You have to create the leave type first.
Leave Type :You can add/update new leave type
You have to fill the leave name and allocated day/s for that leave per year.
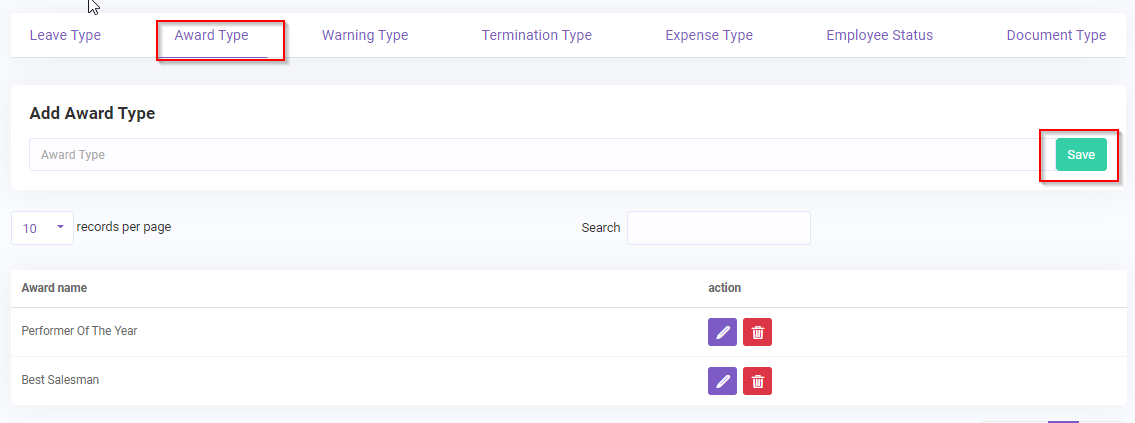
Award Type :You can add/update award type for rewarding an employee.
Warning Type :You can add/update warning type.
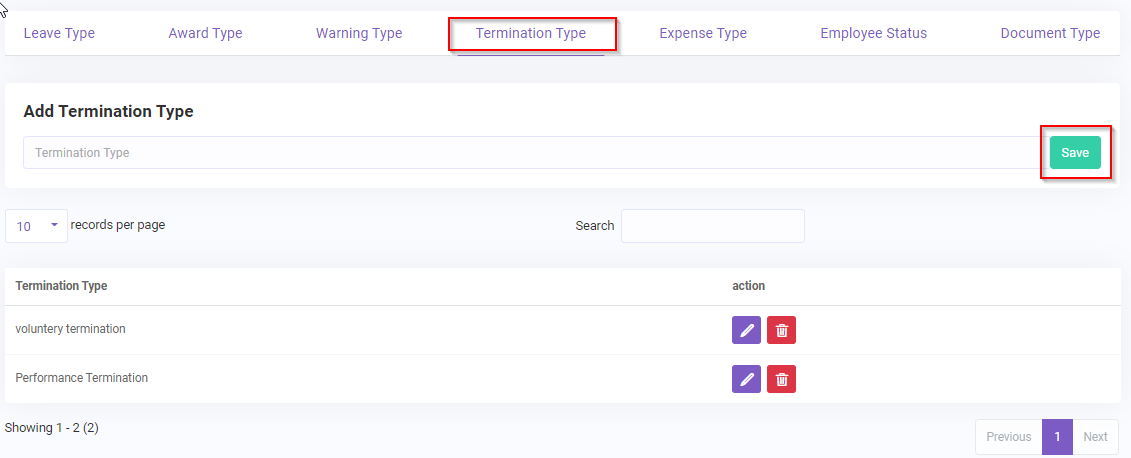
Termination Type :You can add/update termination type here.
Termination Type :You can add/update termination type here.
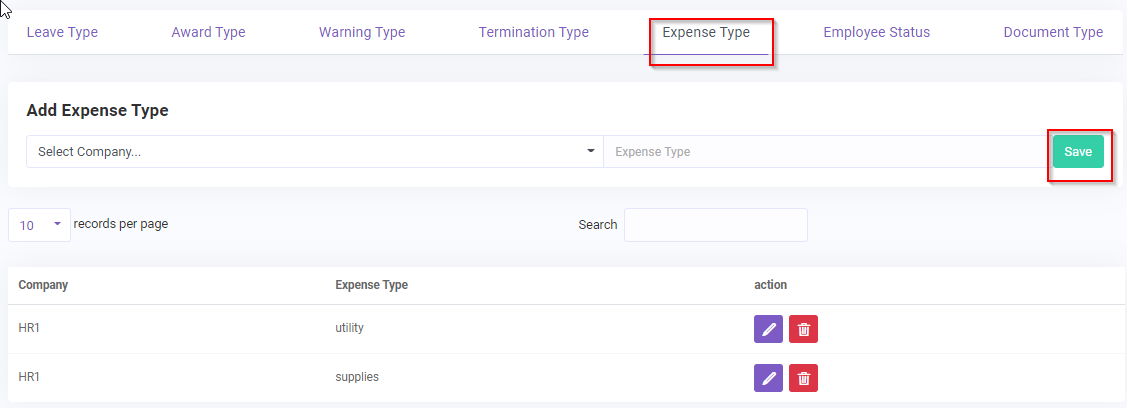
Expense Type :You can add/update expense type here that will be needed for
Finance->Expense
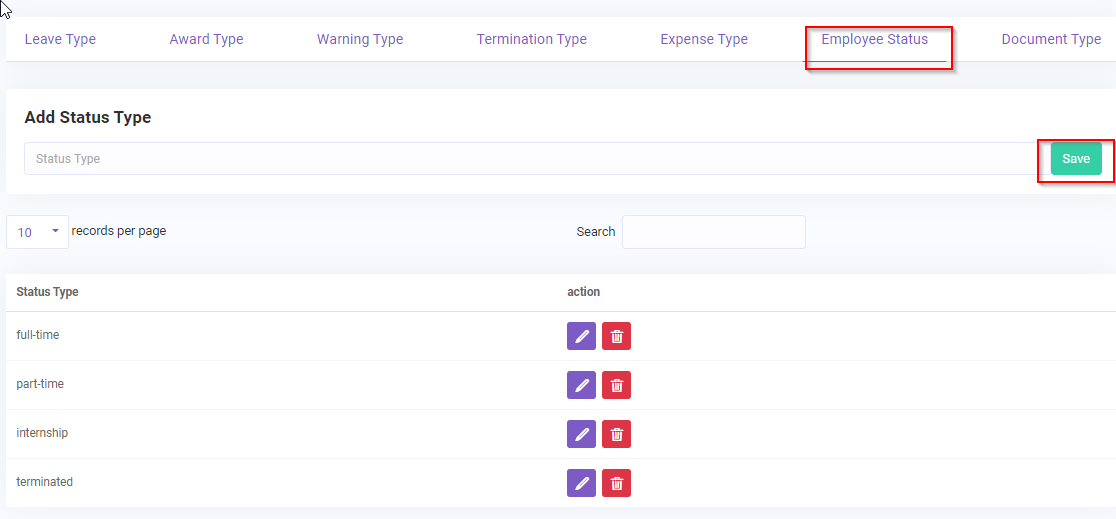
Emplyee Status :You can add/update employee status here
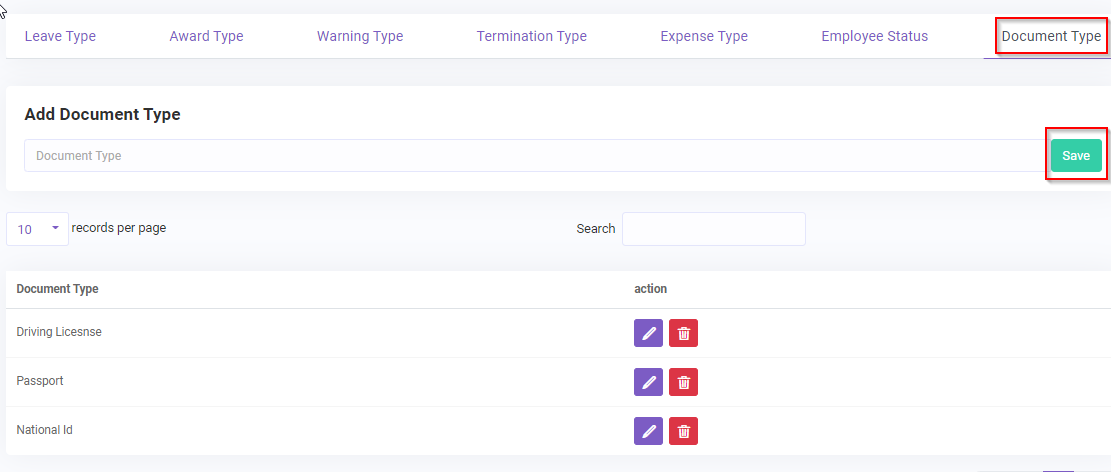
Document Type :Different types of document can be added/updated here . This is
necessary for adding/updating document record
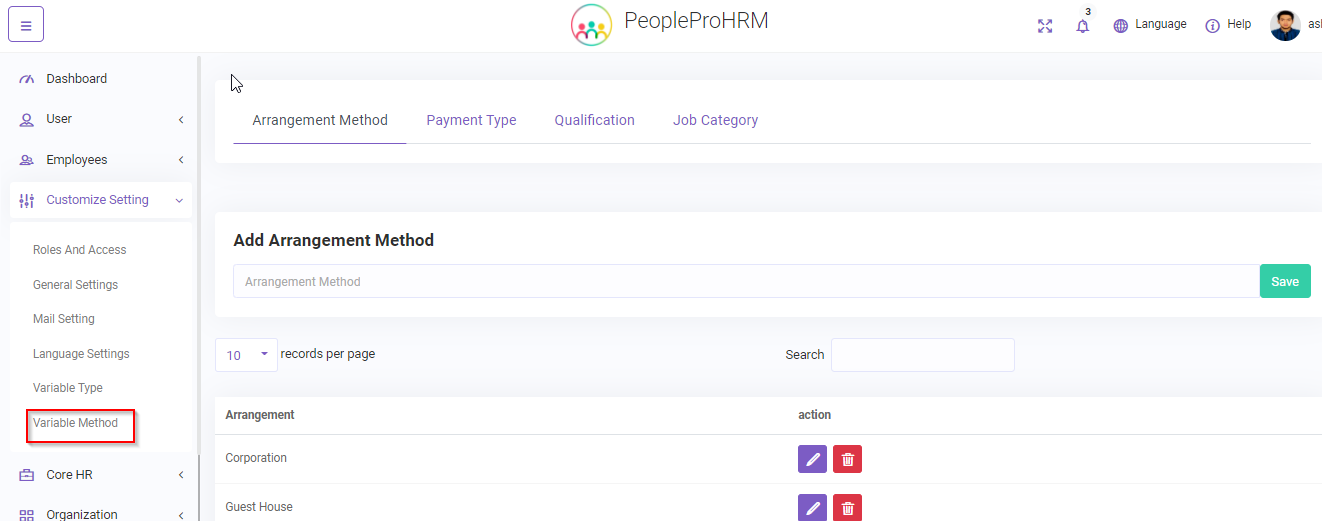
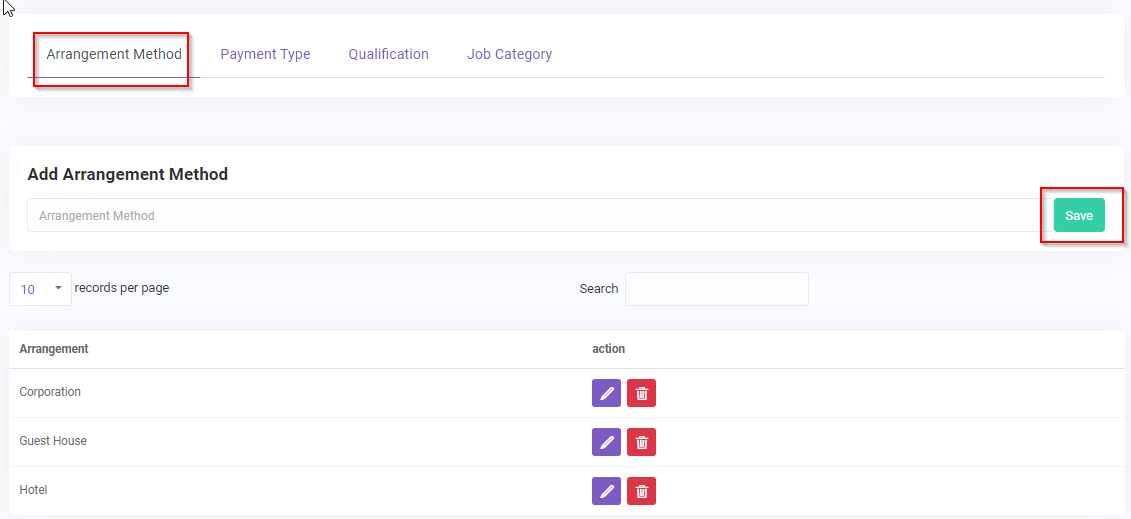
Variable Method
Customize Setting -> Variable Method.
Here you have to add different variable that will be needed when adding new records for some module.For
example,In order to
add job post record job category is needed.You have to create the job category first before adding a job
post record.
Arrangement Method :You can add/update new arrangement method. In order to add
travel record arrangement record is required
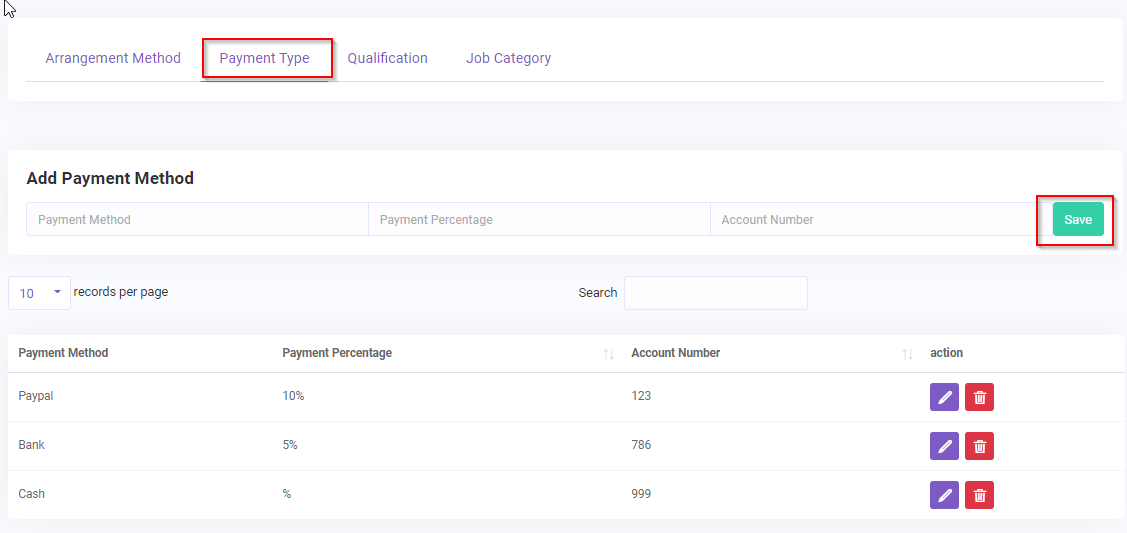
Payment Type :You can add/update payment method with their associated payment
percentage and account number here.
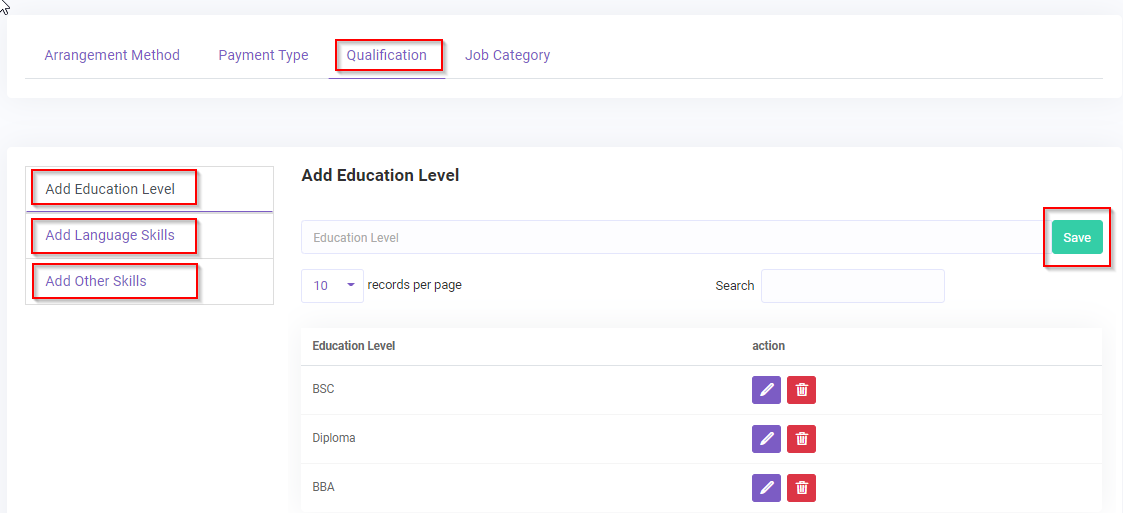
Qualification :You can add/update different types qualification of an employee,e.g.
education levels, language skills, other skills
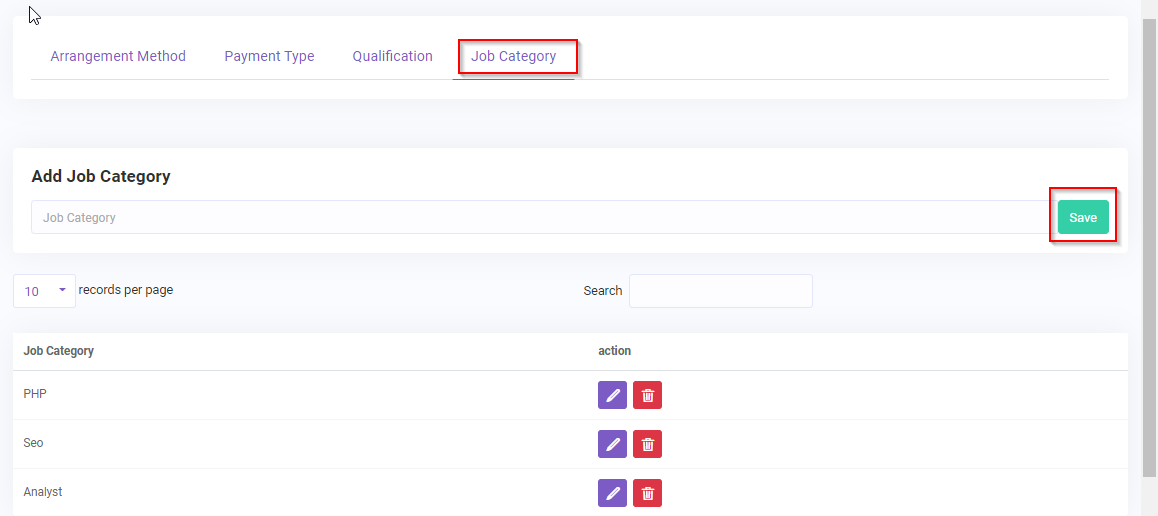
Job Category :Different types of job category for job post record can added/updated
here.
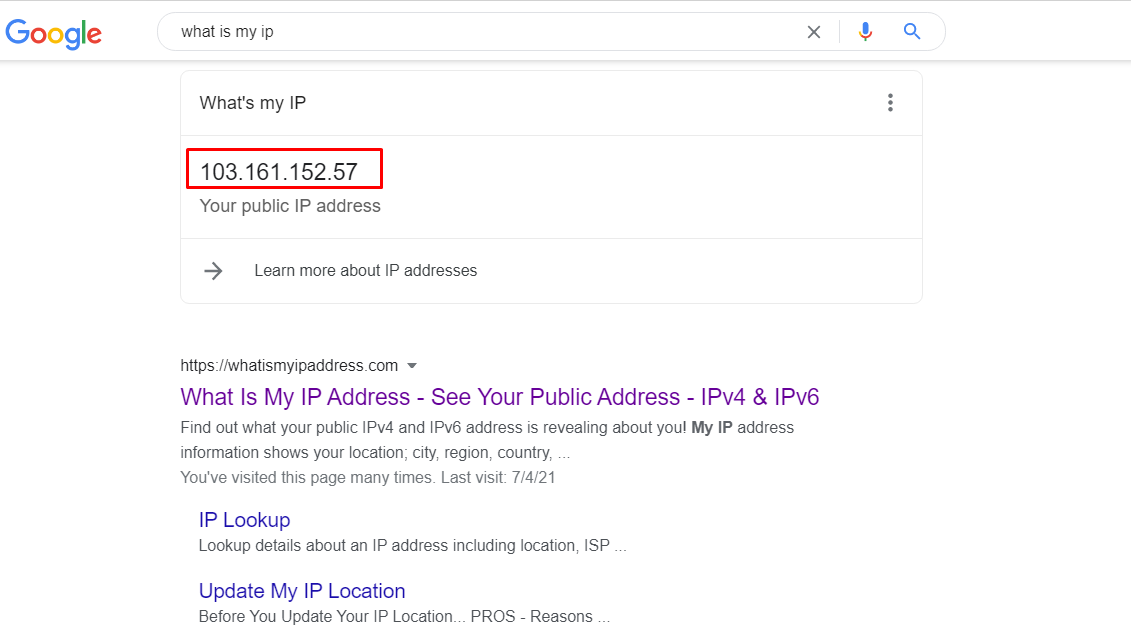
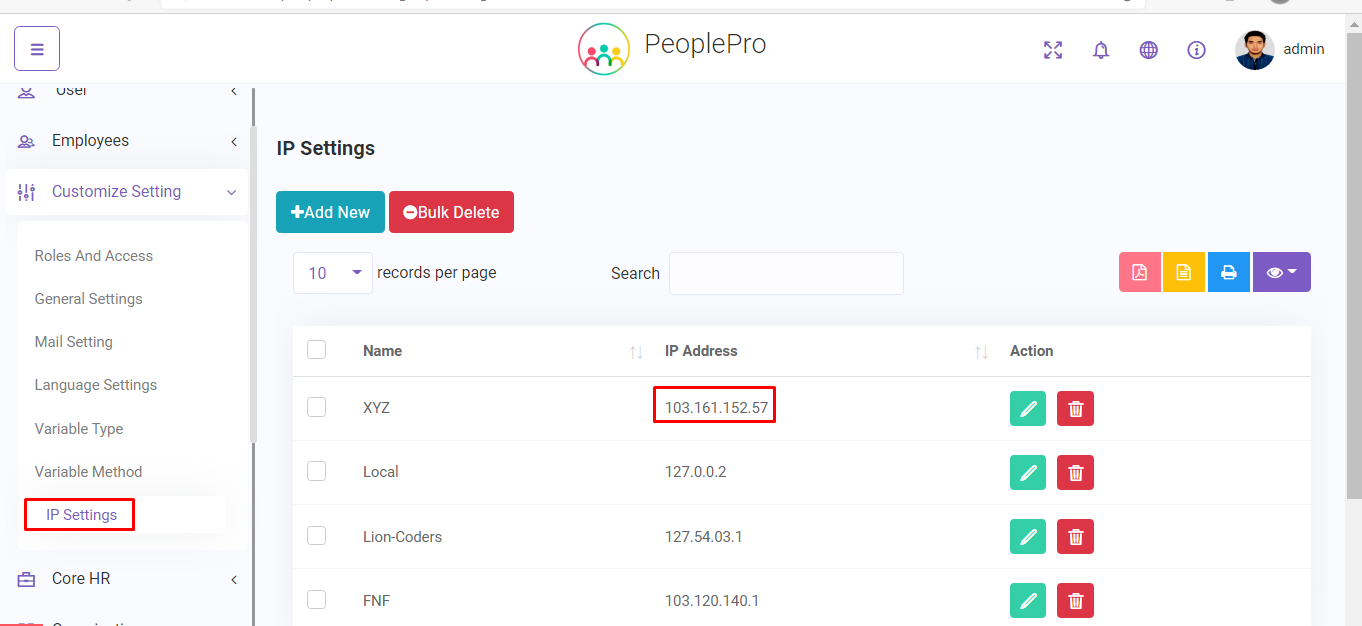
IP Setting
Customize Setting -> IP Setting.
Here you can set your IP address so that employee's attendance (Clock-IN and Clock Out) can control by IP based. At first you have to conncet with internet.
Then search the word "What is my IP" in Google. You will see the IP address for the internet network you're currently connected to. Copy that and store in your software.
Multiple Ip address of multiple router/Wi-Fi network can be stored.
If any employee is connect with these IP, then he can give the attendance by Clock-IN and Clock Out.
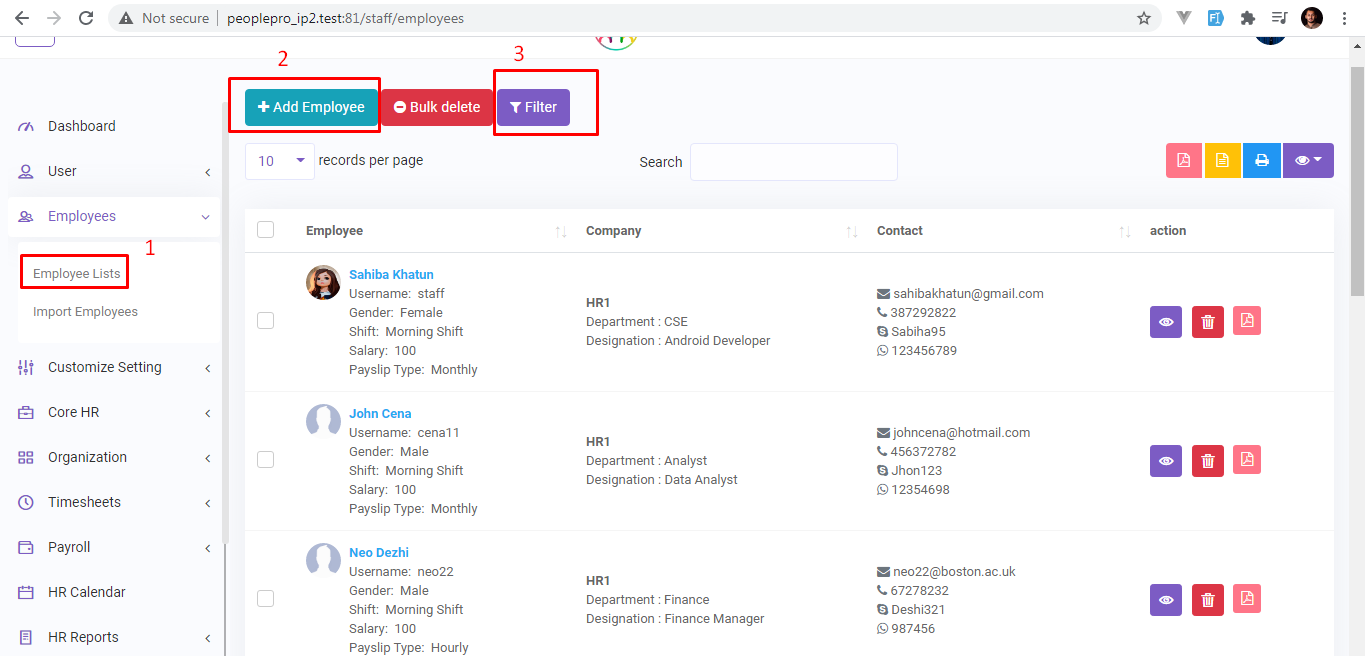
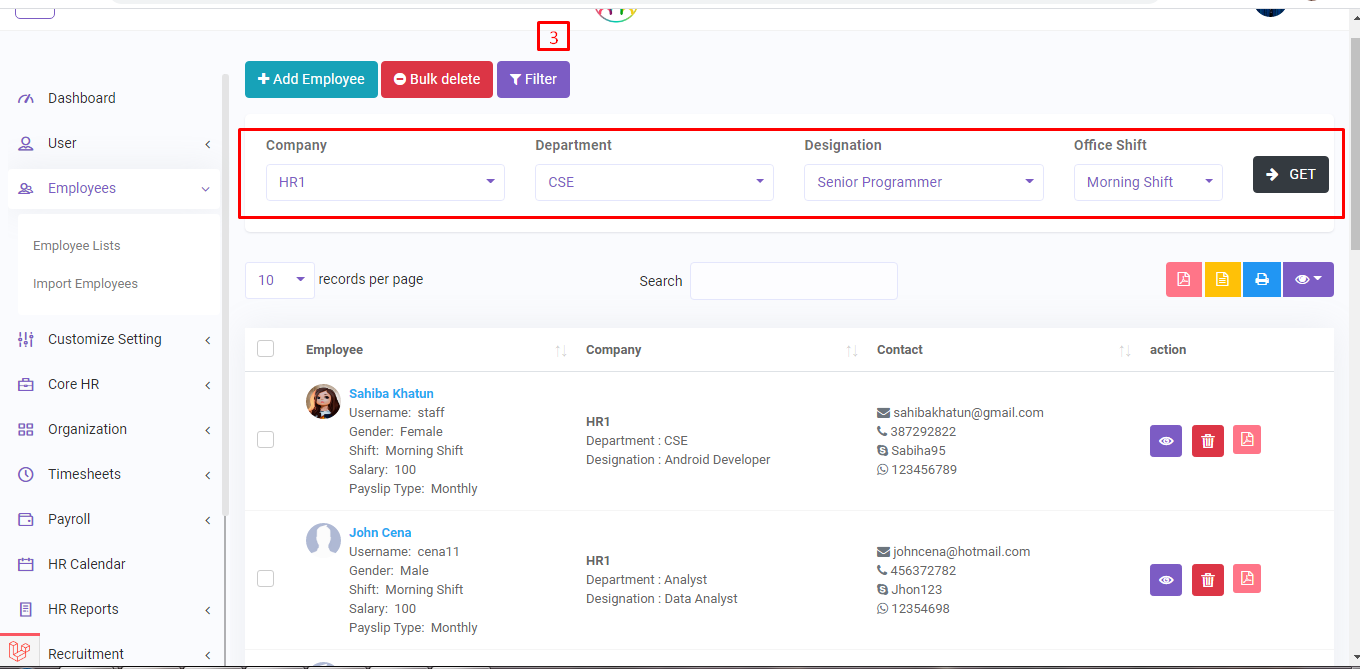
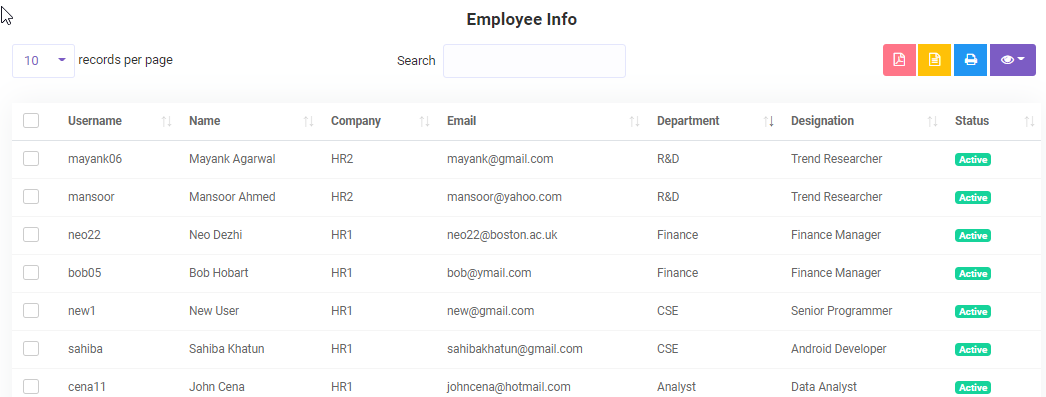
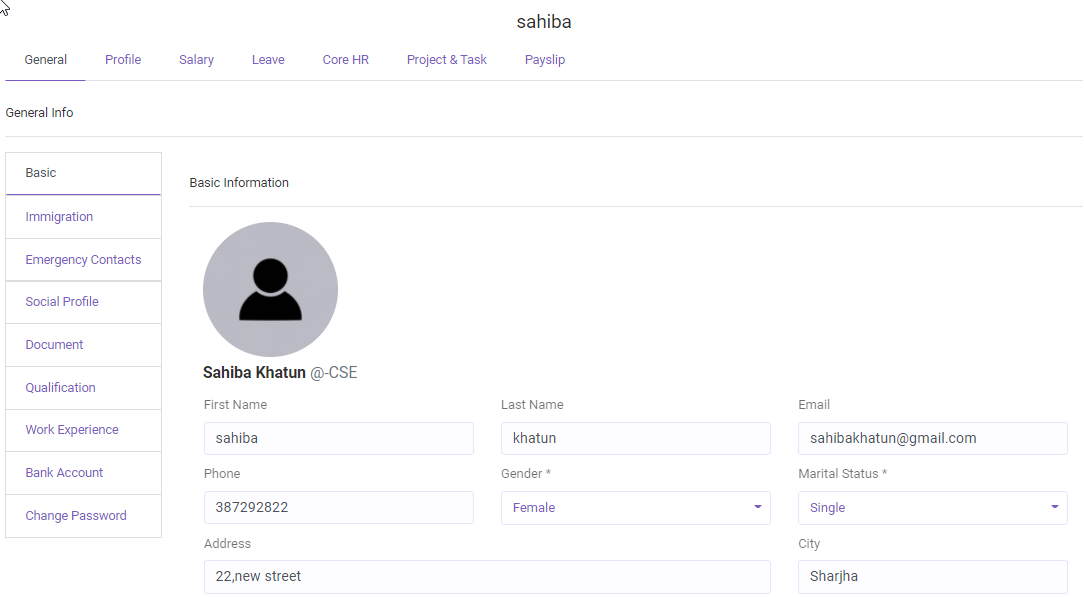
Employee List
Employees -> Employee List(1).
You can view all the employees(active/inactive) and their related information here . You can also view
their detailed information
on the details page and update if needed.
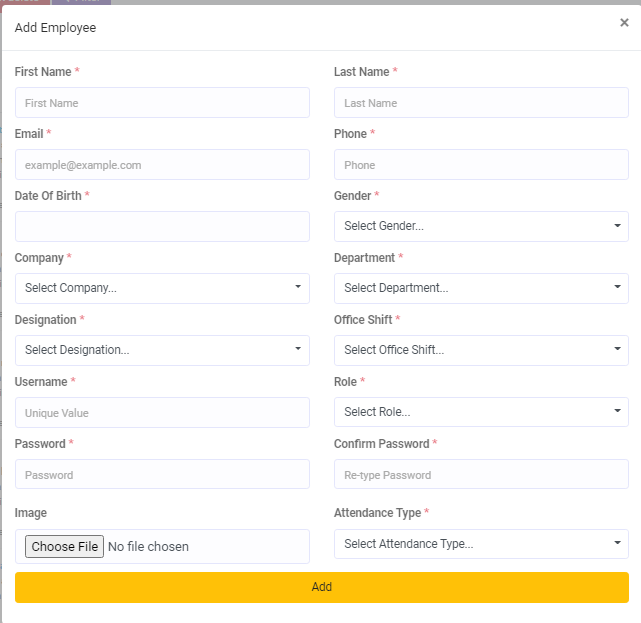
Add Employee(2).
If you add an employee,he/she is automatically be added as an user and can log in using
the username and password.Role can be selected while adding an employee.If an employee is selected
as an admin s/he is given the permission to access all the resources of the software.If set otherwise,
permissions can be manually set on Customize Setting -> Roles and Access Page
Details(3).
You can filter employess .
Details(4).
Employee Details can be seen using this button .
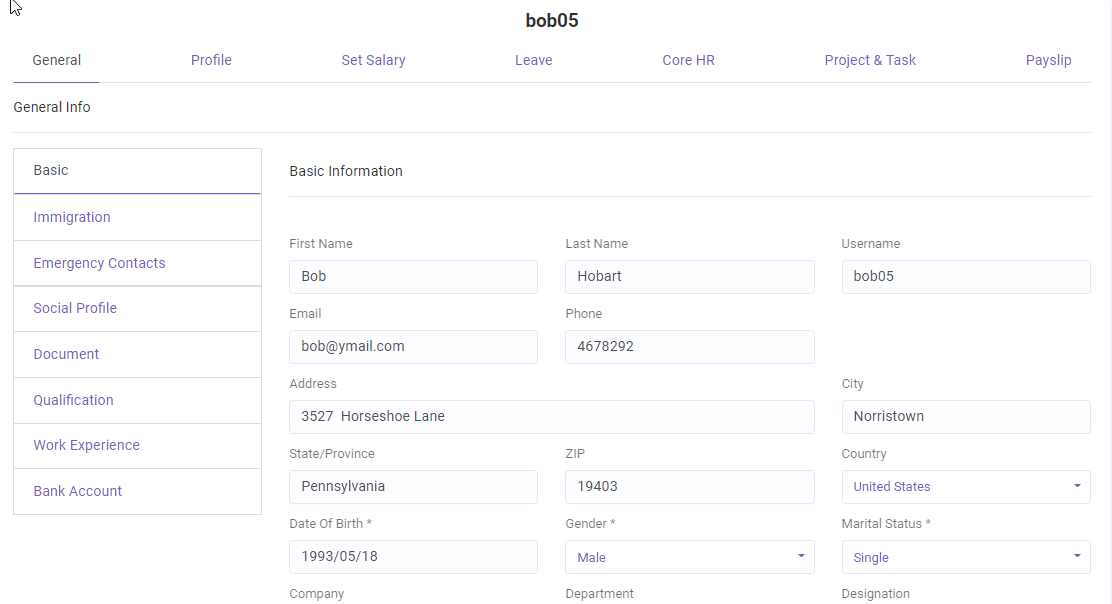
Basic.
Administrator can see and manage Basic info of an employee.
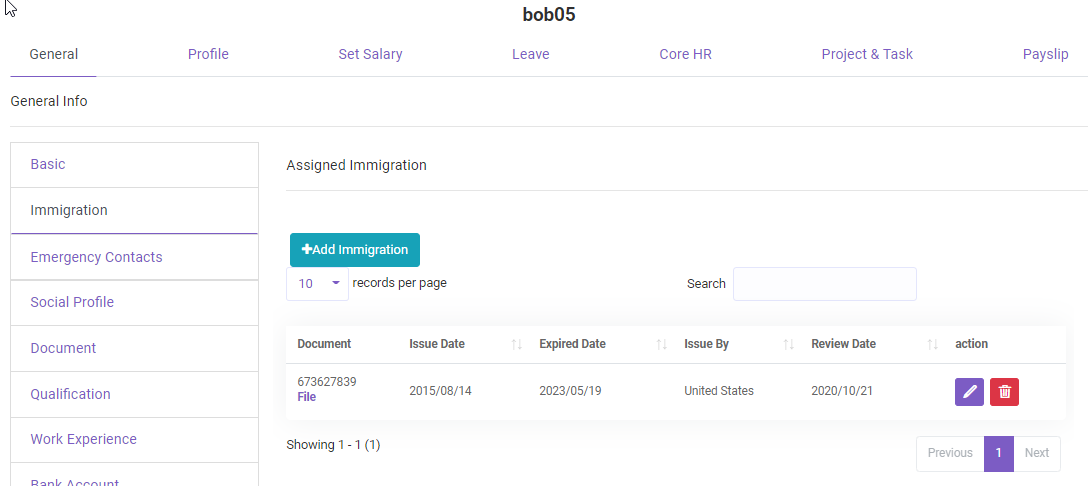
Immigration.
Administrator can see and manage Immigration info of an employee. If you need to use corn job, please check SETUP Mail Server --> SETUP corn Job.
Emergency contact.
Emergency Contact of an employee can be added here .
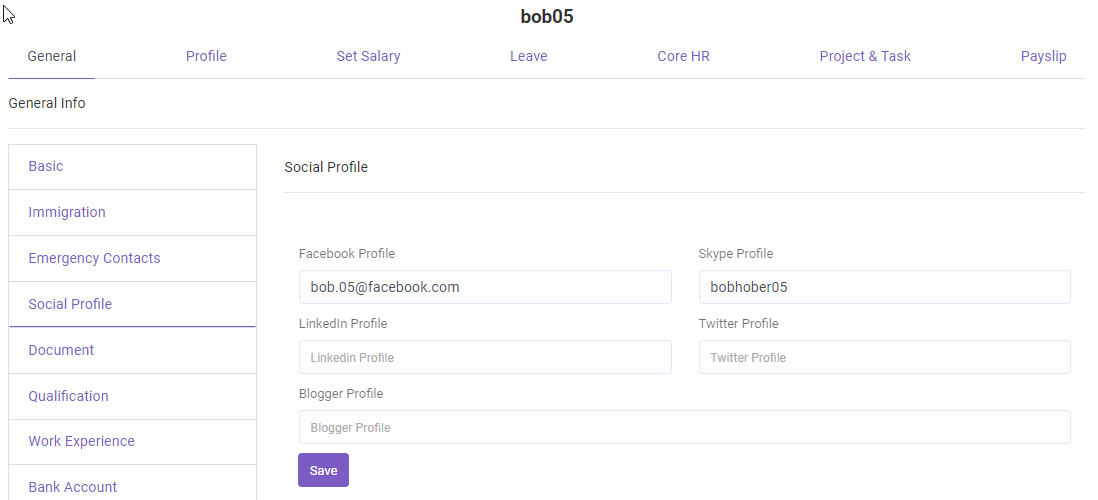
Socail Profile.
Social Profile details of an employee .
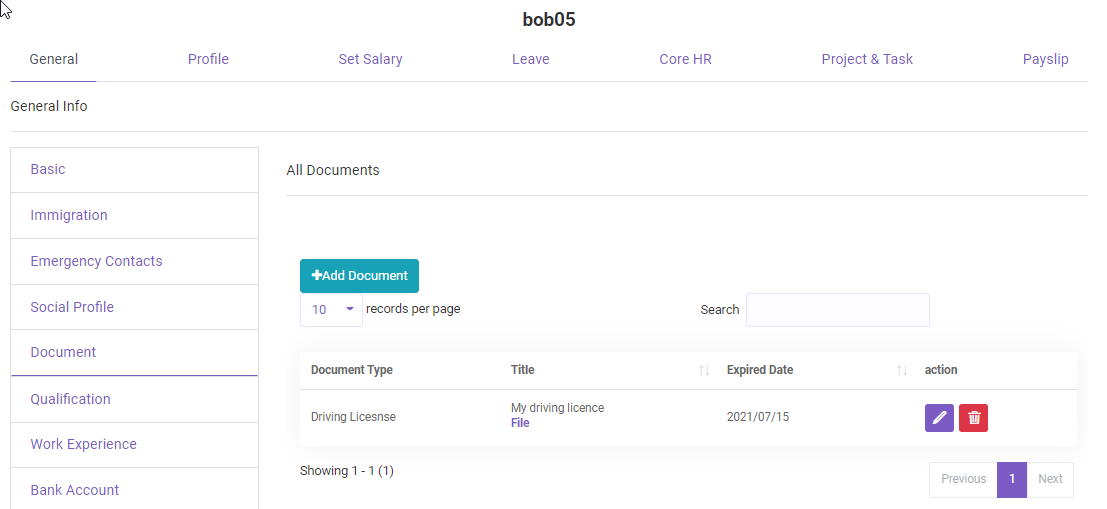
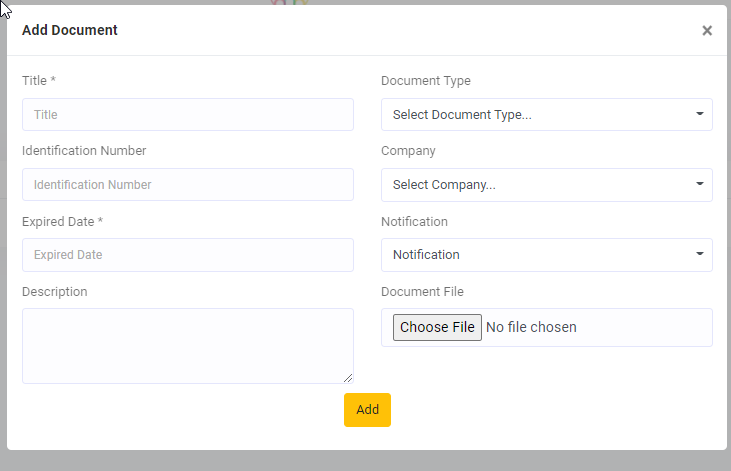
Document.
Employee related documents can be added or updated here.
A notification will be sent to the employee three days before the document expires.If you need to use corn job, please check SETUP Mail Server --> SETUP corn Job.
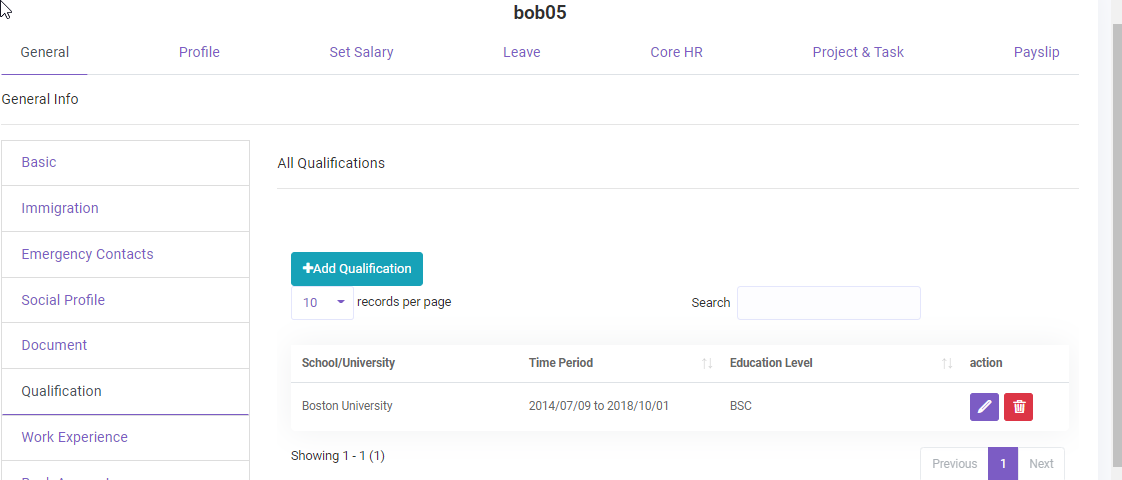
Qualification.
Qualification details of an employee.
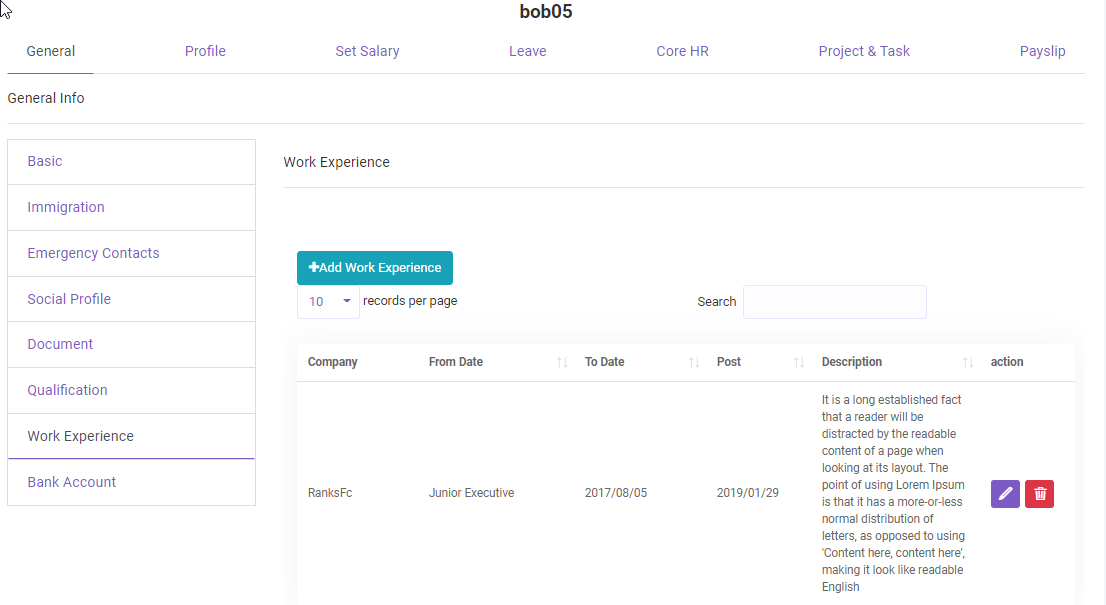
Work Experience.
Previous work Experience of the employee can be added here.
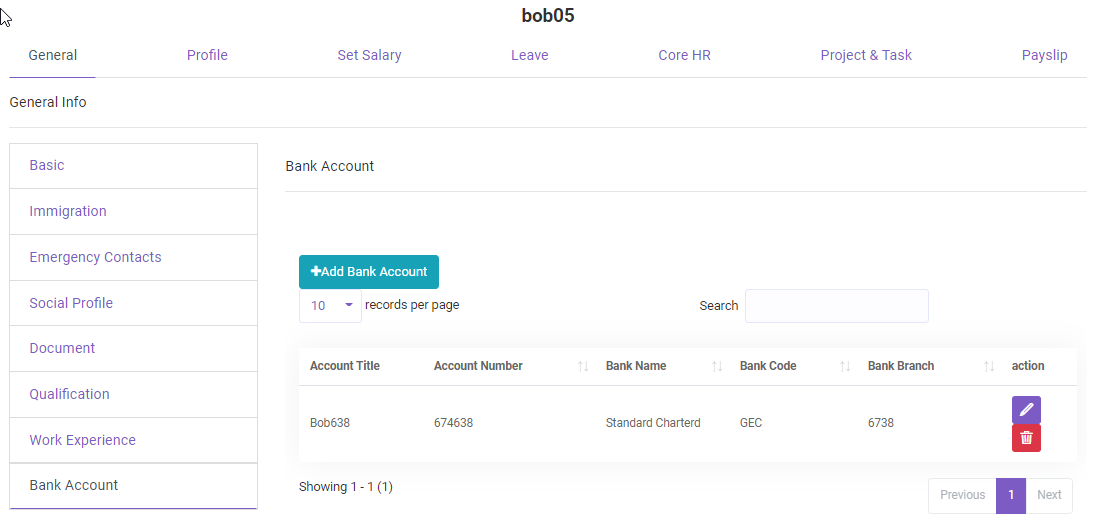
Bank Account.
Bank account details of an employee.
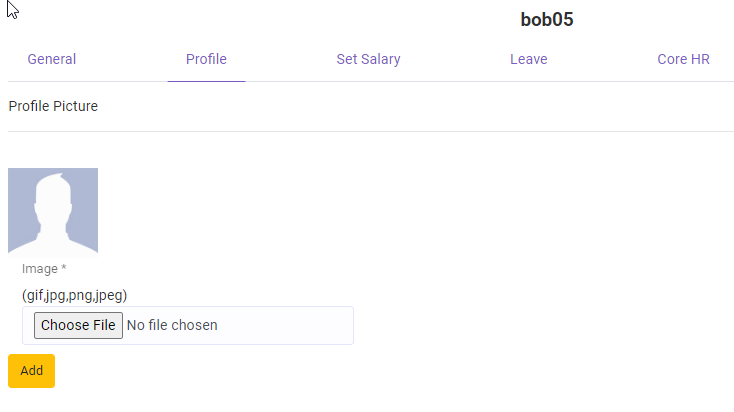
Profile.
Add/Update profile image of an employee.
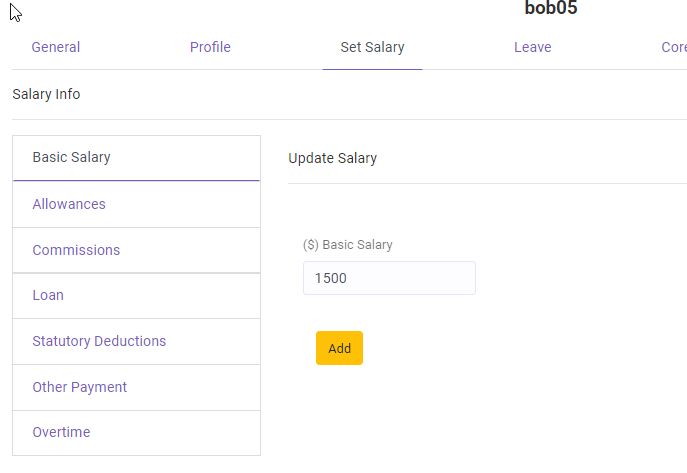
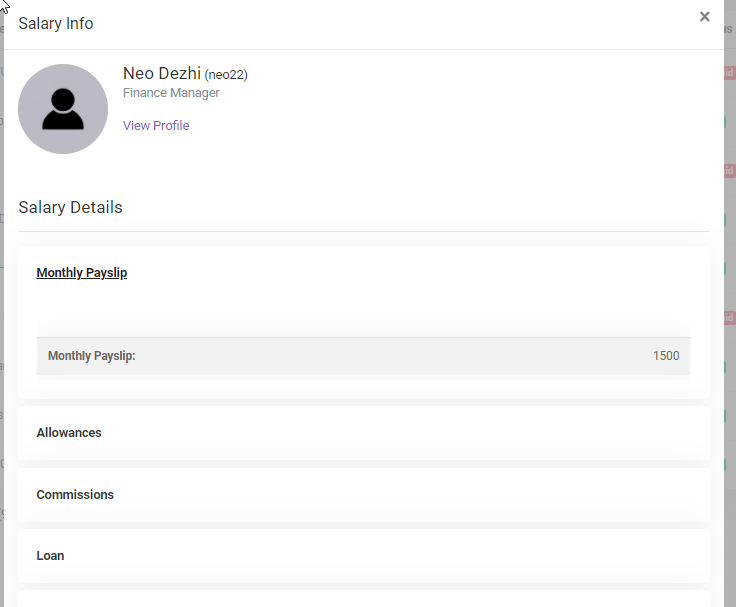
Set Salary.
Salary of an employee can be set under this module.You can set the basic
salary,allowances,commissions,loans etc.
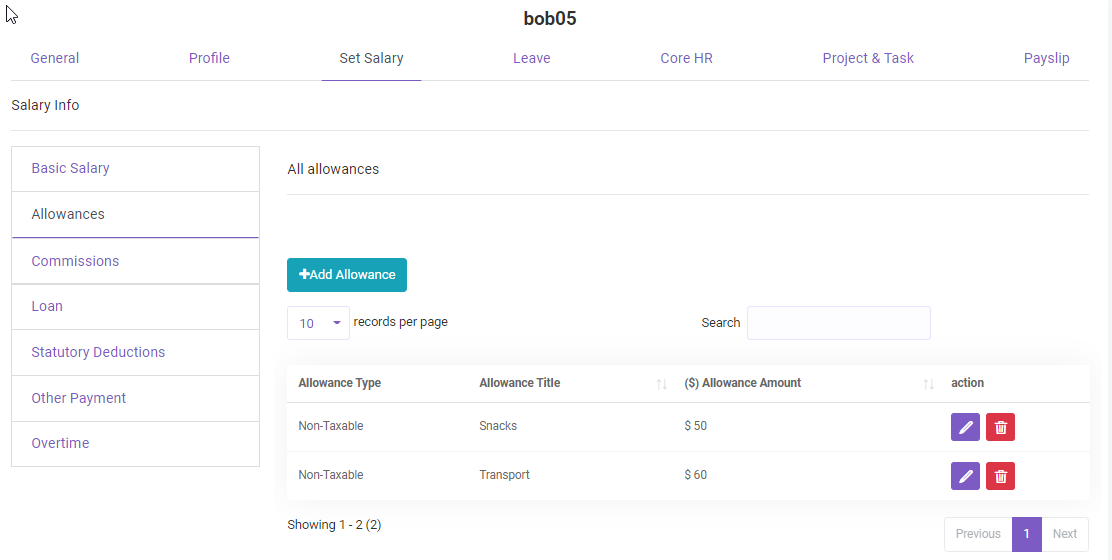
Allowances.
Multiple allowances of an employee can be set under this module .
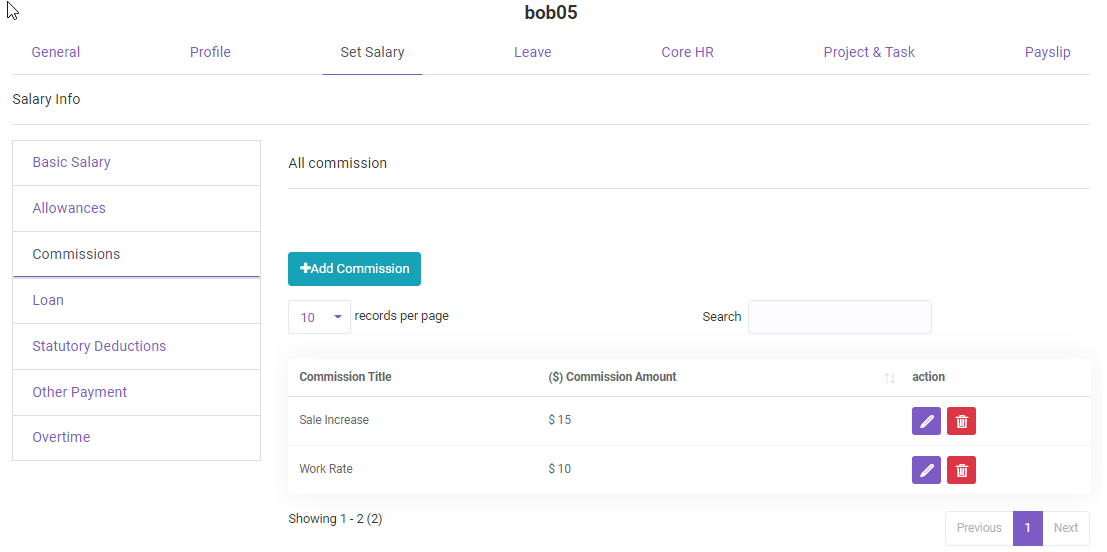
Commissions.
Multiple commissions of an employee can be set under this module .
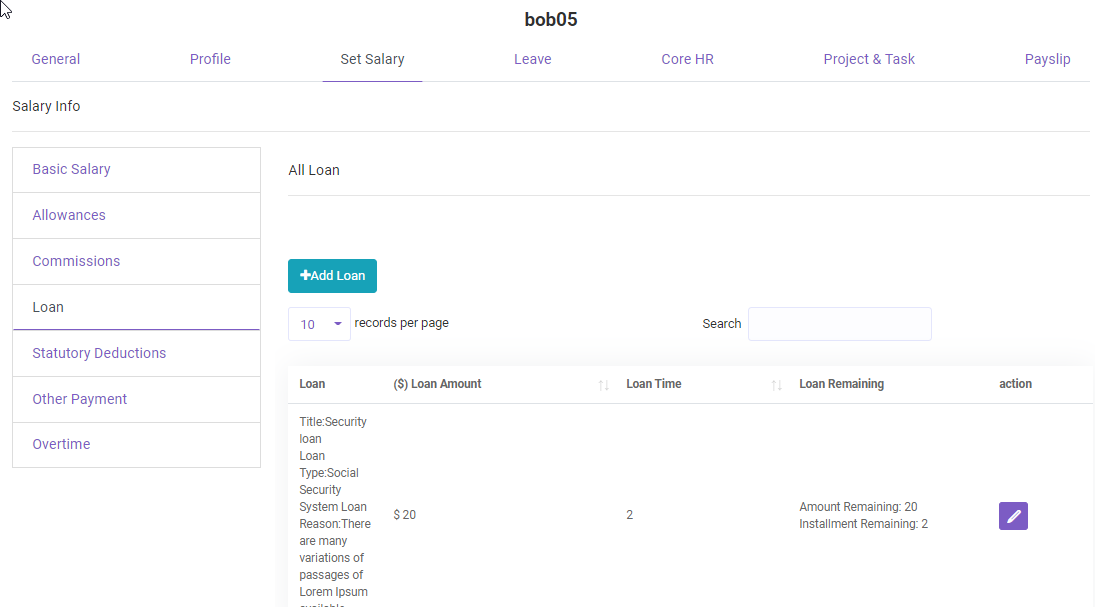
Loan.
Loan records of an employee can be set under this module .
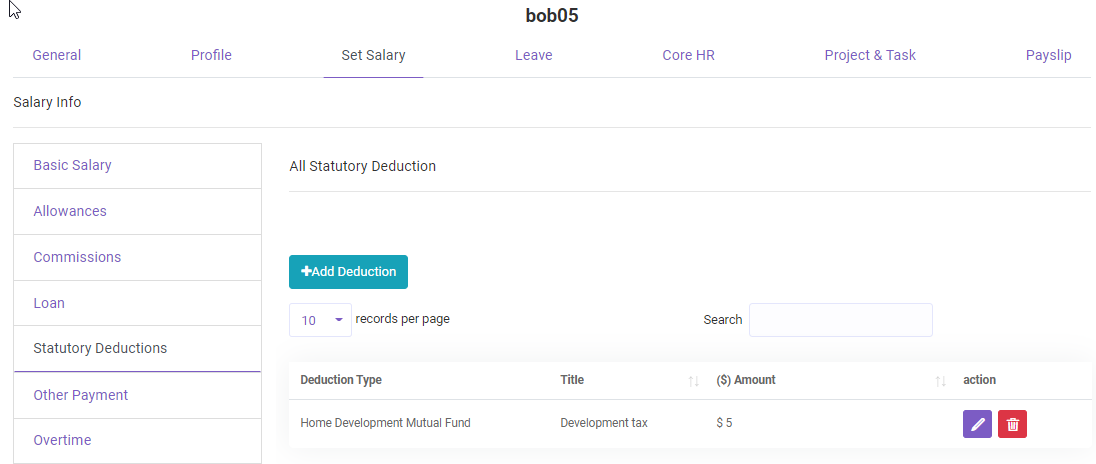
Deductions.
You can find the Deductions records of an employee here.
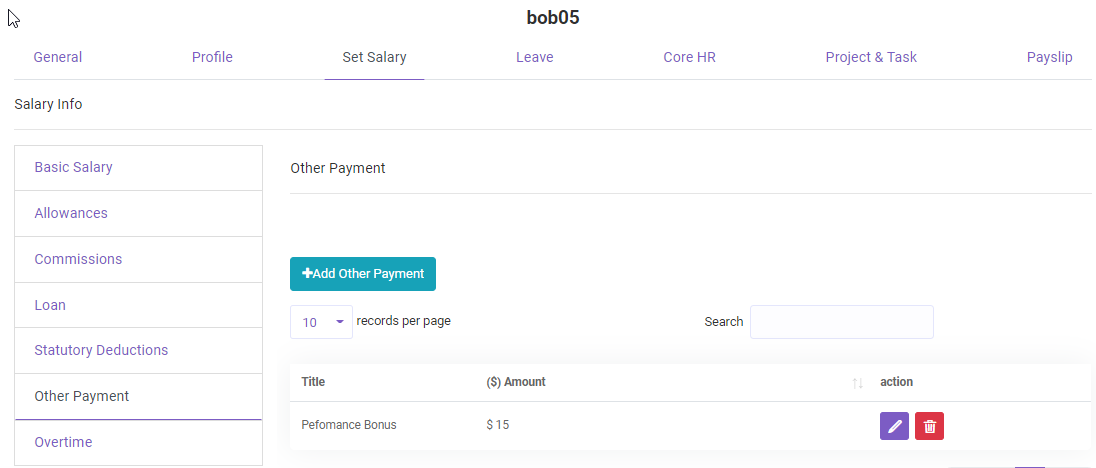
Other payment.
Other payment related information can be added here.
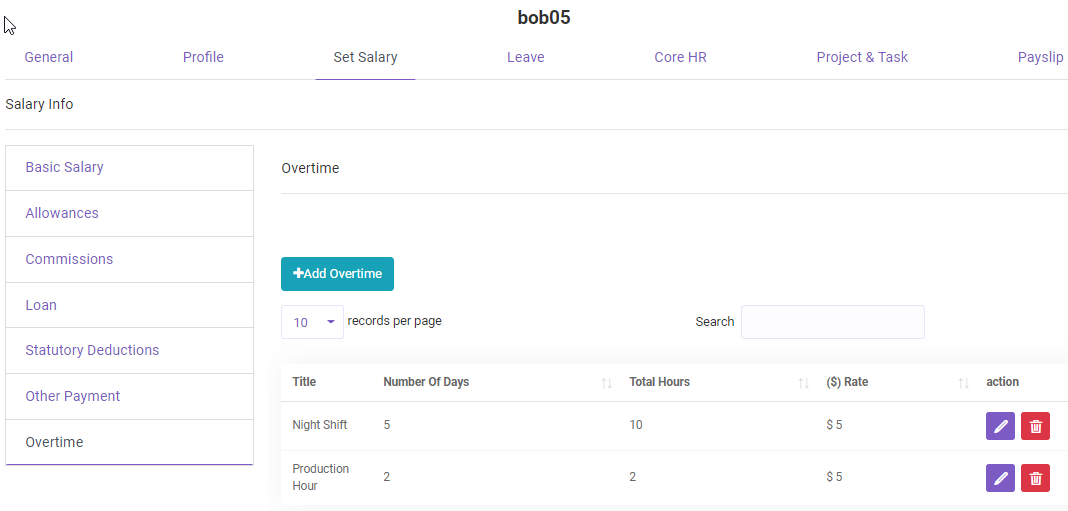
Overtime.
Employee Overtime info.
You can set total number of Overtime hour and per hour rate here which will be added up to that specific
employee.
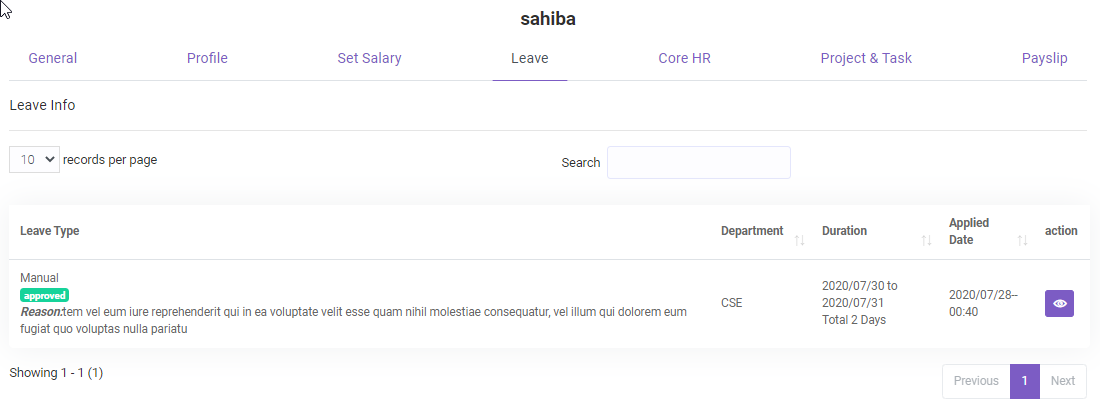
Leave.
Detailed leave information of an employee till date.
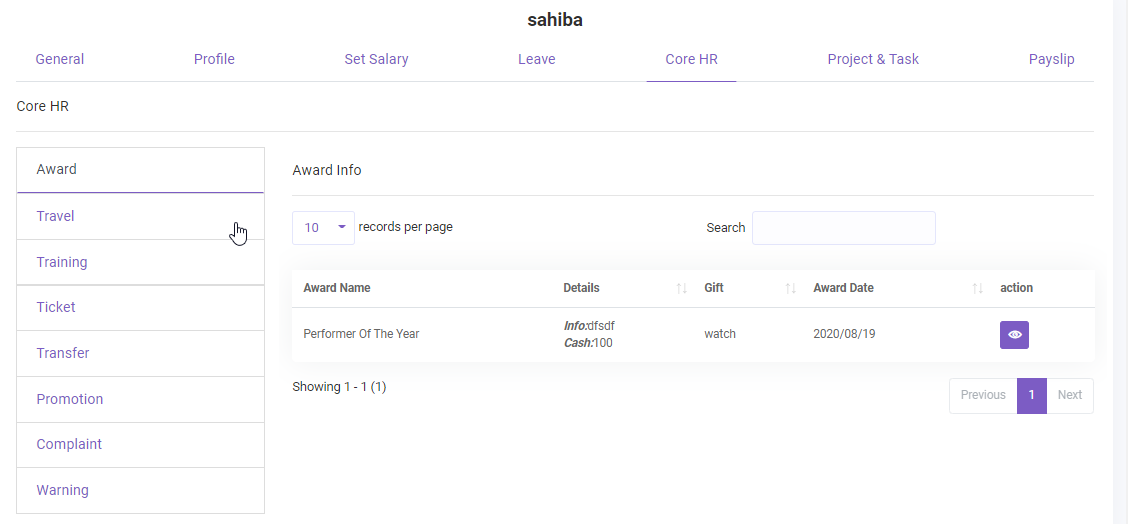
Core HR.
Detailed information about award, travel, training, ticket, transfer, promotion , complaint, warning of
an employee till date
can be viewed here.
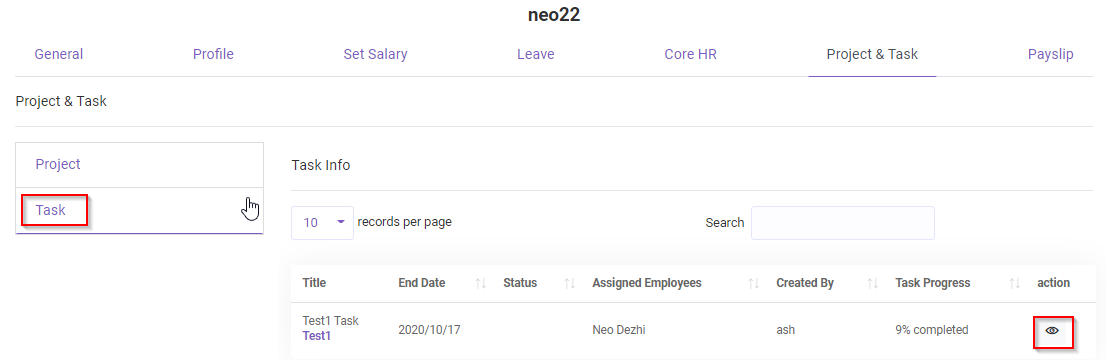
Project & Task.
Detailed information about the projects and tasks that have been assigned to the employee
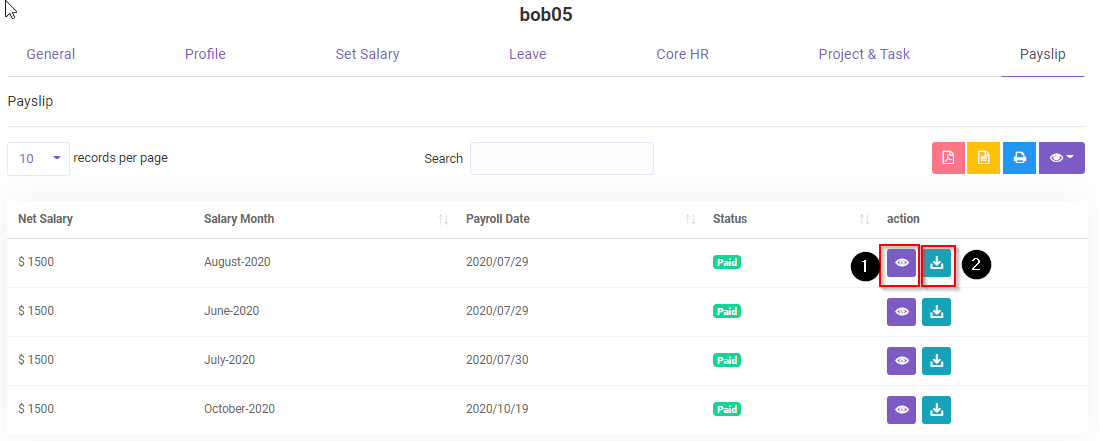
Payslips.
Detailed information about the Payslips of an employee. You can view(1) or download(2) the payslip
Payslip
View
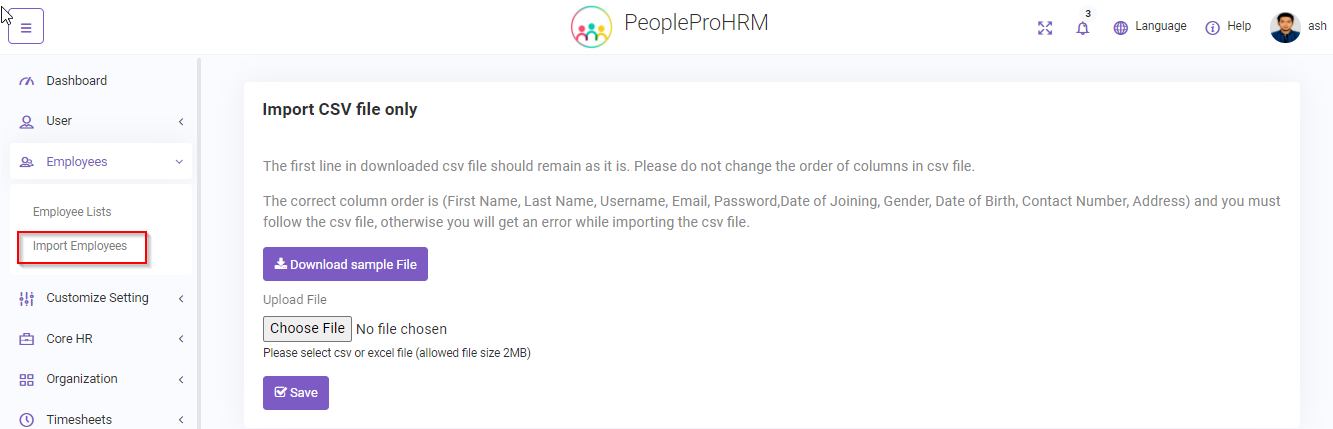
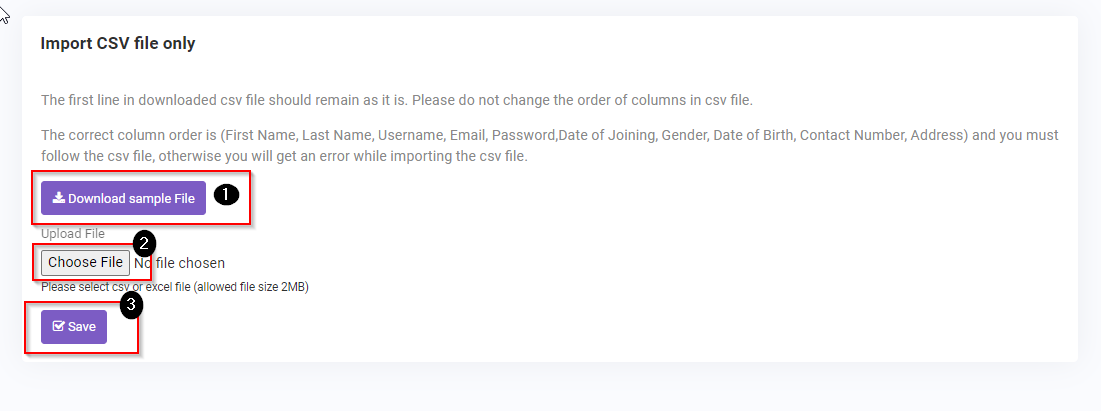
Import Employee
Employees->Import Employee
You can import employee information using a csv file . The imported employee information will be added
in the user and
employee record .
Note :Before uploading a csv you must download the sample file(1) . Do not alter or
change the header row or first line
of the sample file, Keep it as it is and input your data starting from second row.
Then upload the csv file (2).
Then click save (3)
Note : If there is any error, the page will show you the error line, please fix that
error and try to upload again. Note : This is a batch process, so the action will need some time, please wait
patiently.
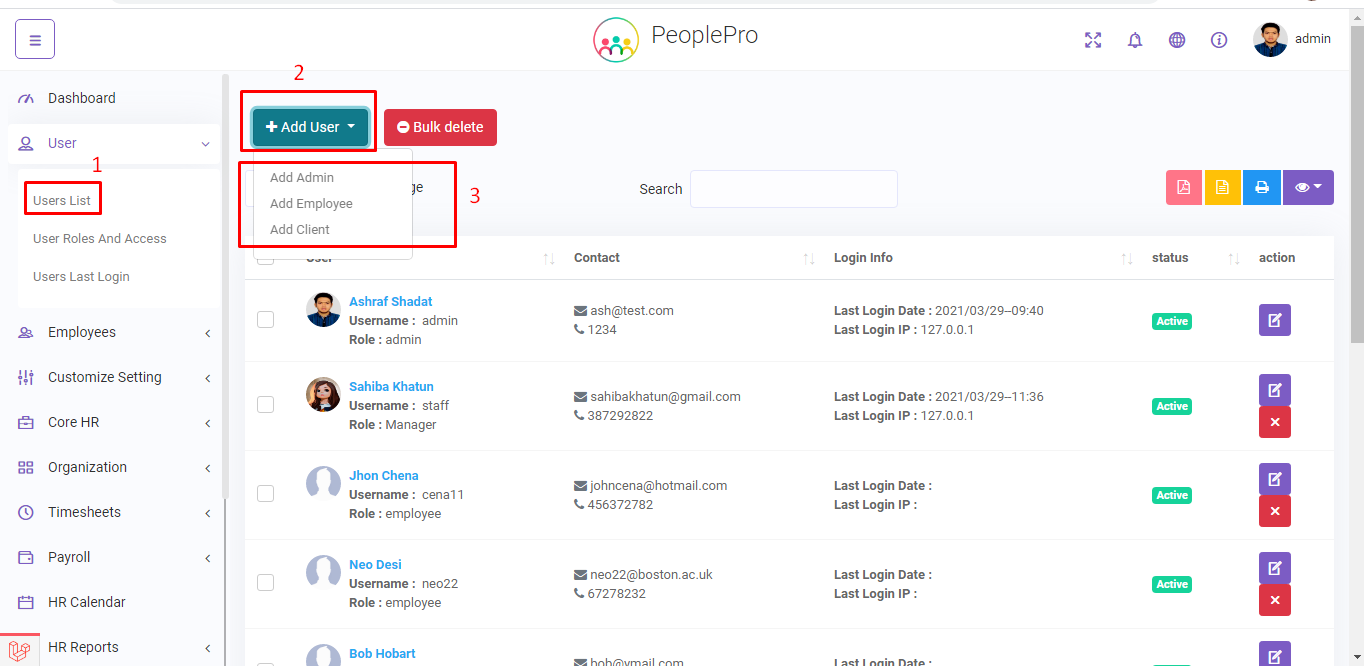
User List
User->User List
Here you can view the record of all the users. You can also add users using Add User(2)
and also can redirect to Employee's and Client's add form. The purpose of this is to add user that can manage/edit the resources
of the system. The user will have default access to all the resources.But you can change/limit the
access using
Roles and Access under Customize Setting
User role and access
Assign Role
Assigning role to a user .By default, admin can access everything.If you want to limit specific user
some
resources or permissions you can add new role and assign that role to that particular user.
Role :Go Back To Role Page
Assign Role :Assign Role to a user
Select multiple user using checkbox and then assign a role to them.
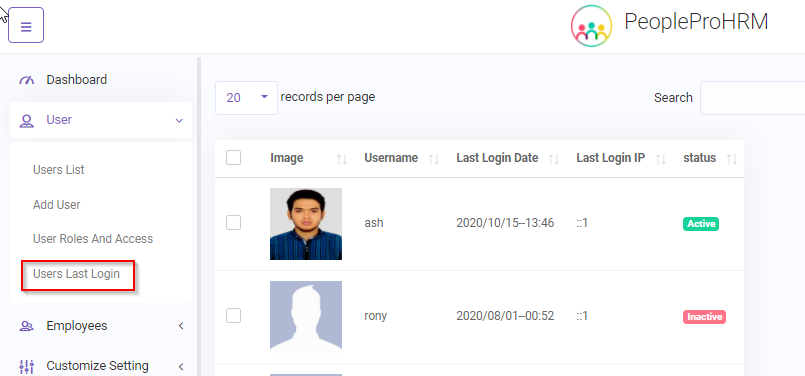
User Last Login
User -> User Last Login.
You can view the last log in ip and log in date-time of a user.
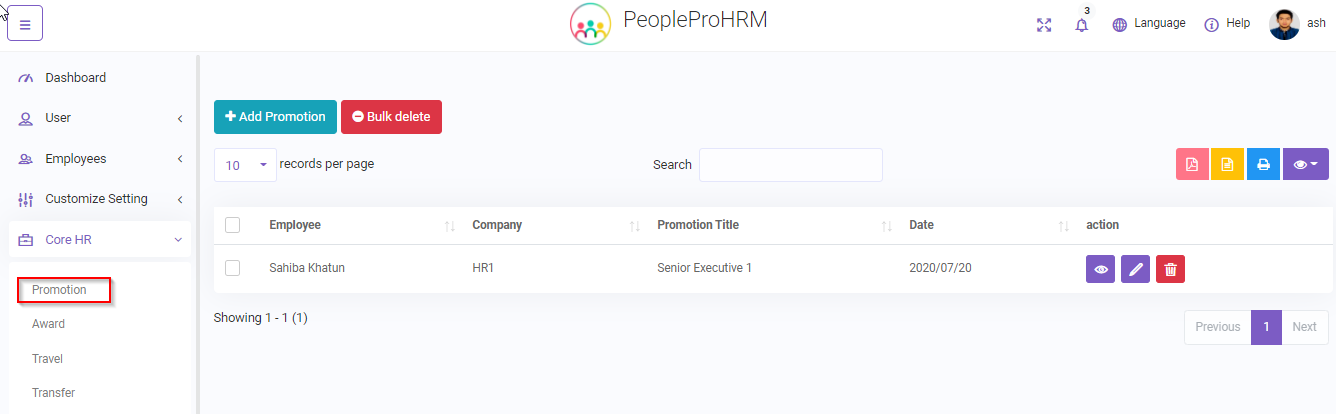
Promotion
Core HR -> Promotion.
You can add/edit promotion record for an employee. The promoted employee will be notified through in app
notification
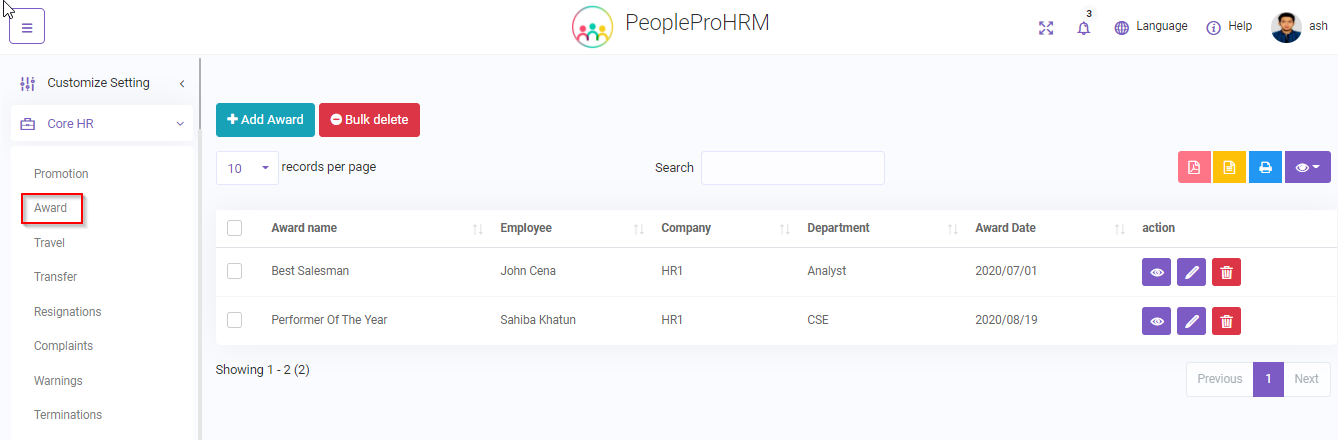
Award
Core HR -> Award.
You can add/edit award record of an employee. The awarded employee will be notified through in app
notification
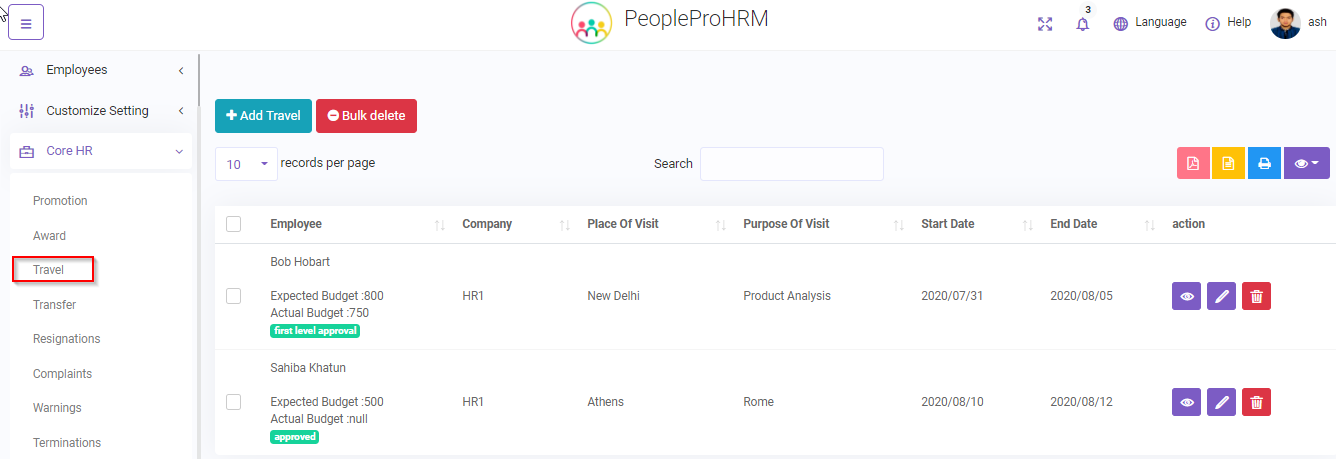
Travel
Core HR -> Travel.
Admin can add/edit travel record of an employee. Moreover, admin can approve/reject travel request of an
employee.
The approved travel request record will send an in app notification to the respected employee
Transfer
Core HR -> Transfer.
Admin can transfer an employee from one department to another department.
The transferred employee will be notified through in app notification
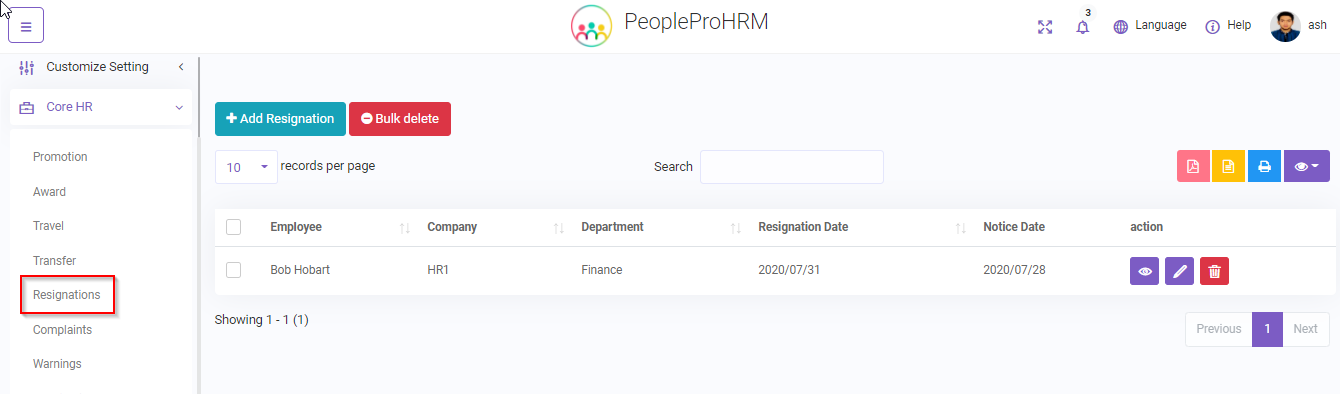
Resignation
Core HR -> Resignation.
Resignation records of employees. Admin can add and edit resignation information.
The resignated employee will be notified through in app notification
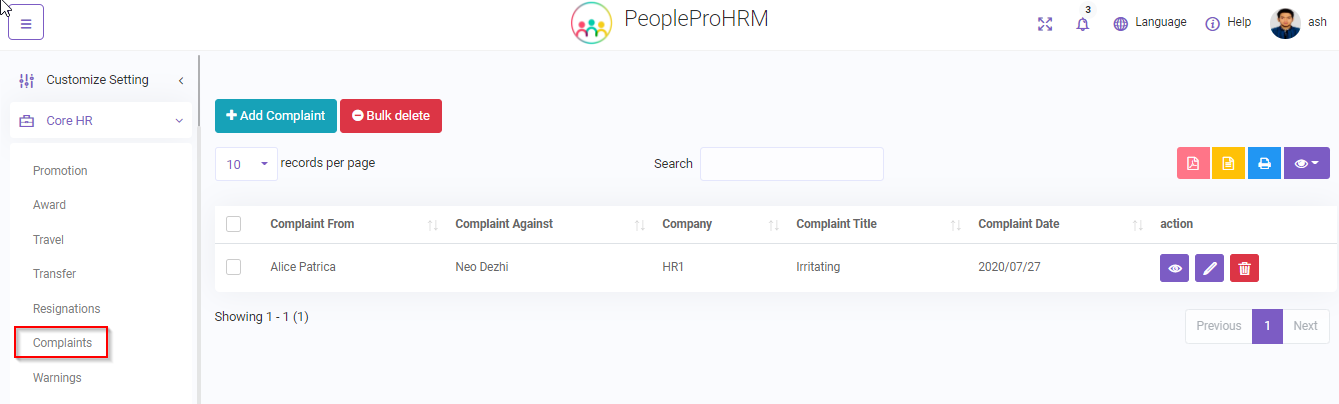
Complaint
Core HR -> Complaint.
Complain from an employee and against an employee can be seen and added here.
Both of the employees will be notified .
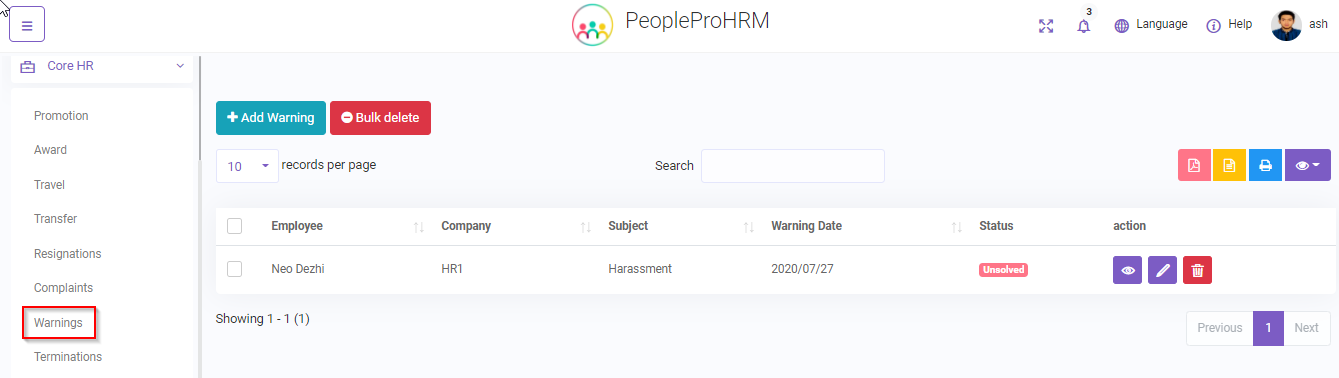
Warning
Core HR -> Warning.
Admin can give warning to an employee.
The warned employee will be notified through in app notification
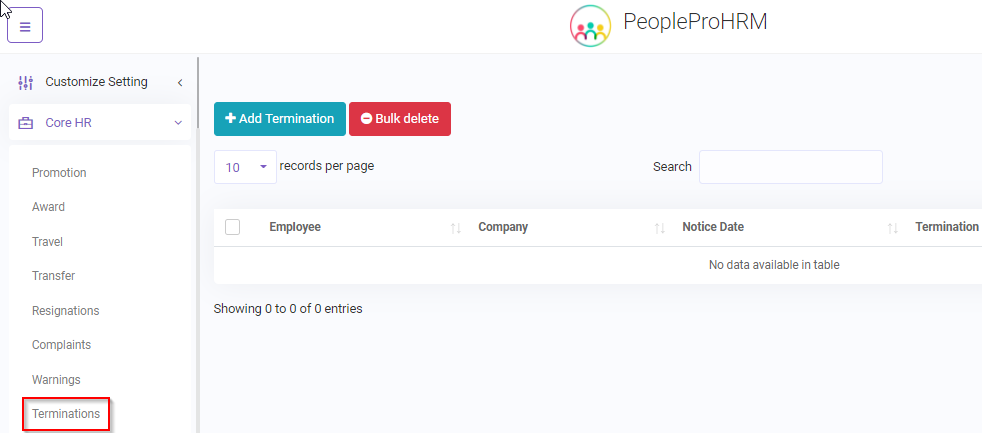
Termination
Core HR -> Termination.
Admin can terminate an emoloyee.
The terminated employee will be notified through in app notification
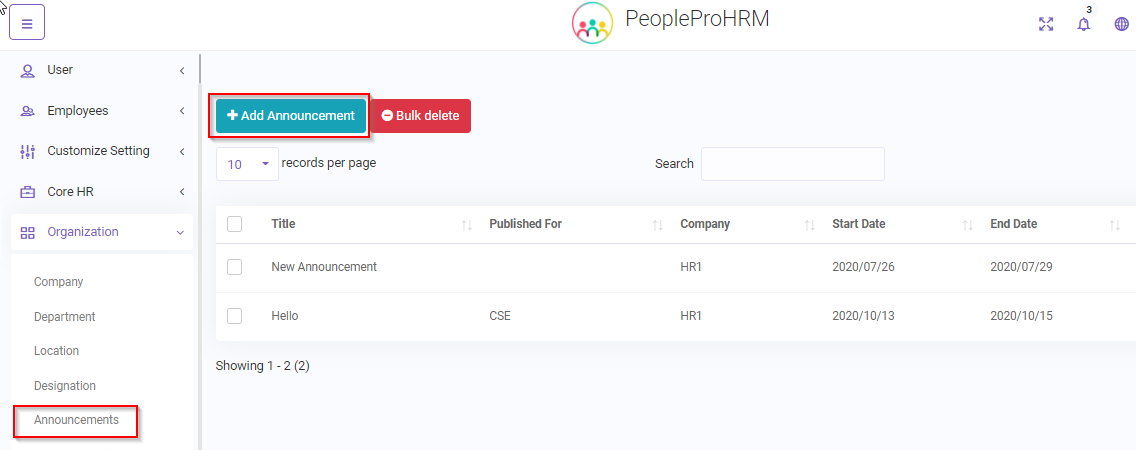
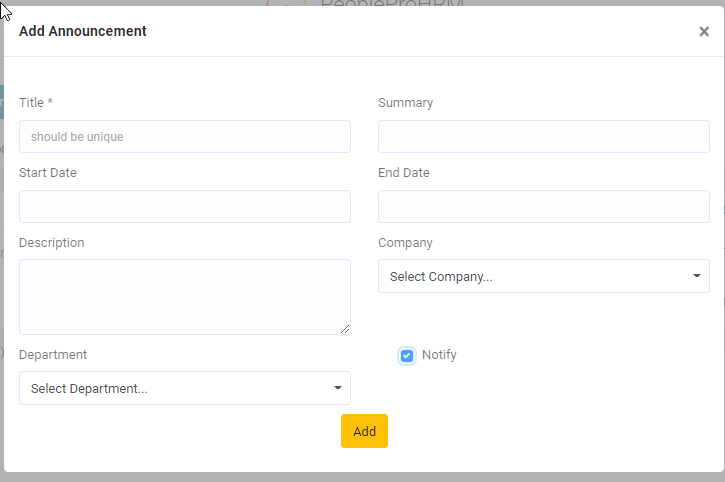
Announcement
Organization -> Announcement.
Admin can publish an announcement here . The announcement will be displayed on the dashboard from start
time
to end time.
All the users will be notified.
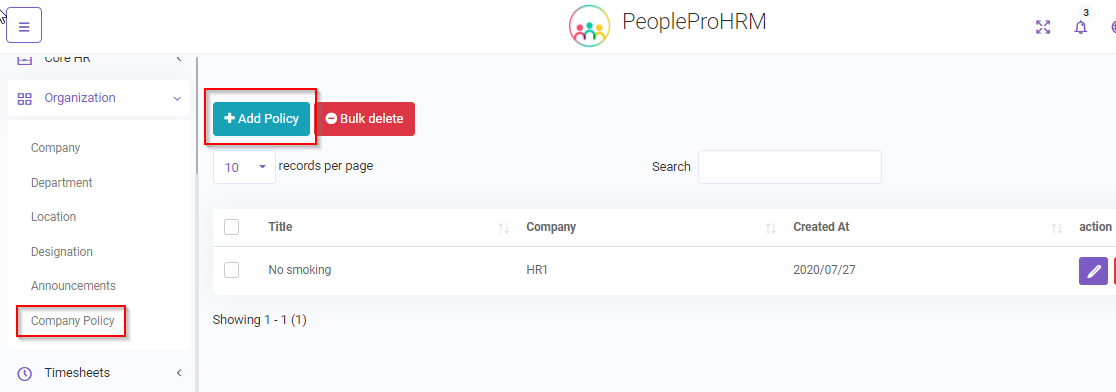
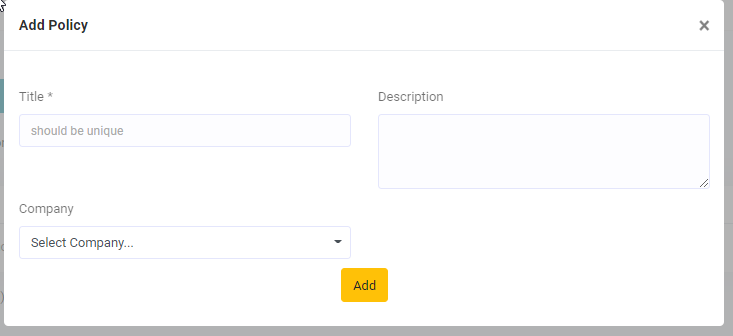
Policy
Organization -> Company Police.
Admin can add/update company policy here .
adding or updating company policy will notify all the user.
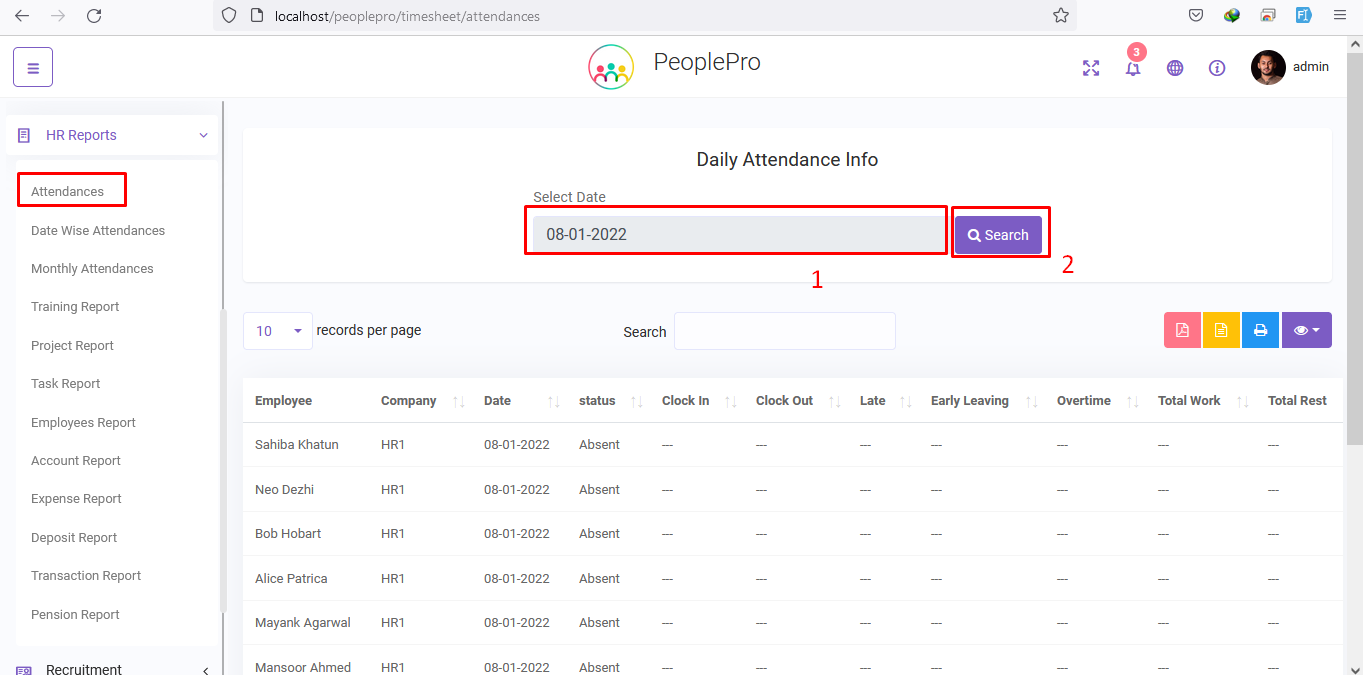
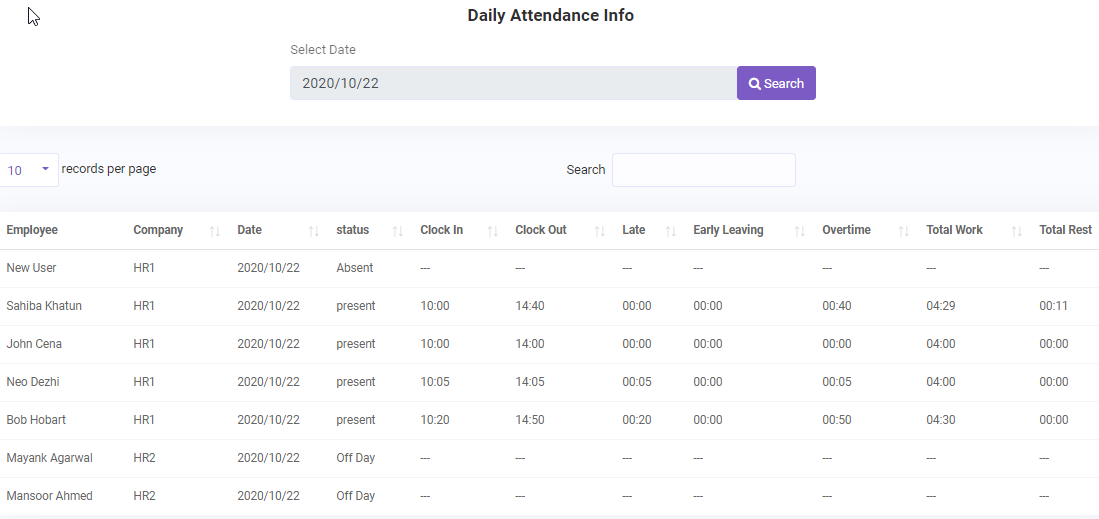
Attendance
Report -> Attendance.
Admin can view attendance info of all the employees here. Admin can select a specific date(1) and
search(2) for
attendance of all the employees on that particular date.
Detailed attendance info of the employee. The employee can clock in from their respective employee
dashboard.
If the clock in time is equal or before the employee shift in time then the clock in value will be the
shift in time and
the employee will be remarked to be present on time . If the clock in time is later then the shift in
time, then it
will be counted and calculated as late arrival. On the other hand, if the clock out time is before the
employee shift out time
then it will be counted and calculated as early leaving. If the clock out time is greater then the shift
out time then it
will be counted and calculated as overtime .
If an employee clock in then clock out during shift time then the time s/he will remain clocked out will
be counted as rest.
Similarly, the total amount of time the employee remain clocked in will be counted as total work.
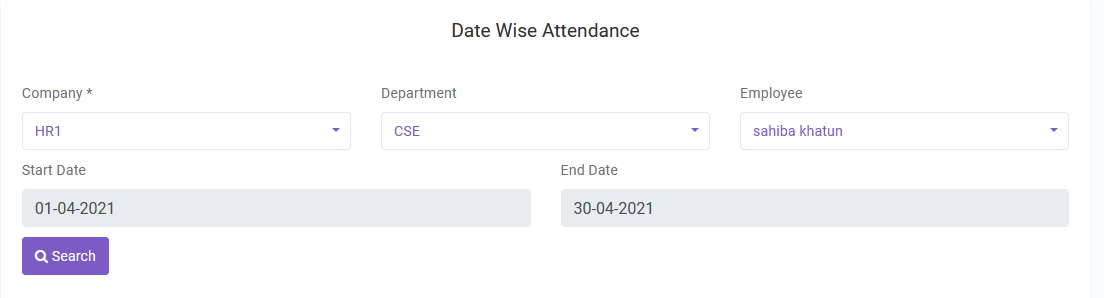
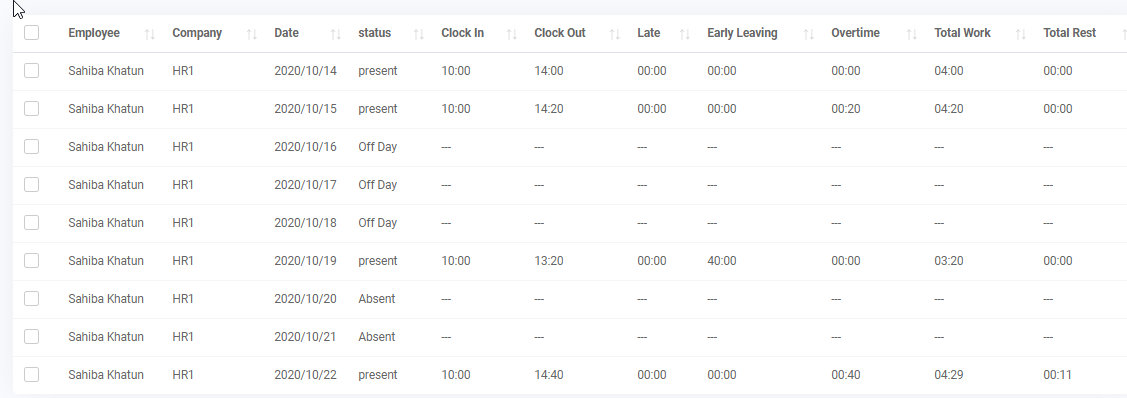
Datewise Attendance
Report -> Date wise Attendance.
Admin can view datewise attendance info of a selected employee here. Admin can select start-end date(1)
and search(2) for
attendances of the employees on that date range.
Datewise attendance table
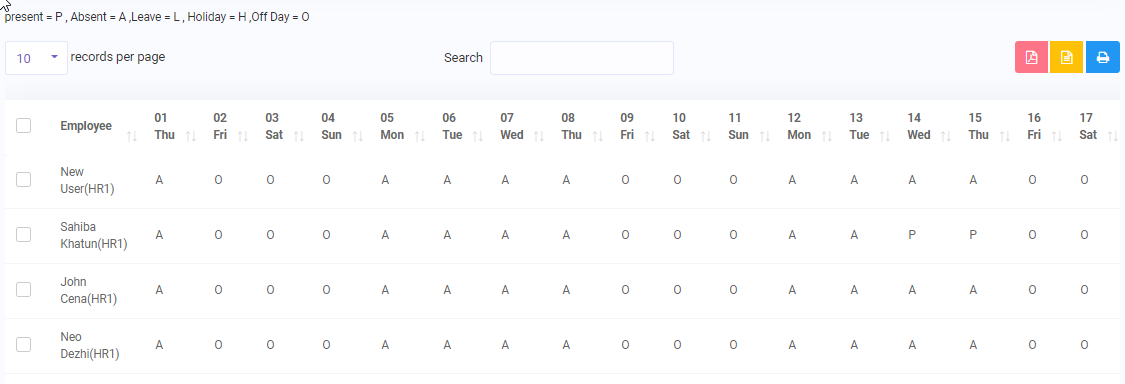
Monthly Attendance
Report -> Monthly Attendance.
Admin can view Monthly attendance info of all the employees here. I will show the attendance info of the
current month by default.
There is also search/filter option.
Admin can select month,company or employee to filter out for the desired result.
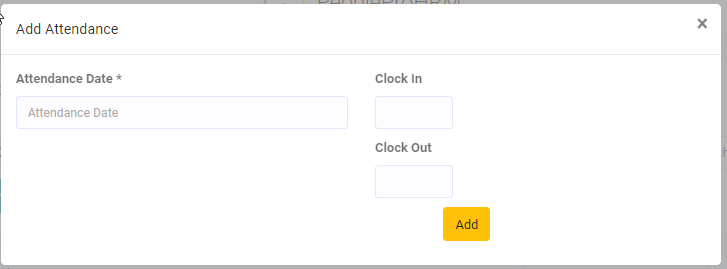
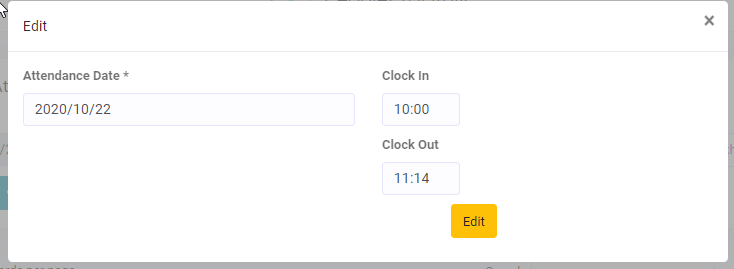
Update Attendance
Admin can update attendance of a certain employee. For that the admin will first search(1) for the
specific date and employee
that the attendance needs to be updated. Then admin can edit/update(2) that specific attendance or
add(3) attendance on that date.
Search or Get (1)
Add (2)
Edit (3)
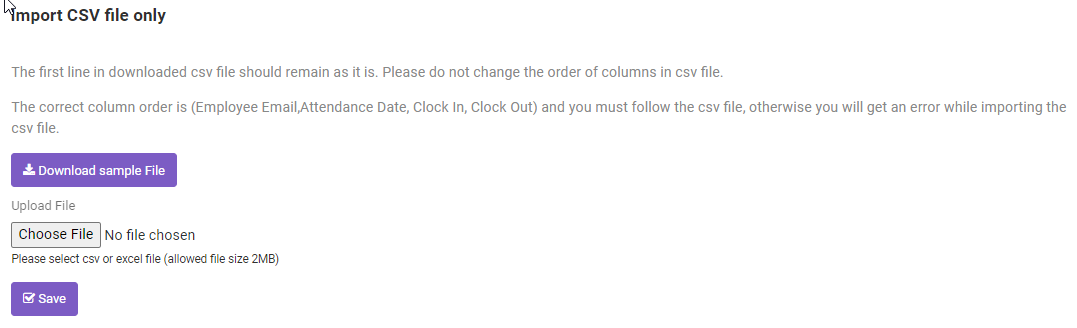
Import Attendance
Timesheets->Import Attendance
You can import Attendance information using a csv file . The imported employee information will be added
in the attendance
table .
Note :Before uploading a csv you must download the sample file . Do not alter or
change the header row or first line
of the sample file, Keep it as it is and input your data starting from second row.
Then upload the csv file.
Then click save.
Note : If there is any error,the page will show you the error line, please fix that
error and try to upload again.
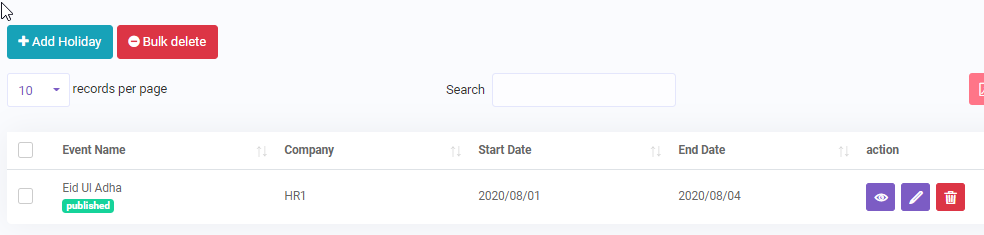
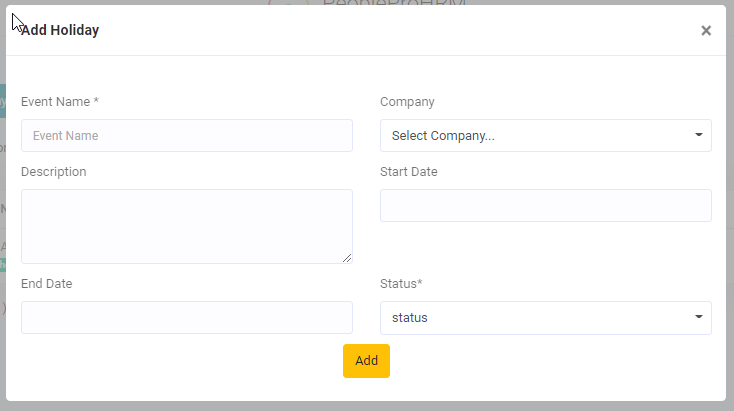
Manage Holidays
Timesheets->Manage Holidays
Admin can add/update holiday information here . The employees will see the information of the published
holidays
on their dashboard.
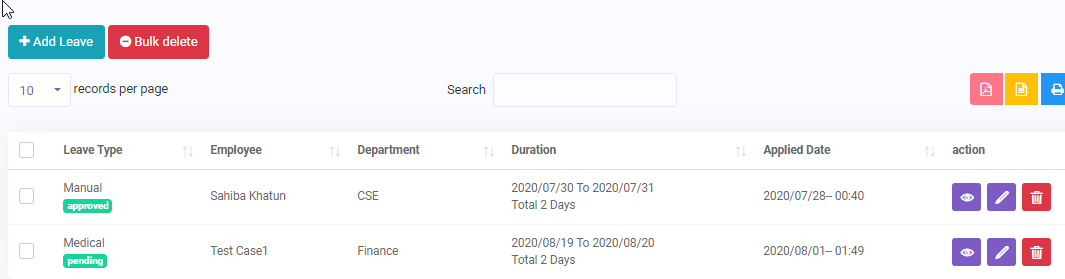
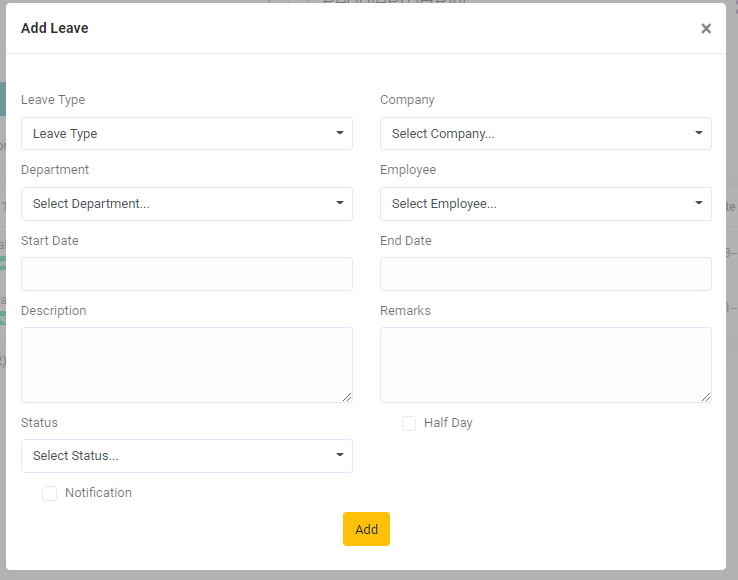
Manage Leaves
Timesheets->Manage Leaves
Admin can add/update leave information here . Besides, admin can approve or reject leave request
submitted by
an employee . Employee will get a notification upon admin approval or rejection.
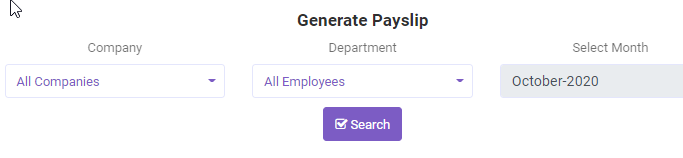
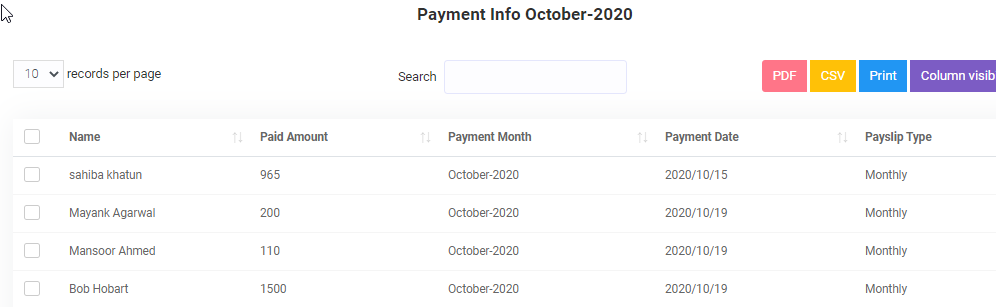
Payslip Report
HR Reports->Payslip Report
Admin can view the payslip report here . By default,It will show the current month payment info.
But admin can filter result using the search button.
Attendance Report
HR Reports->Attendance Report
Admin can view the attendance report here . Admin can select a start and end date to find out the
attendance info
of that date range.
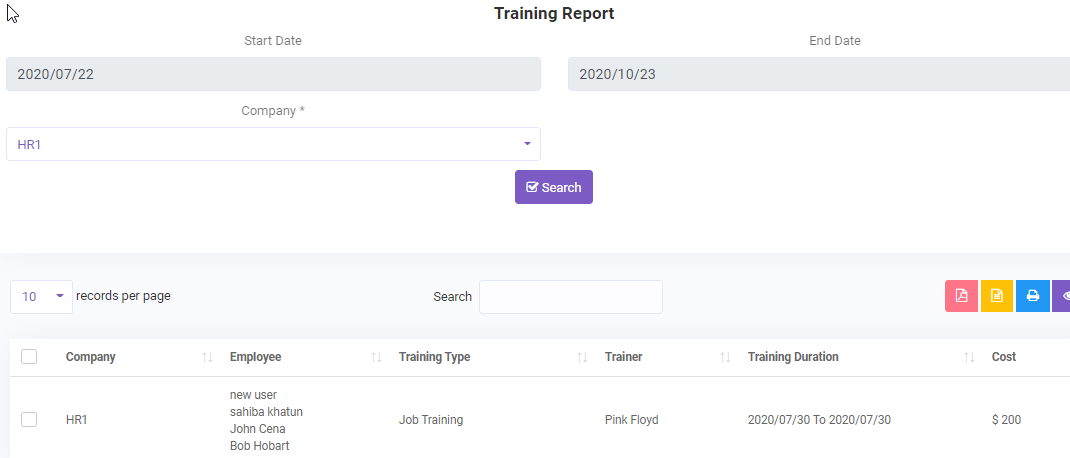
Training Report
HR Reports->Training Report
Admin can view the training report here . Admin can select a start and end date to find out the
attendance info
of that date range.
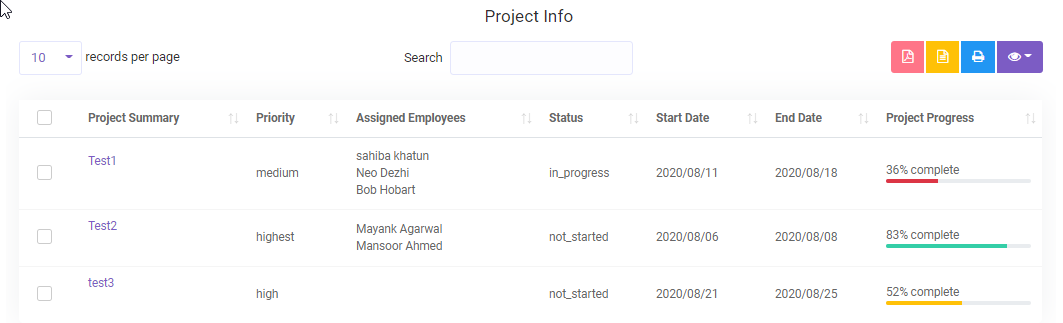
Project Report
HR Reports->Project Report
Admin can view the project report here . Admin can select a project or status and search for the result.
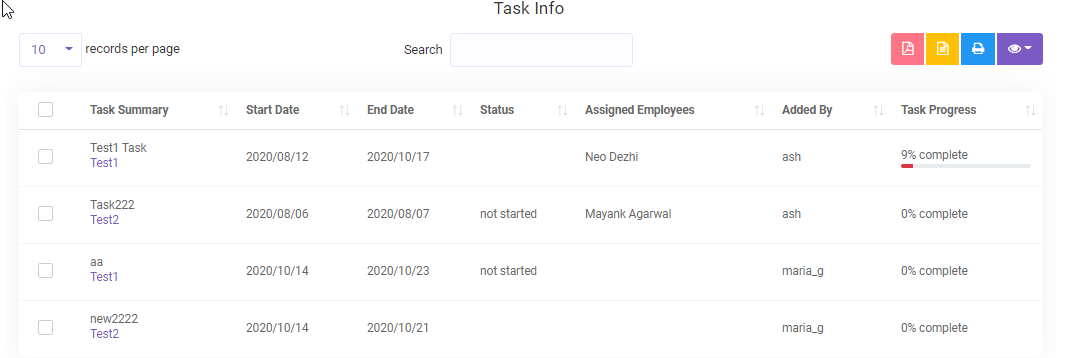
Task Report
HR Reports->Task Report
Admin can view the task report here . Admin can select a task or status and search for the result.
Employee Report
HR Reports->Employee Report
All of the employees information can be found on this table. Admin can also search employee using
search button.
Account Report
HR Reports->Account Report
Detailed account report and financial details. Admin can select a bank and get their financial report or
select a
start and end date to get detailed account information on that date range.
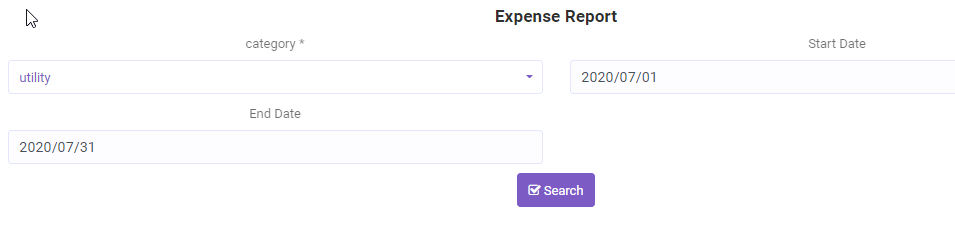
Expense Report
HR Reports->Expense Report
Detailed expense report . Admin can select a category expense and then select a
start and end date to get detailed expense information on that date range.
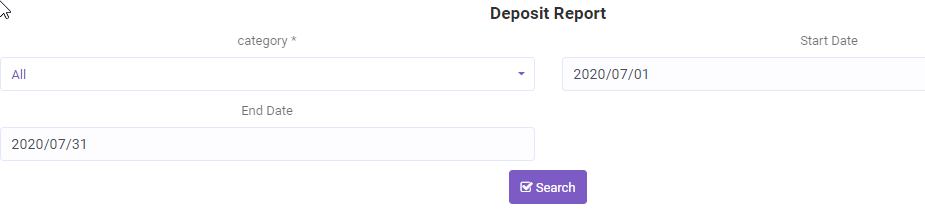
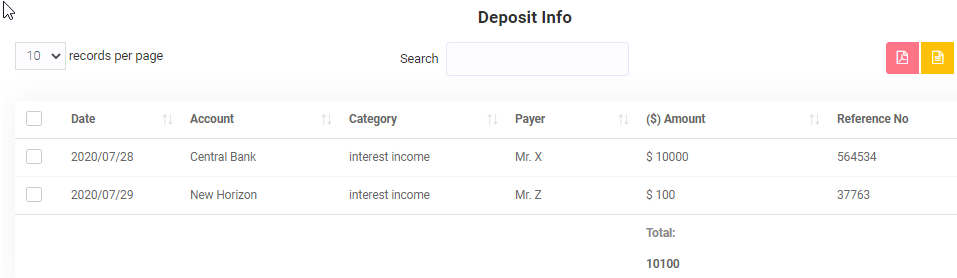
Deposit Report
HR Reports->Deposit Report
Detailed expense report . Admin can select a category deposit and then select a
start and end date to get detailed deposit information on that date range.
Transaction Report
HR Reports->Transaction Report
Detailed transaction report . Admin can select a
start and end date to get detailed transaction information on that date range.
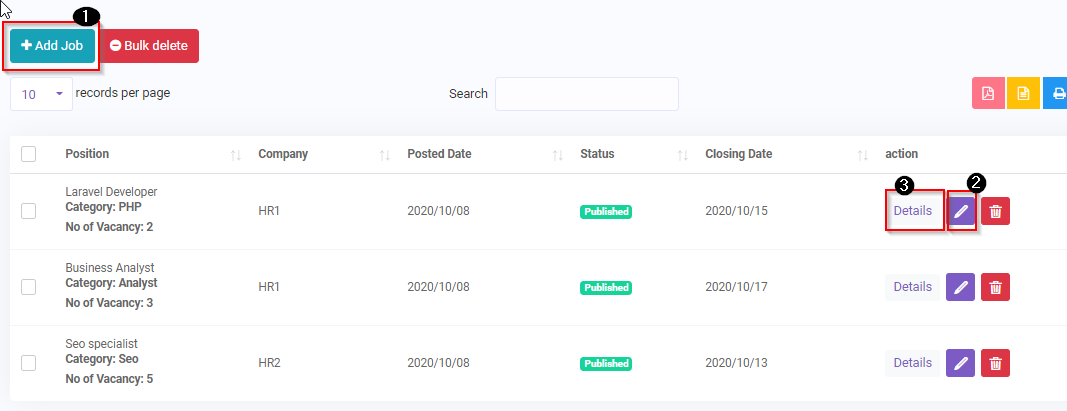
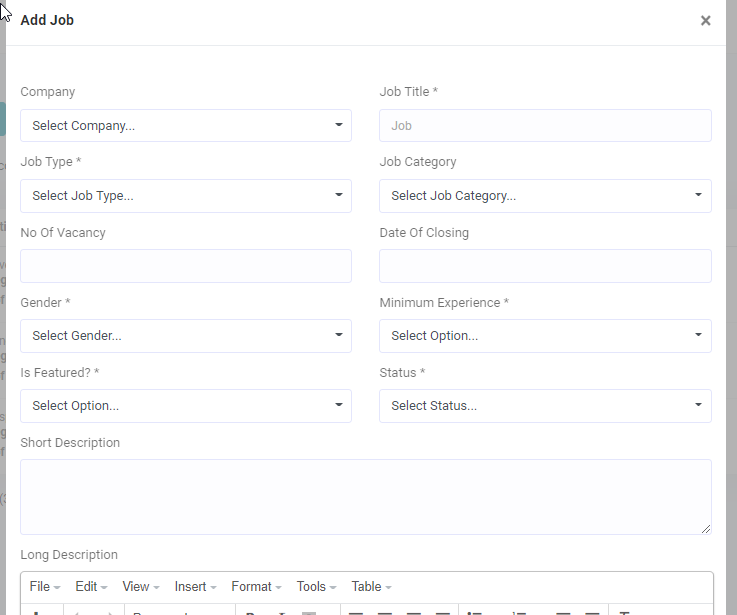
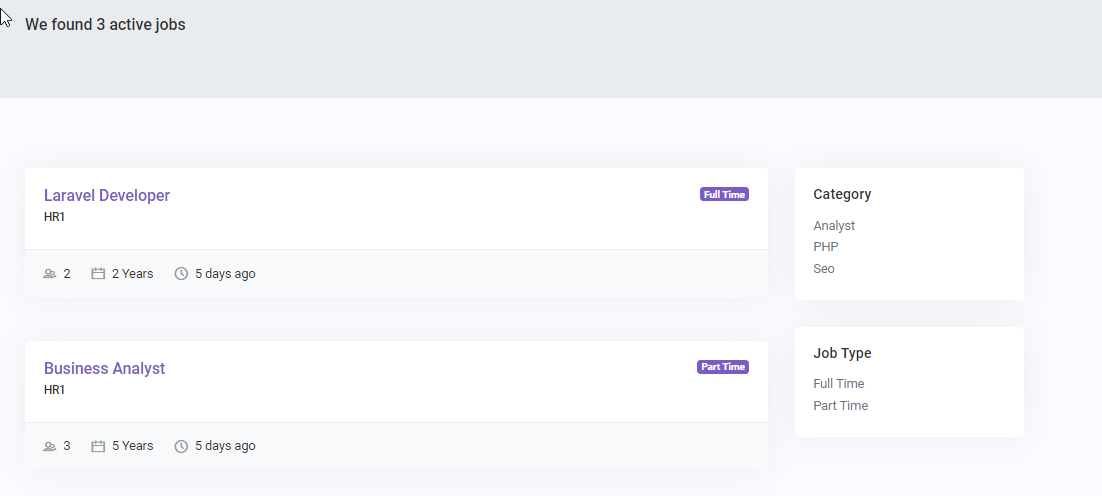
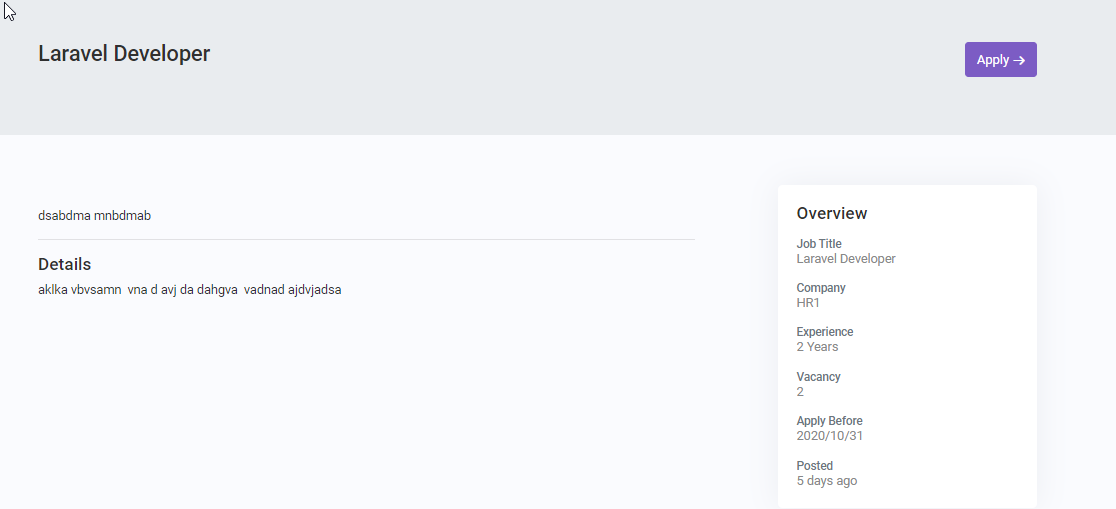
Job Post
Recruitment->Job Post
Admin can add(1)/update(2) job post here. If a job post status is published then only it will be shown
on the front job
page . You can view the front job page by clicking on the details(3) button.
(1)
(3)
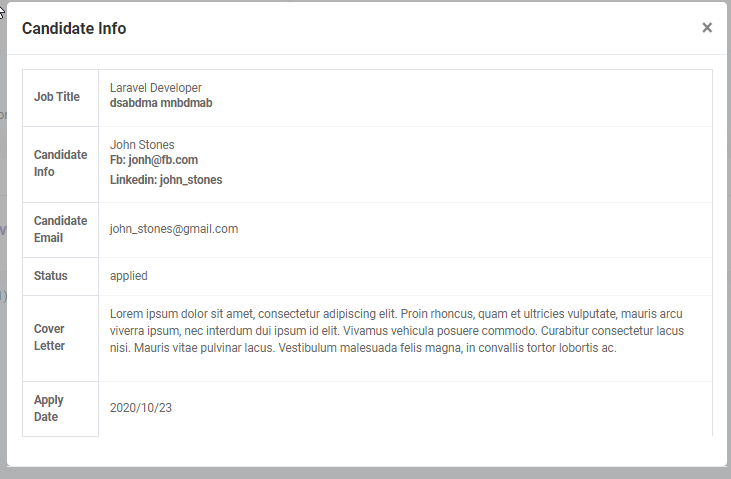
Job Canidate
Recruitment->Job Candidate
Admin can view the details of the applied Candidates here.
Details
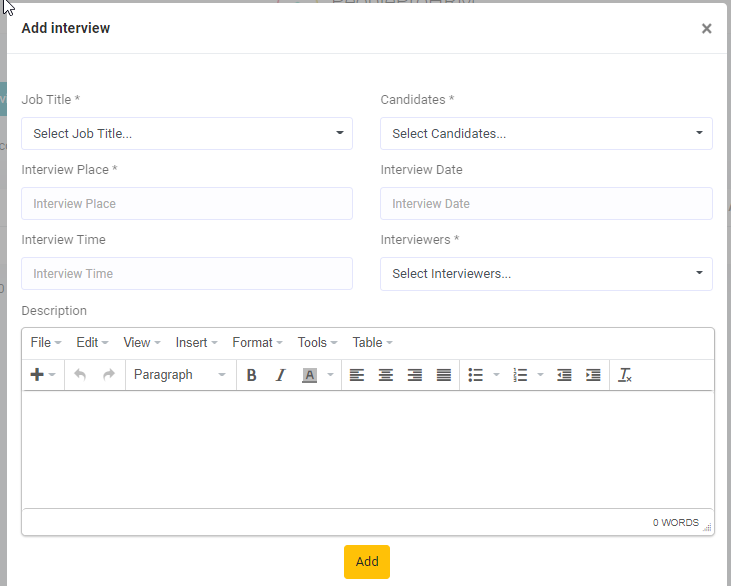
Job Interview
Recruitment->Job Interview
Admin can select from the applied candidates and call them for Interview using this module.
The selected candidates will be notified through an email.
CMS
Recruitment->CMS
Admin can create html template for the front end of the website. They can create home,about and contact
page using this module.
These pages can be viewed on the url your_url/home, your_url/about and your_url/contact responsively.
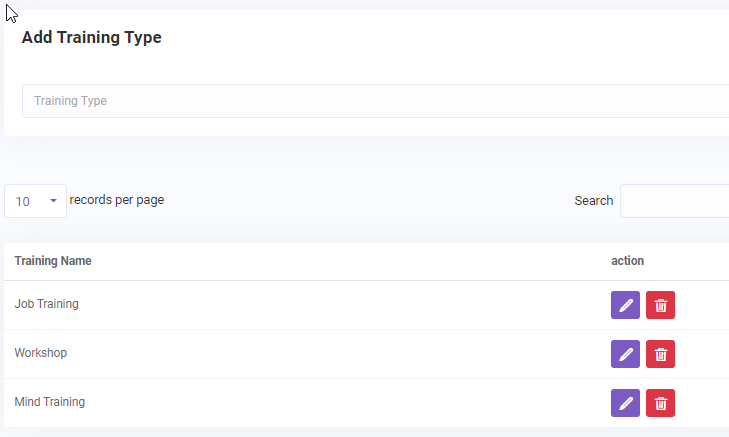
Training Type
Training->Training Type
Admin can add/update/delete training type. This is necessary before adding training record
as training information depends on training type.
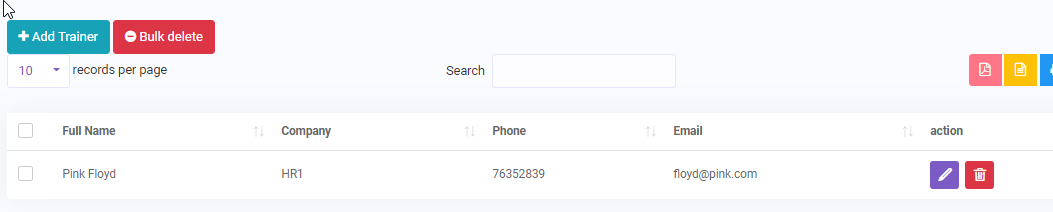
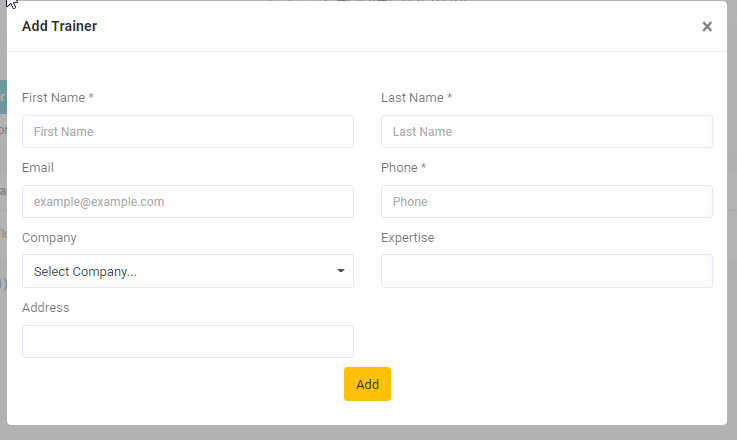
Trainer
Training->Trainer
Admin can add/update/delete trainer that will conduct the training. This is necessary before adding
training record
as training information depends on trainer.
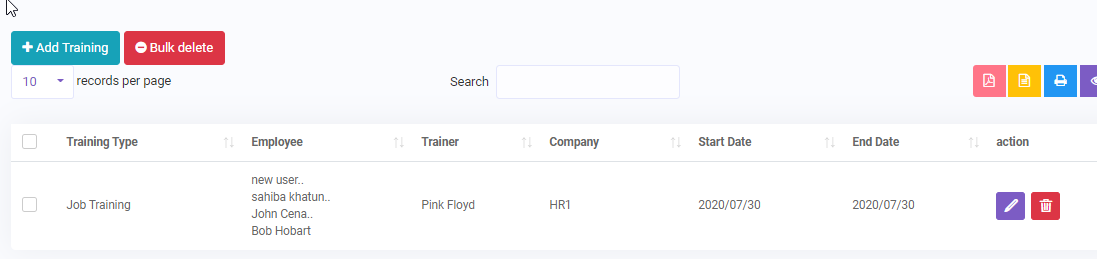
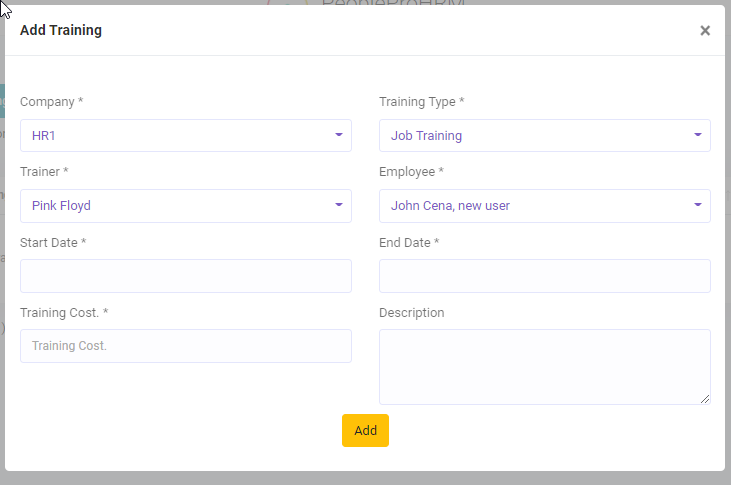
Training List
Training->Training List
Admin can add/update/delete training information. Admin can select multiple employees to a particular
training program.
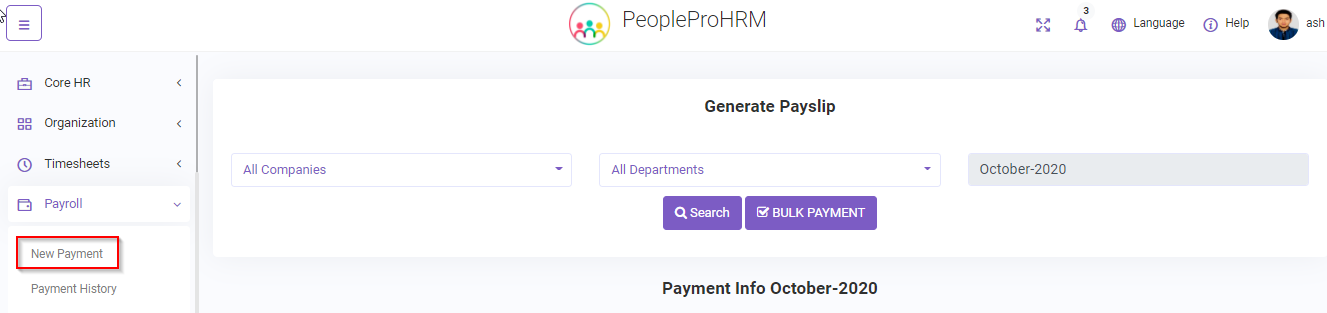
New Payment
Payment -> New Payment.
Employee payroll information and payment can be managed here.
Authorized user can view and pay employee.
The search filter can be used to search to get payroll information of the selected employees.
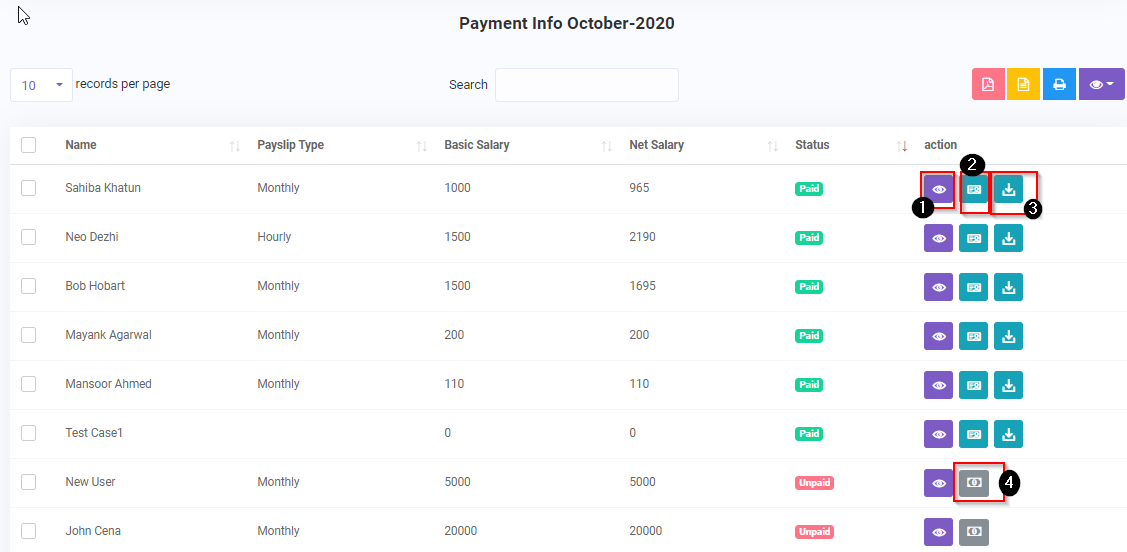
Payroll Table
You can pay employee or view their payment details.
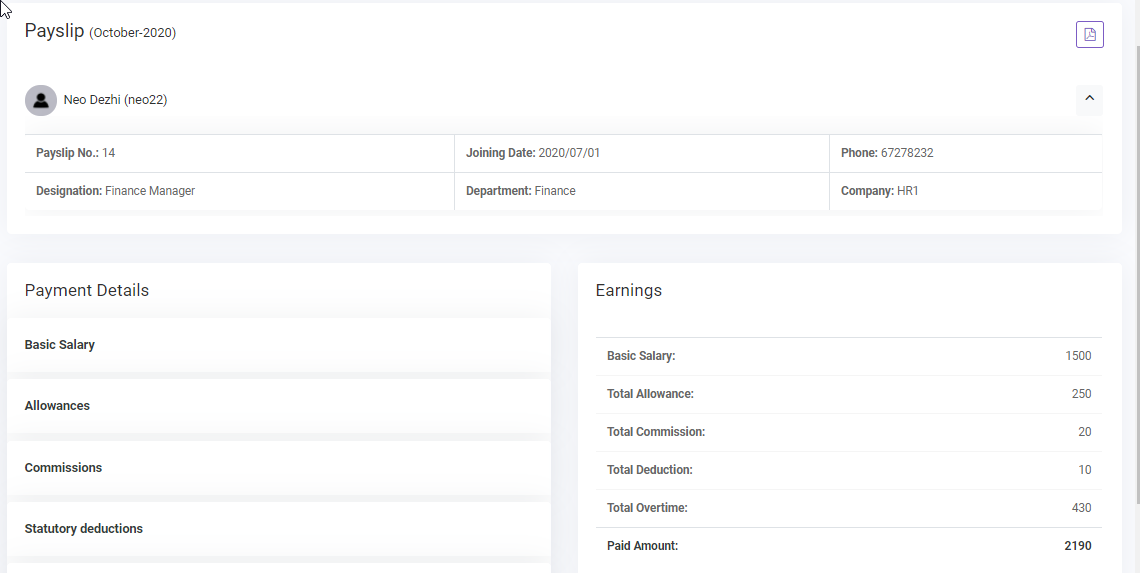
View(1)
the detailed information of the payslip of an employee . The net salary along with
the details can be seen here . Admin can update the salary from the employee module by going to the
details page
of that employee.
Paid Info(2)
Paid info of an employee can be seen here.
Download(3)
You can download the payslip using this button.
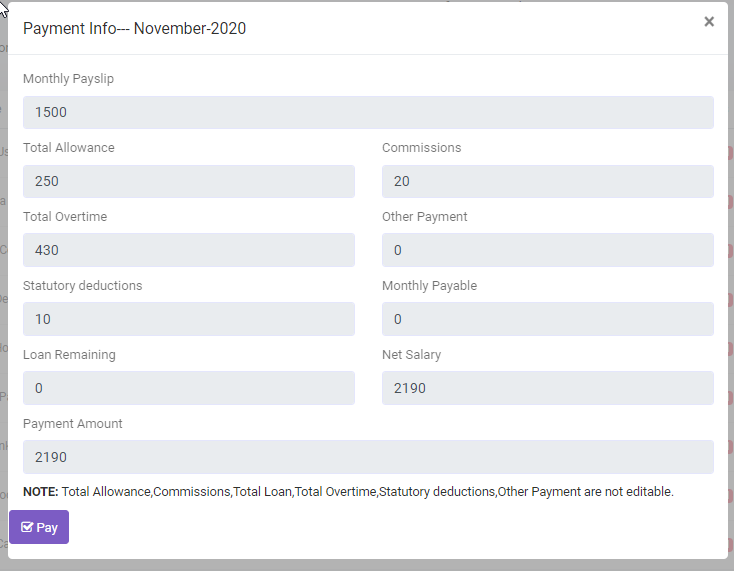
Pay(4)
Admin can pay an employee using this button.
The net salary is calculated as follows: Net Salary = net salary + (total allowances + commissions + total overtime + other
payment) - (statutory deductions + monthly payable) Note: The payment form fileds are not editable.If you want to change the payment, you
have to go to the
employee profile.
The paid amount will be deducted from the main account balance.
Bulk Payment
Admin can pay all employees or select a company or department to pay employees of that company or
department .
You can search for the employees that you want to pay to confirm before your desired action and then
click on bulk payment to pay or just select the filter and click
on bulk payment to pay as one go.
Note: This is a batch process that will need some time. please wait patiently.
The paid amounts will be deducted from the main account balance.
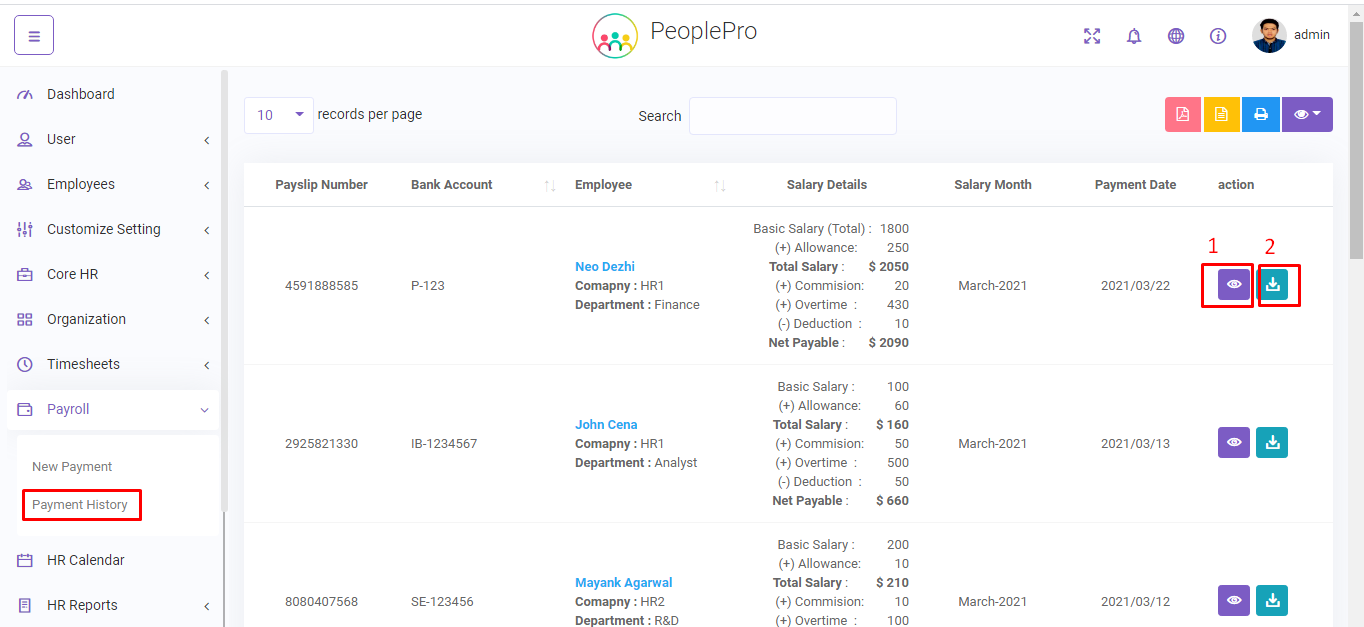
Payment History
Payroll->Payment History
History of the successful payment to the employees till date. You can view(1) or download(2) the payslip
form
here.s
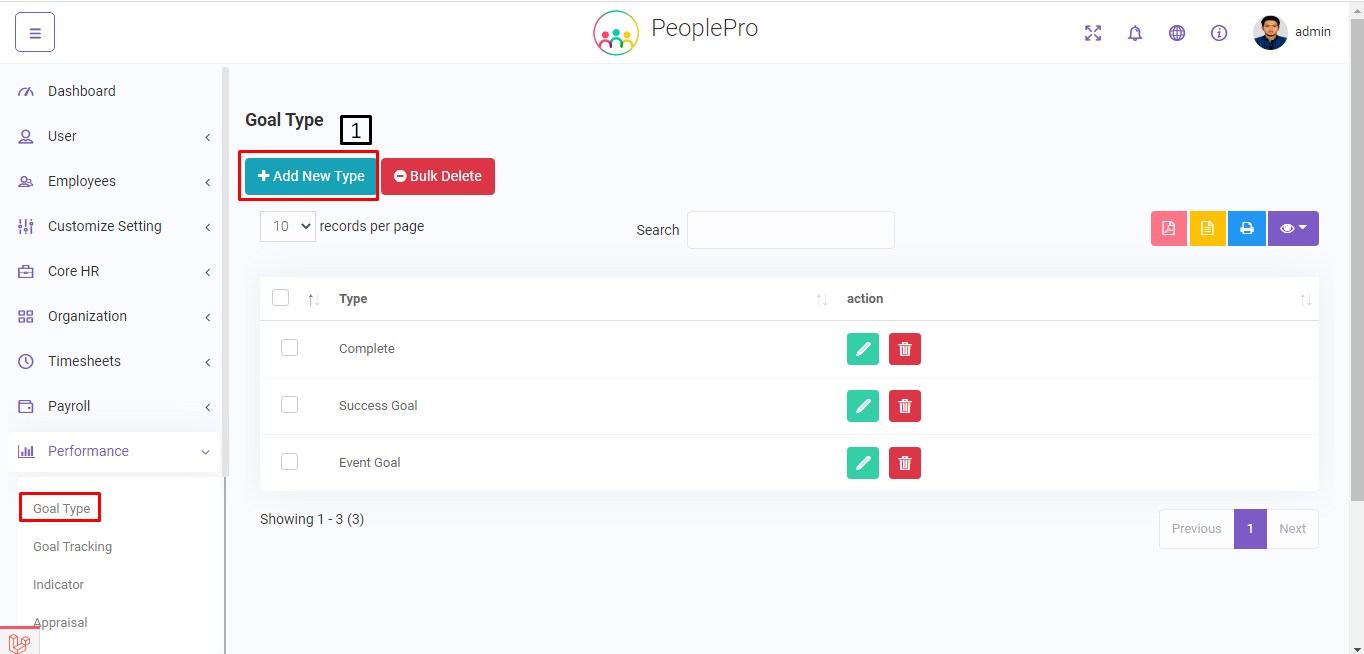
Goal Type
Performance->Goal Type
You can see performance goal type list for the employees.
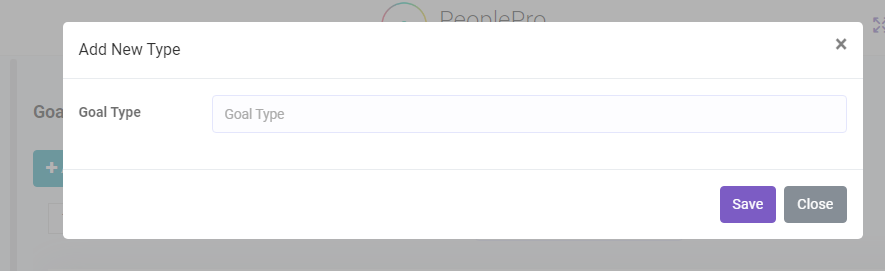
Add New Type
You can add new goal type.
Goal Tracking
Performance->Goal Tracking
You can see performance goal tracking list for the employees.
Add New Goal Tracking (1)
You can add new goal tracking.
Edit Goal Tracking (2)
You can edit goal tracking.
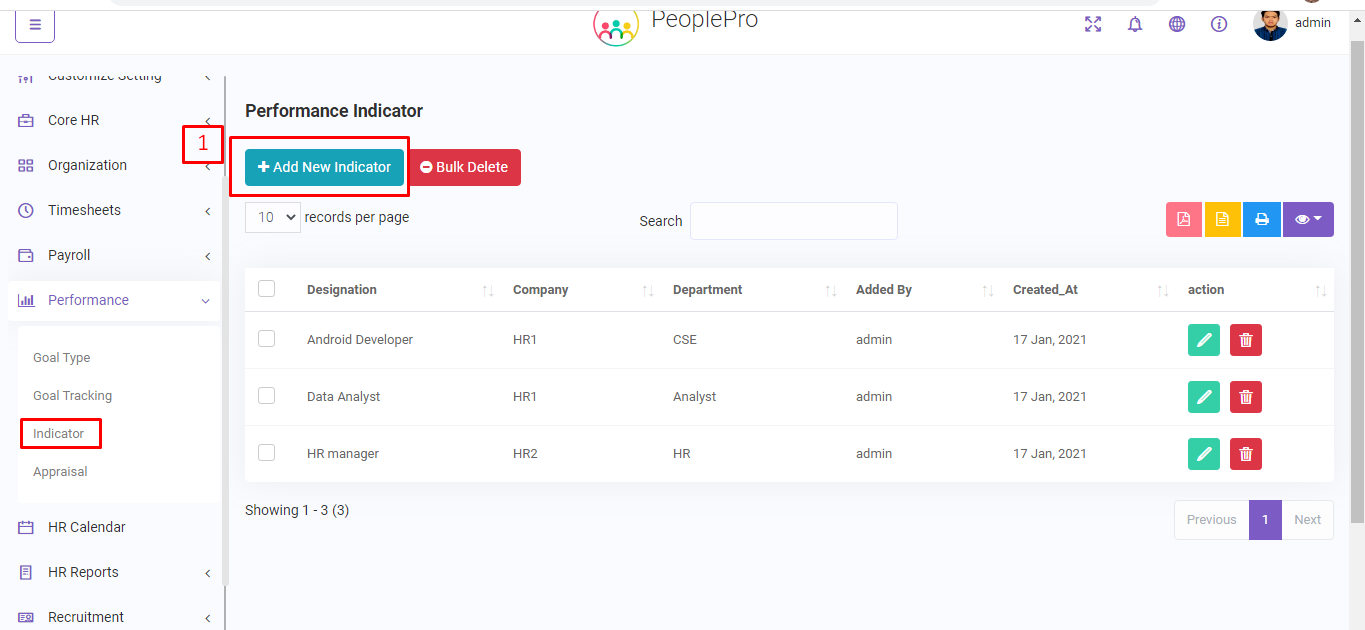
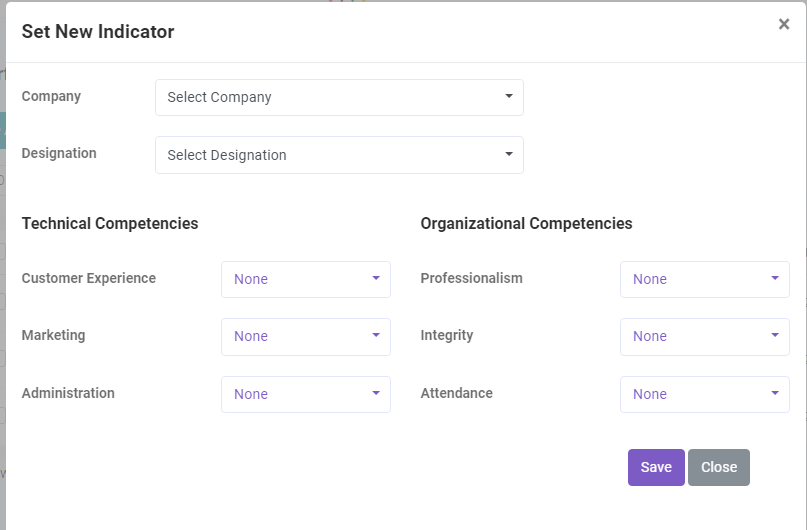
Indicator
Performance->Indicator
You can see indicator list of peroformance.
Add New Indicator (1)
You can add new indicator info.
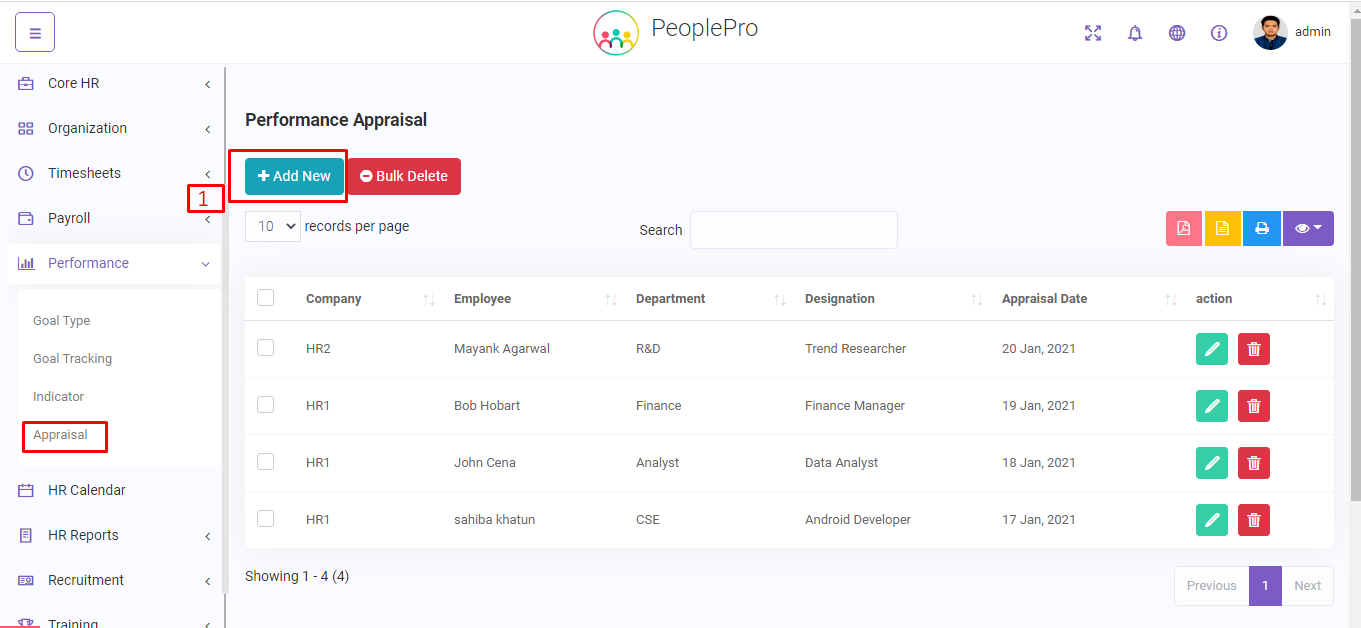
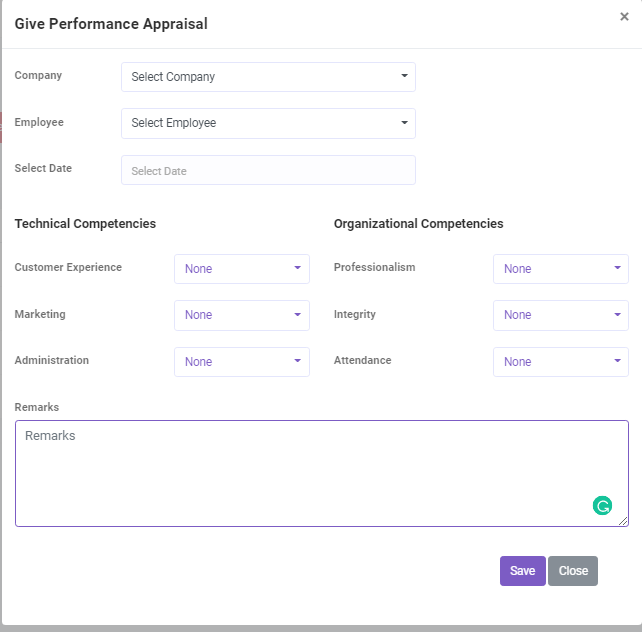
Appraisal
Performance->Appraisal
You can see apprisal list of peroformance.
Add New Indicator (1)
You can add new appraisal info of employee performance.
HR Calendar
You can view all the events/occurance/deadline in a calendar(1) view in this module.
Admin can also add events/occurance here using the option(2) section.
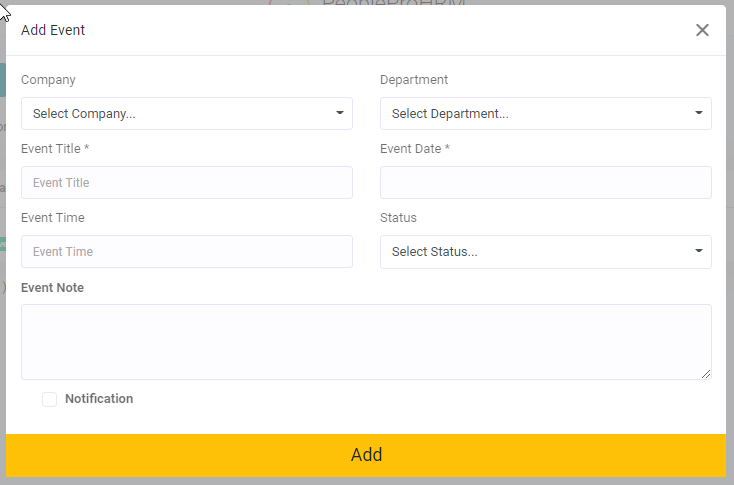
Event
Admin can view/add/edit events here. The event can be for a specific company or a specific department.
The related employees will get a notification for the approved event.
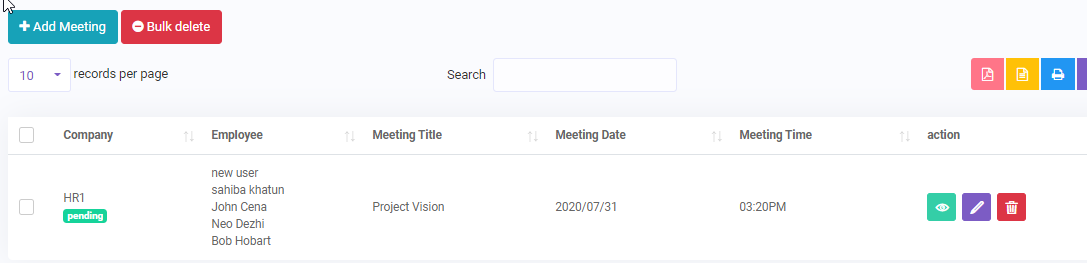
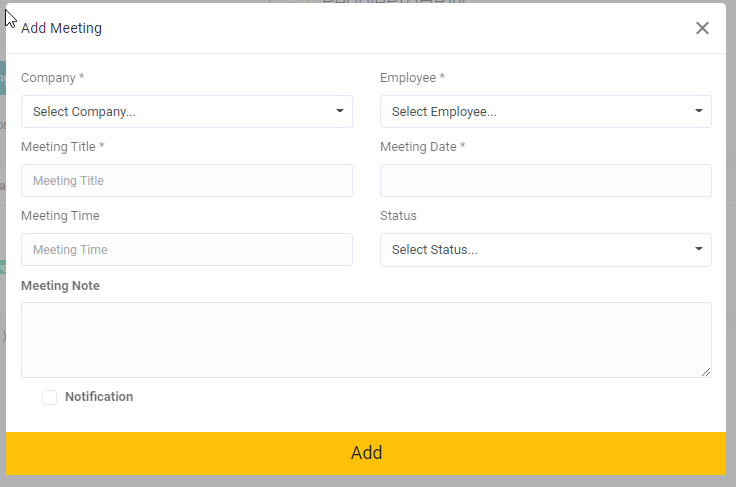
Meeting
Admin can view/add/edit meeting here. Admin can select specific employees for a meeting and can notify
them about the meeting.
If you set your meeting status Ongoing, then it will display in Calender.
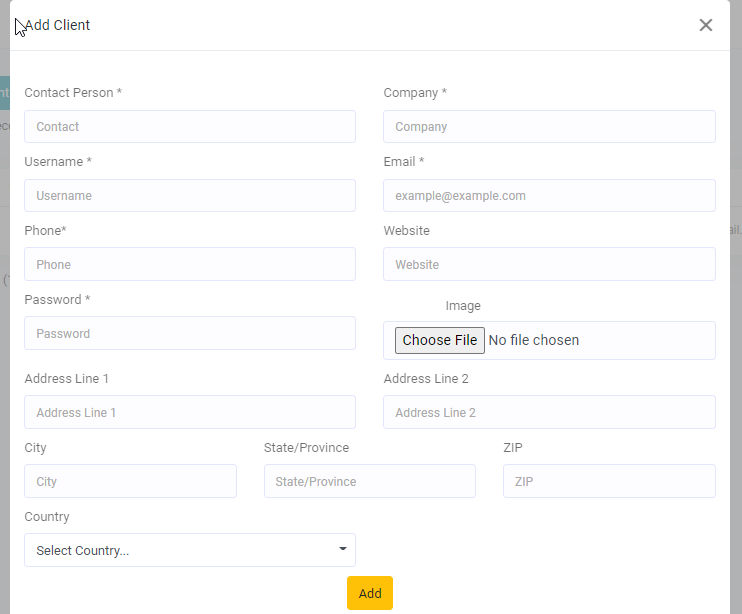
Client
Project Management -> Client.
Admin can view the current clients or add/update a client. Client can login with the credentials set by
the admin and later can
uodate the credentials. Client can request for new project or task. Client will be notified about the
project update.
Add Client
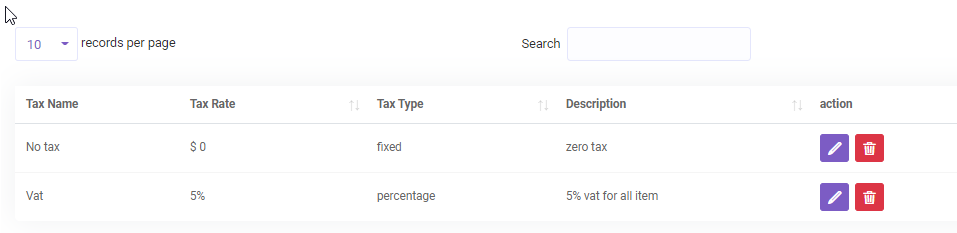
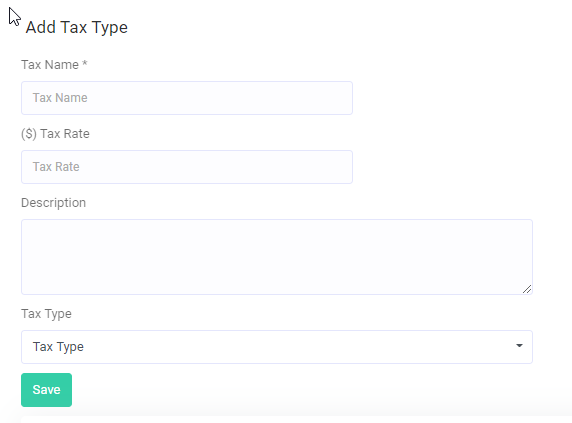
Tax Type
Project Management -> Tax Type.
Admin can add/update tax type and tax rate here. This is important before creating an invoice as
invoice total is dependent on tax rate.
Add tax Type
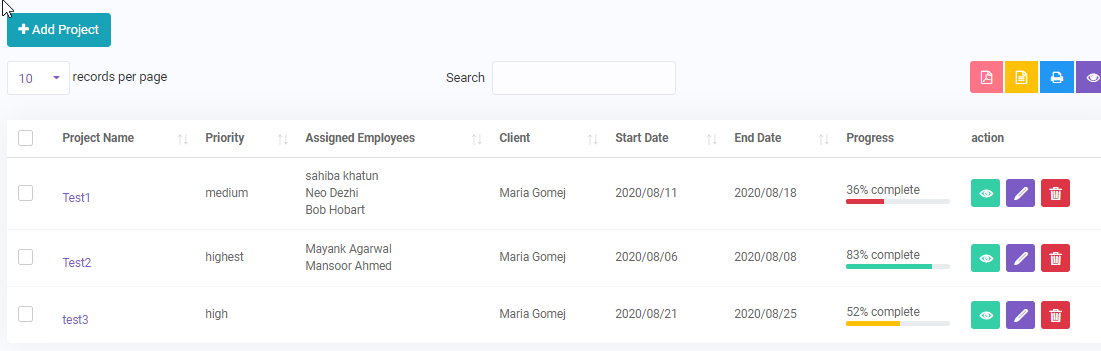
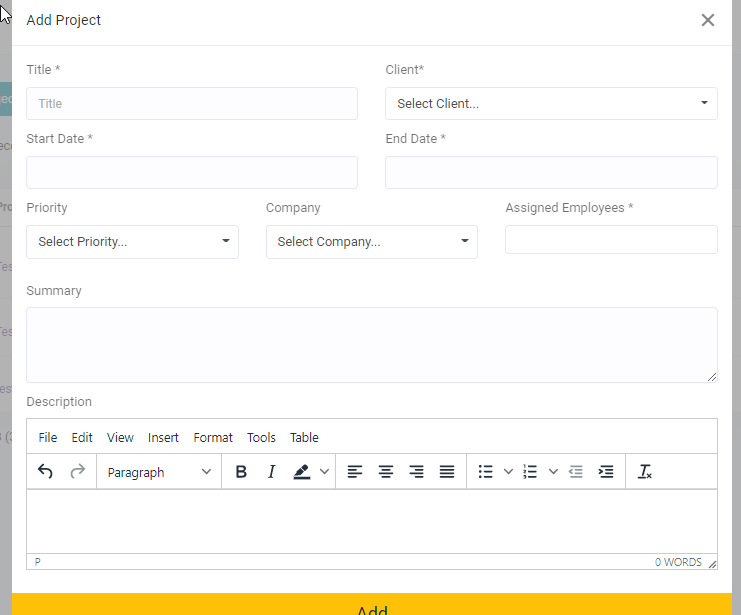
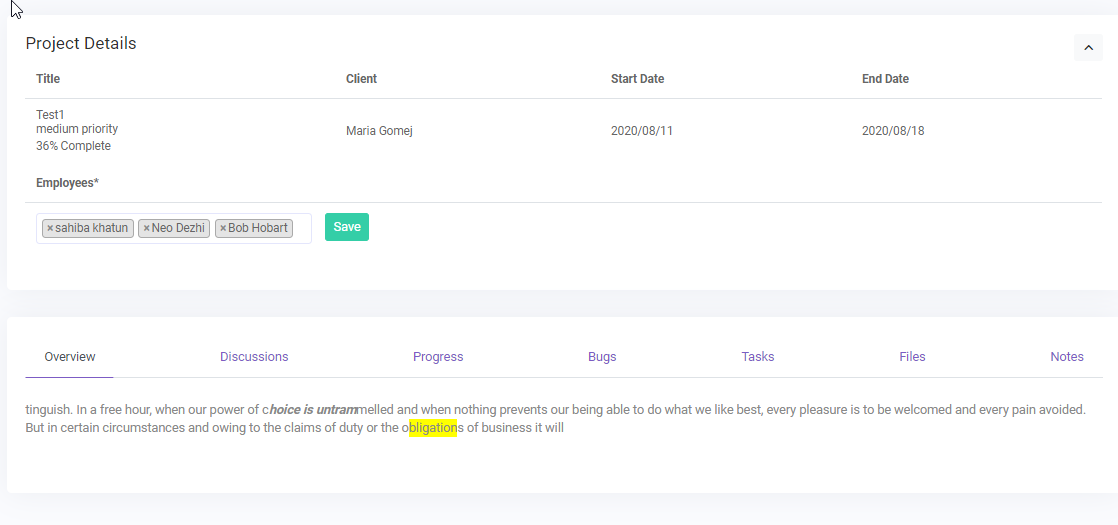
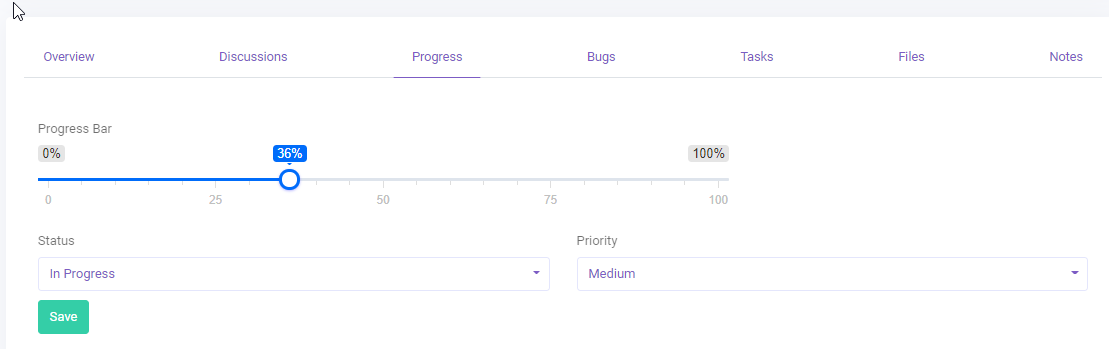
Project
Project Management -> Project.
Admin can view/add/update a project and project details here. The requested projects of the client can
also be seen here.
Admin will be notified when a client creates a project. Admin can assign a project to certain employees.
The assigned employees
will be notified about the assigned projects.
Add Project
Project Details
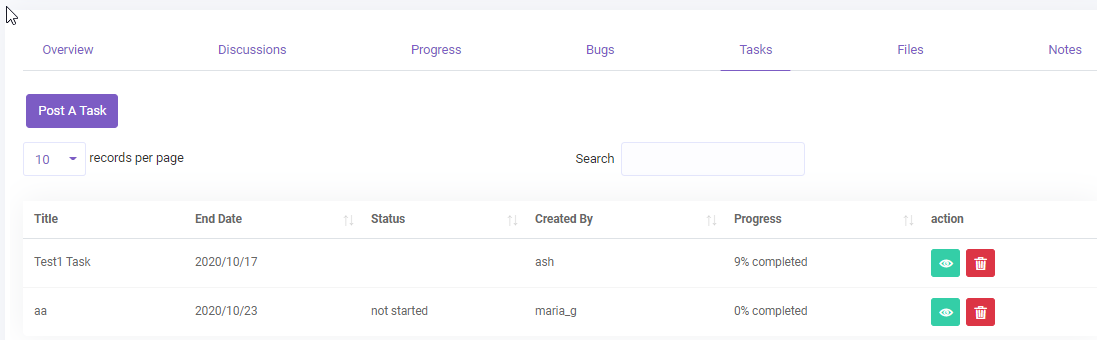
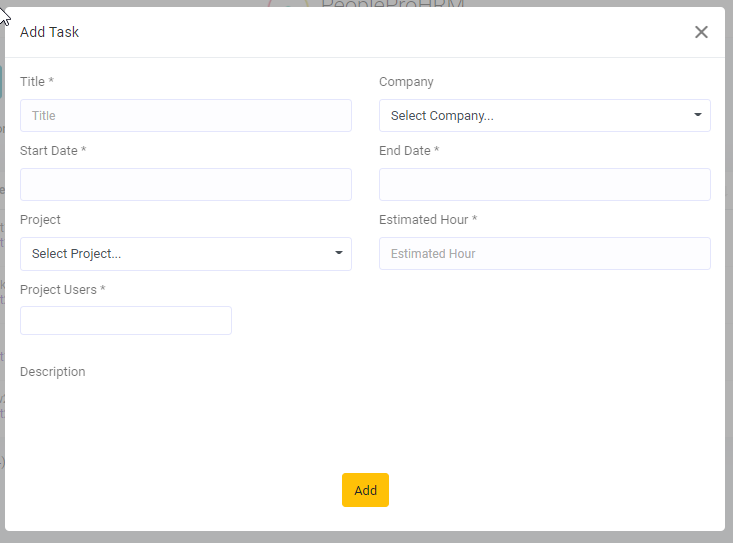
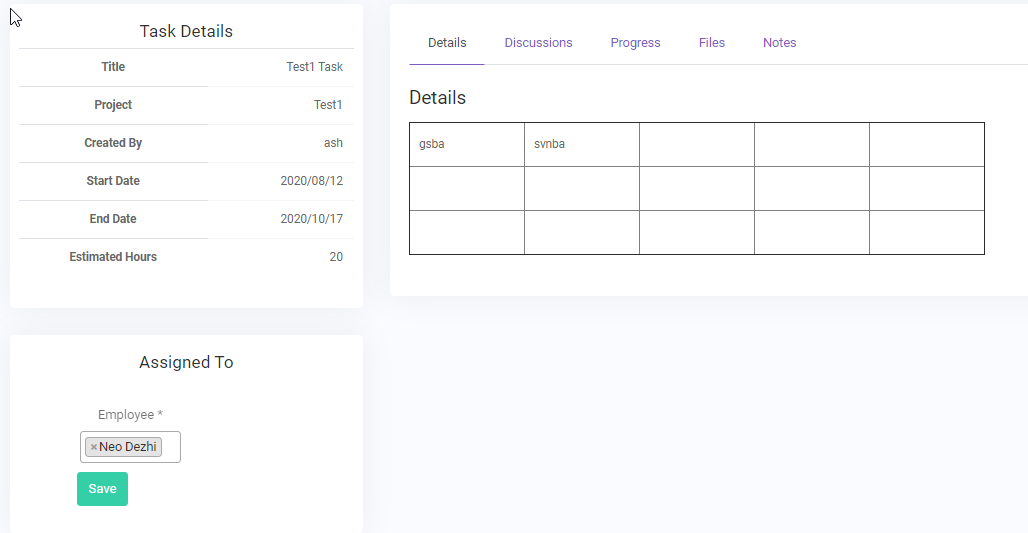
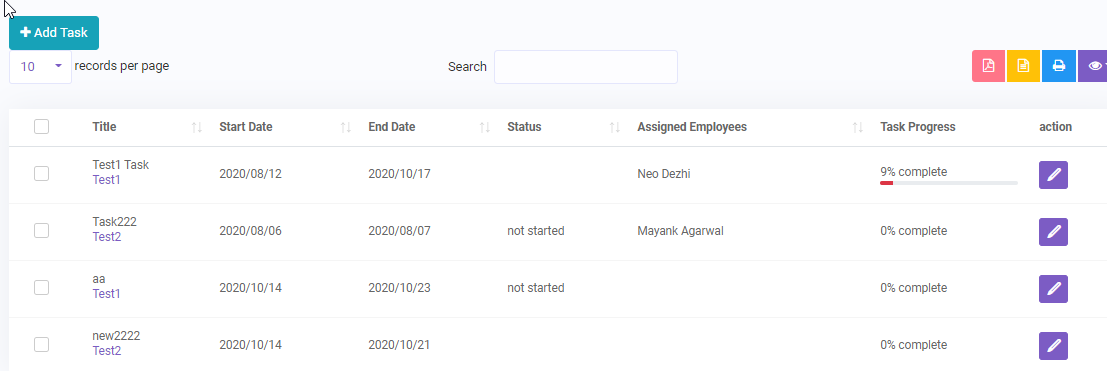
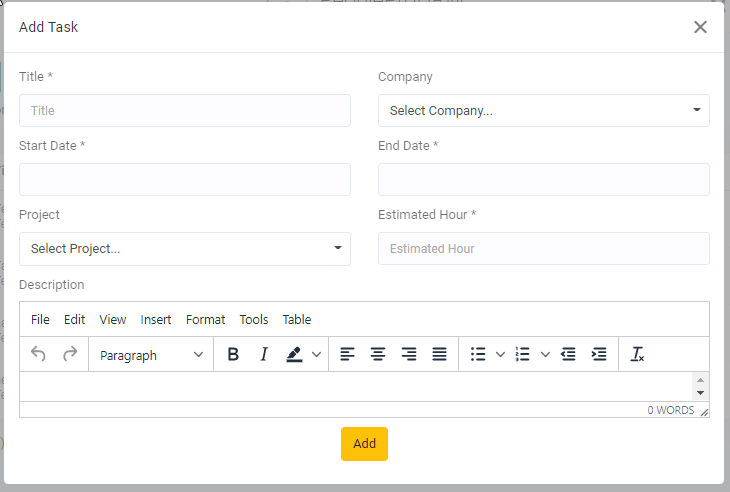
Task
Project Management -> Task.
Admin can view/add/update a task and task details here. Admin can add a task under a project or task can
be added independently.
Client can request for a task under a certain project, admin will be notified about the requested task.
Admin can assign certain employees
to a specific task,the employees will be notified about the assigned task.
Add Task
Task Details
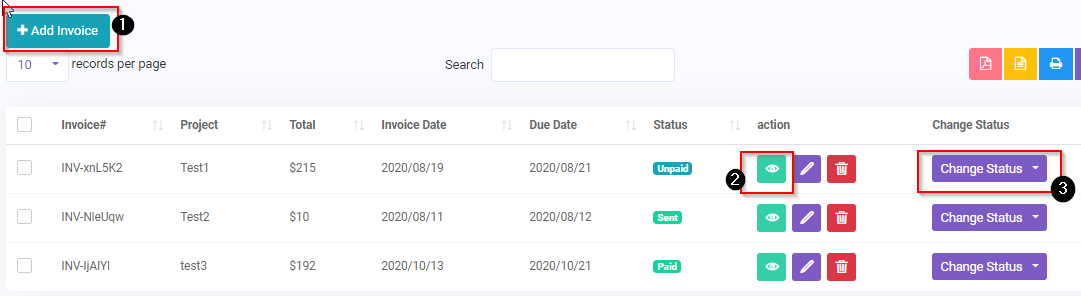
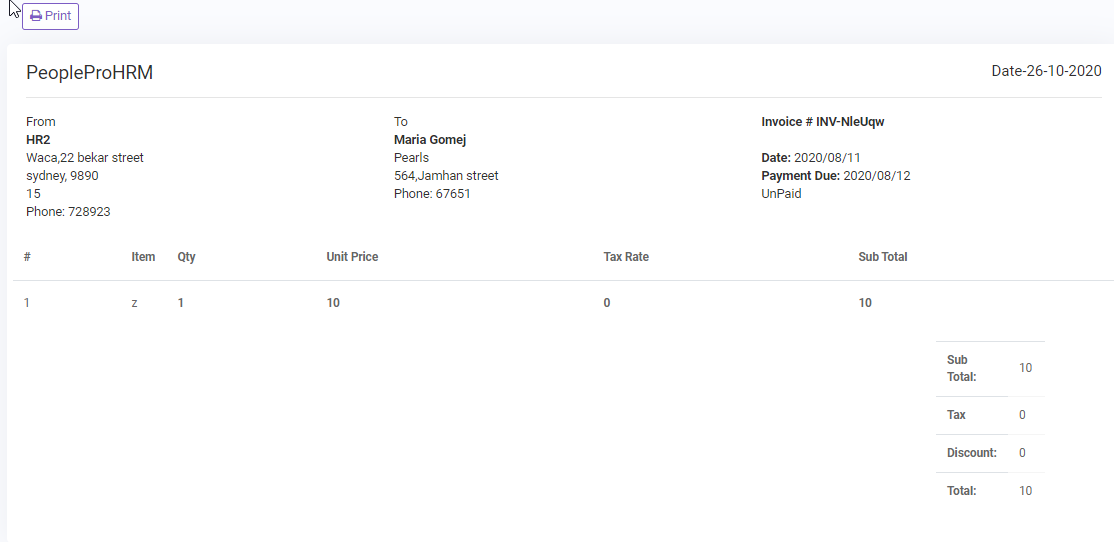
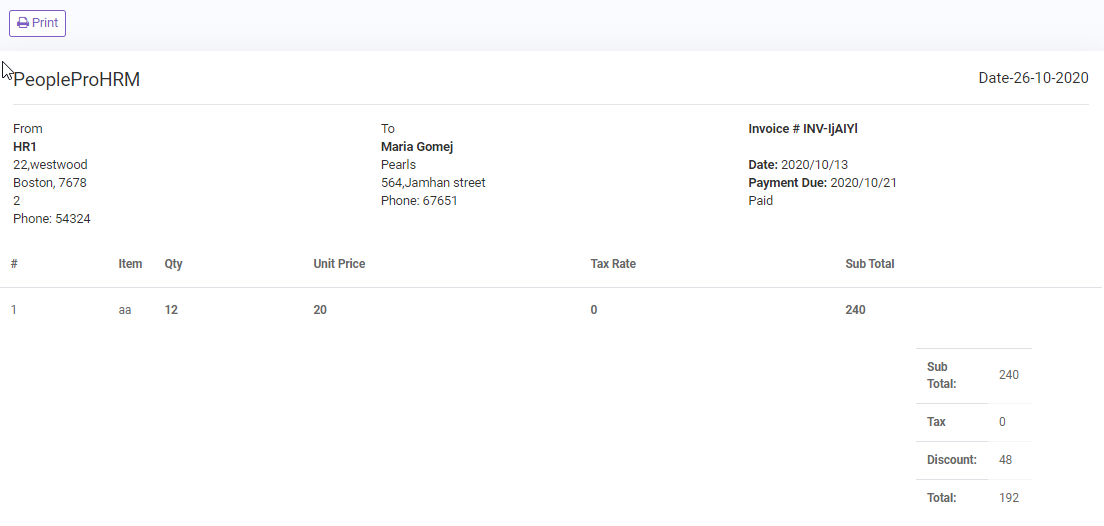
Invoice
Project Management -> Invoice.
Admin can create(1) an inovice for a project . The invoice will contain detailed(2) information about
project cost.
After successfully creating an invoice the status will be unpaid by default. But the admin can change
the staus(3) to
paid or send the invoice to the client. When the invoice status is unpaid it will not notify the client.
If the invoice is
ready then the admin can send it to the client. The client will be notified through both email and in
app notification.
When the client payment is receievd, the admin can change the status to paid. The client will be
notified through both email and in app notification
that the payment has been receievd.
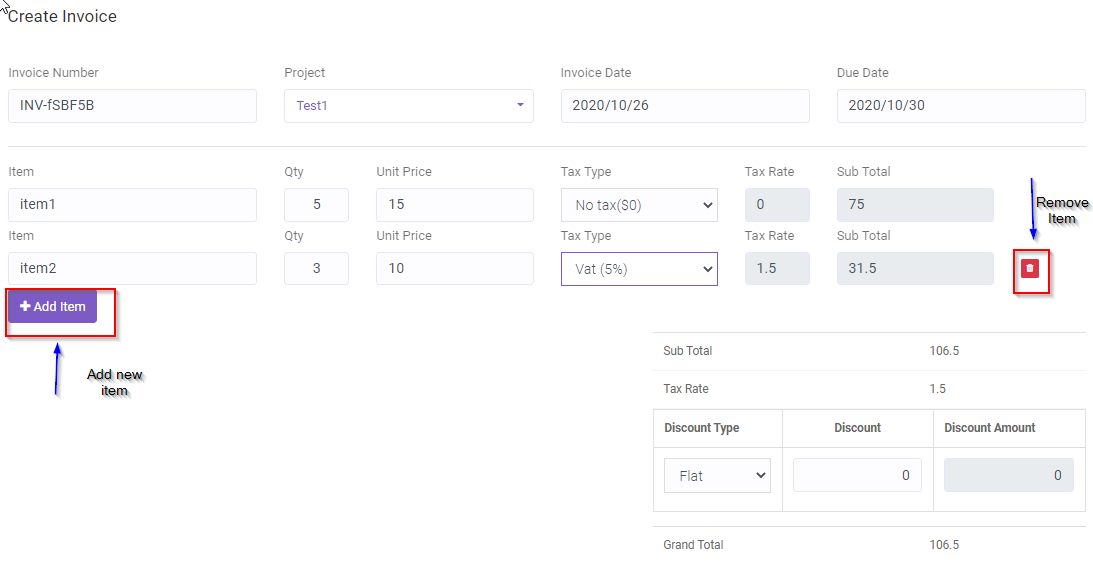
Add Invoice
Admin can add items and their price dynamically. The sub total for an item will be calculated as
follows: Sub Total= (Qty * Unit price)- tax rate
Discount can also be added here if there is any. The grand total will be calculated as follows: Grand Total=Total sub total - discount amount
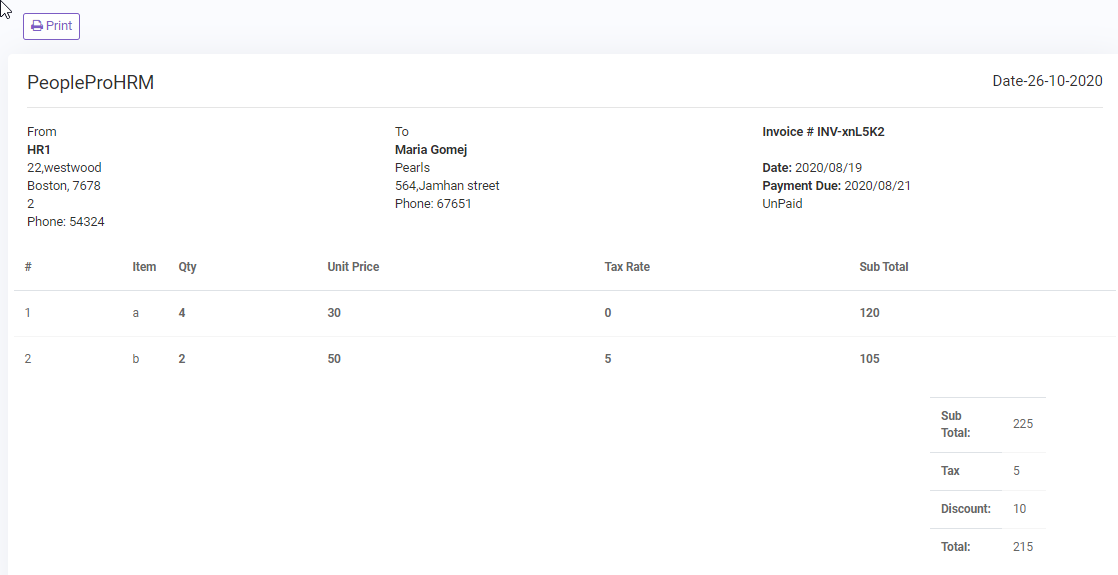
Details of Invoice
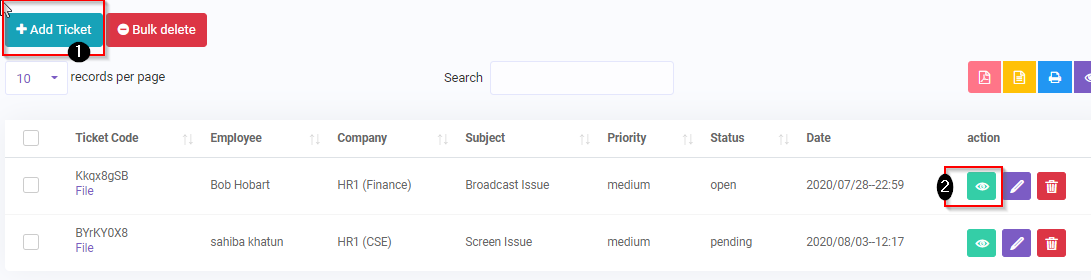
Support Ticket
Support Ticket
Admin or Employee can open(1) a support a ticket for an issue. If a emoloyee request for a support
ticket, the admin
can approve and assign employee to resolve the issue. Details(2) page will show the detailed info of the
ticket.
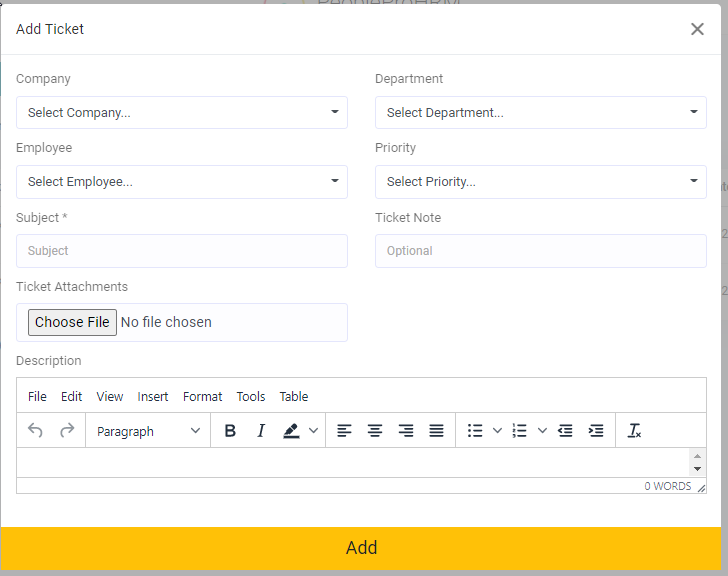
Add Ticket
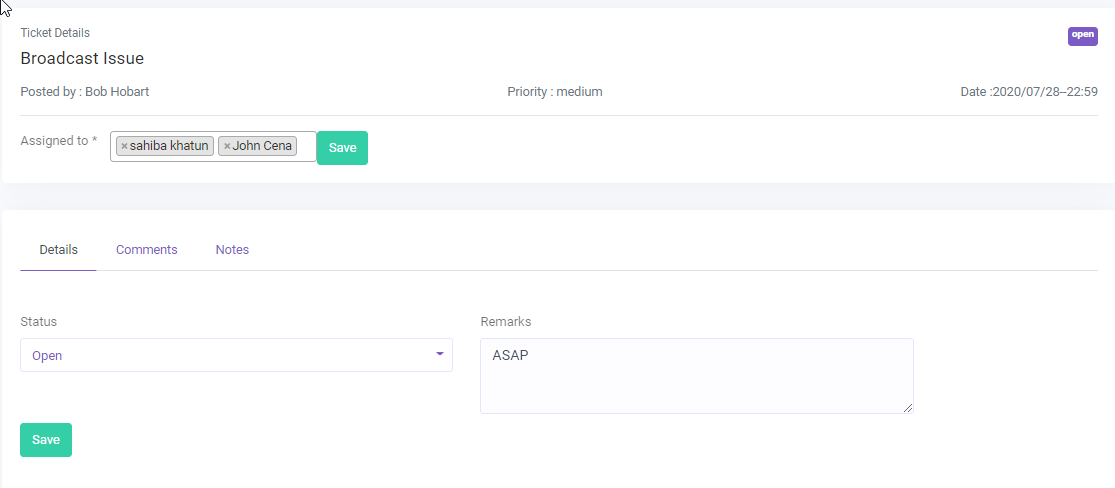
Ticket Details
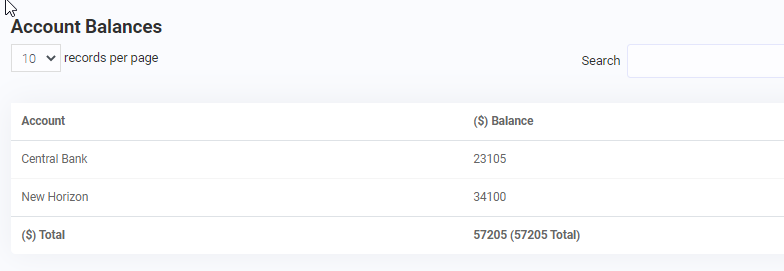
Account Balance
Finance -> Available Balance.
The current available balance of the bank. For each deposit or expense the available balance of the
respected bank will update.
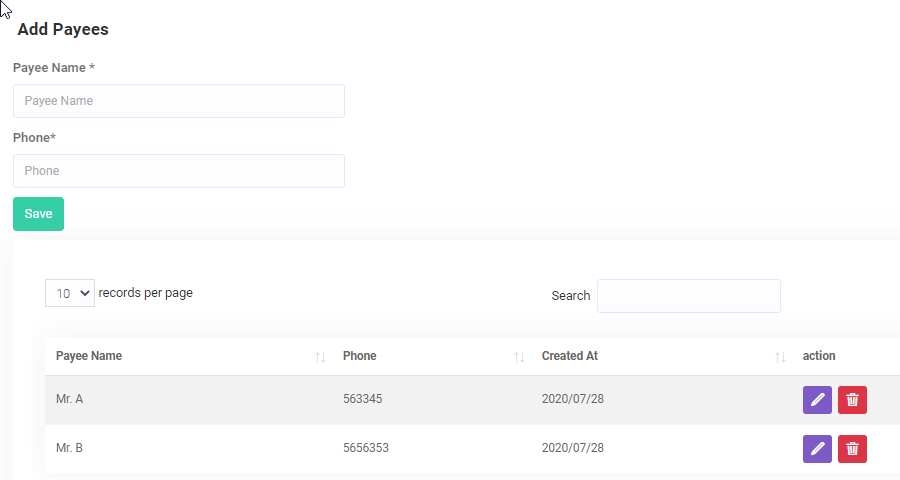
Payee
Finance -> Payee.
You can view/add payee information . Basically a payee is a person to whom money is paid or is to be
paid.
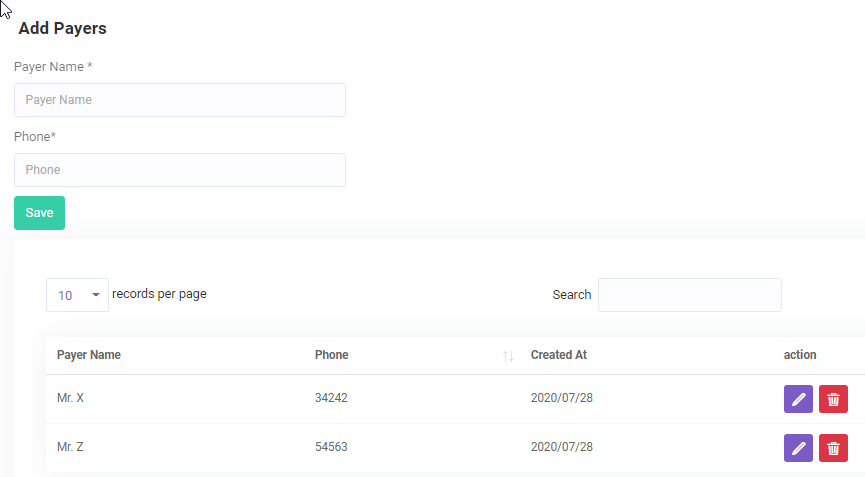
Payer
Finance -> Payer.
You can view/add payer information . Basically a payer is a person who pays money.
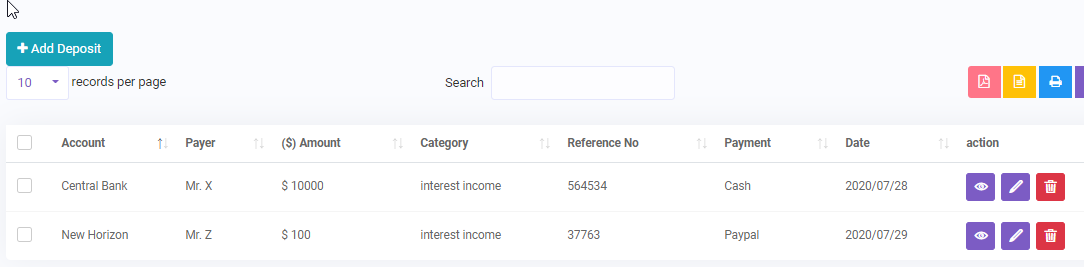
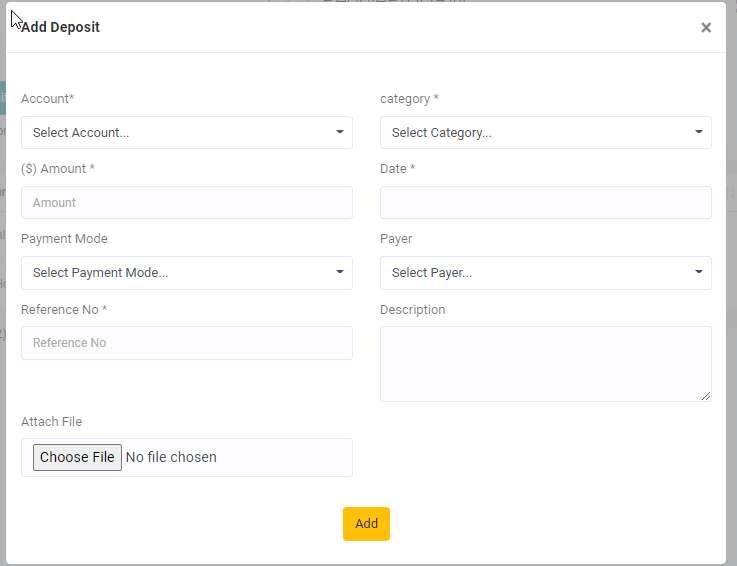
Deposit
Finance -> Deposit.
You can view/add deposit information . You can deposit money to the selected bank account.
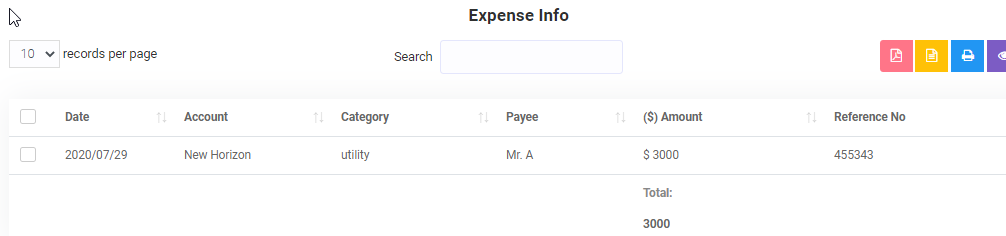
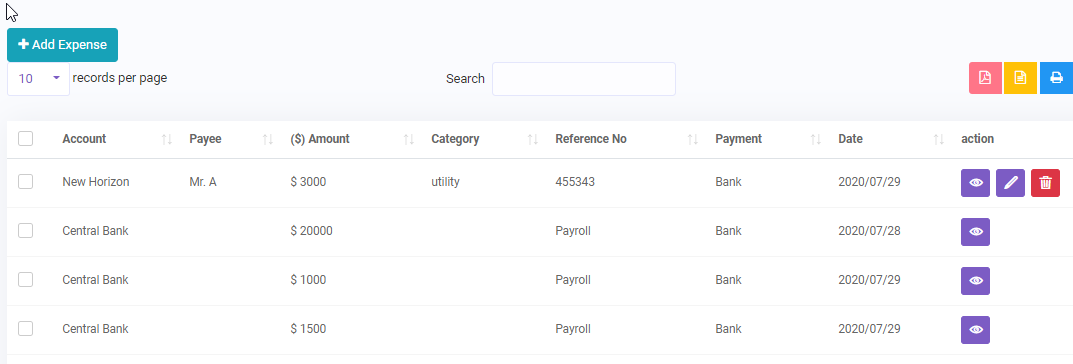
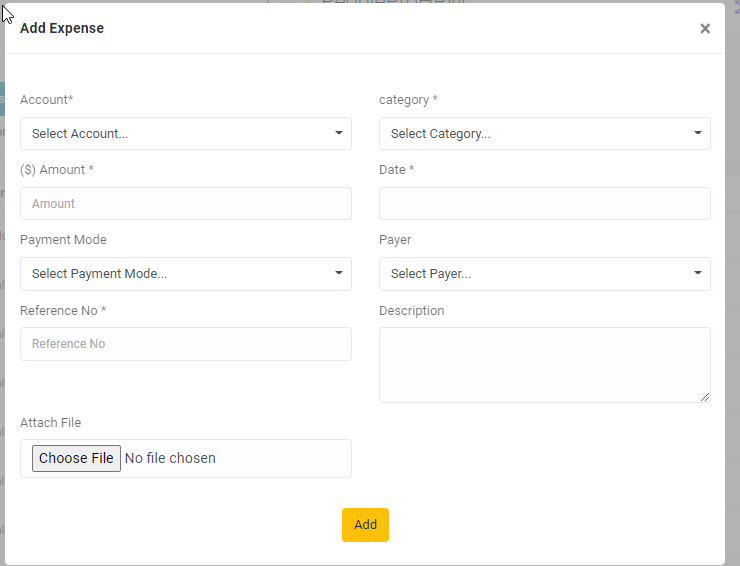
Expense
Finance -> Expense.
All of the finance expenses can be seen here . Employee payment expenses will also appear here.
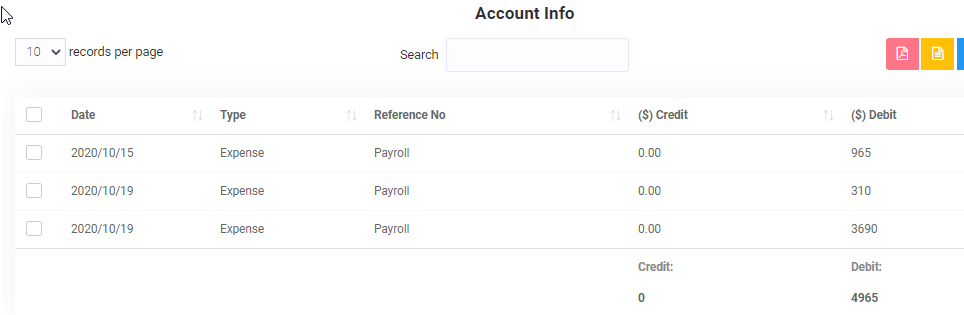
Transaction
Finance -> Transaction.
Detailed transaction history till date is shown here.
Transfer
Finance -> Transfer.
You can transfer balance from one account to another.
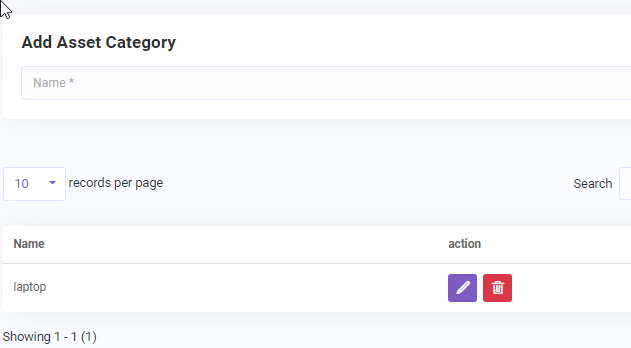
Asset Category
Assets -> Category.
Asset Category can be added/updated here. Note : This is mandatory before adding asset record.
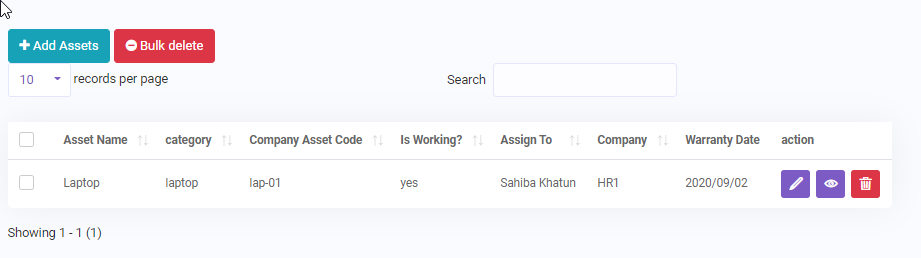
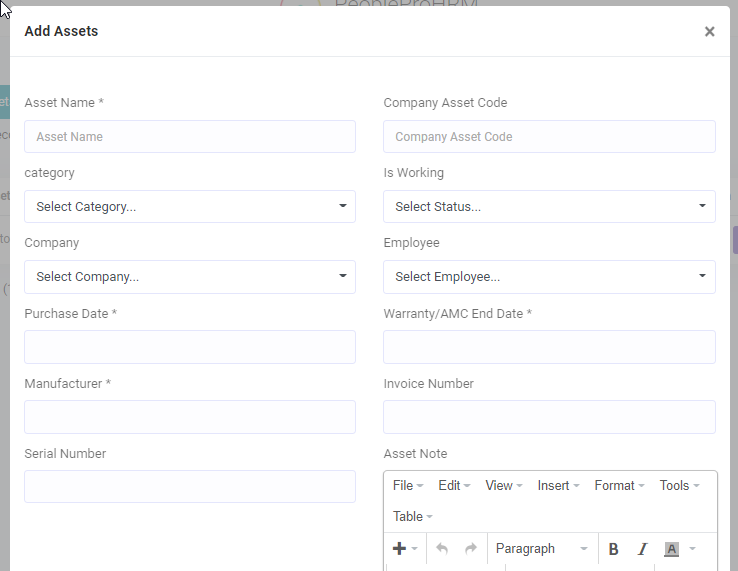
Asset
Assets -> Assets.
Asset info can be added/updated here and that asset can be assigned to an employee.
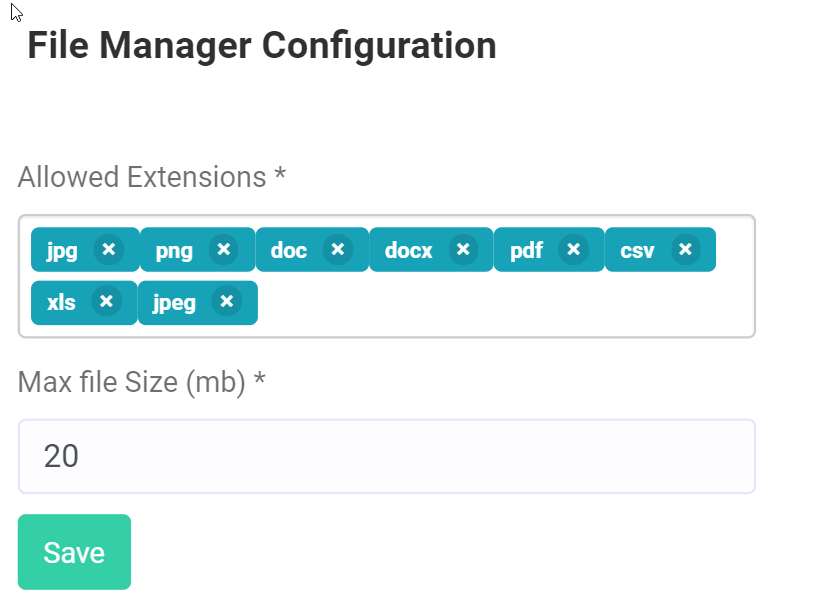
File Configuration
File Manager -> File Configuration.
Allowed file types/extensions can be added here. Moreover, the maximum file size can also be defined
here.
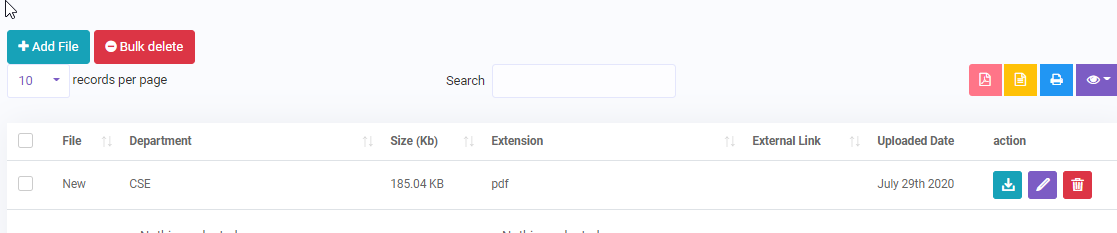
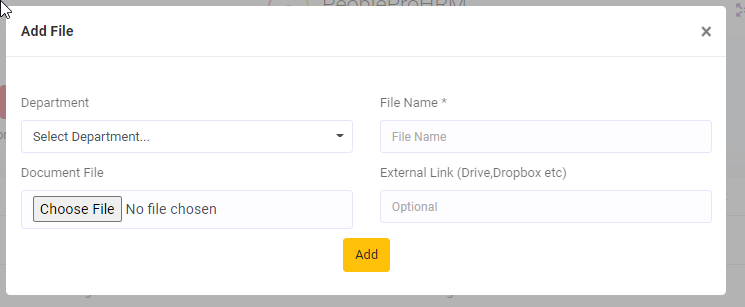
File Manager
File Manager -> File Manager.
You can add/update file for a certain department. You can also add external link e.g google drive,imagur
etc.
Official Document
File Manager -> Official Document.
You can add/update Official Documents here. You can also select the date when to send mail notification
before the document expires. If you need to use corn job, please check SETUP Mail Server --> SETUP corn Job.
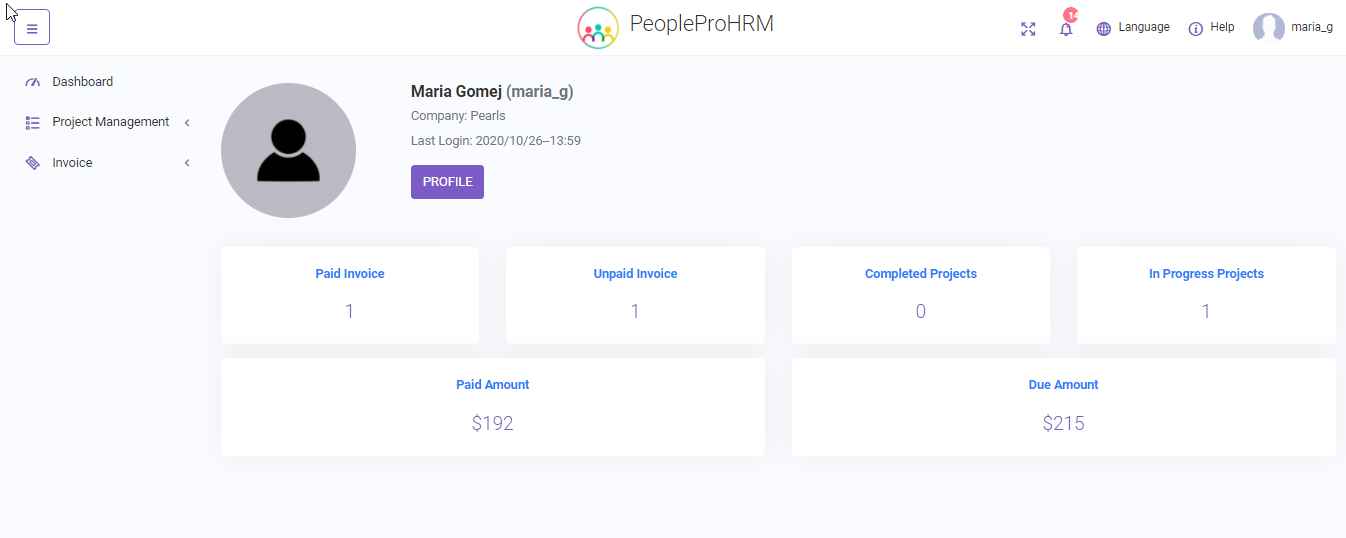
Client DASHBOARD
The system offers an informative,interactive and simple client dashboard.
client can view all the project and invoice related information at a glance in the dashboard.
Profile: Client can go the profile page and update profile info if needed
Paid Invoice: Total number of invoices that has been paid, clicking the link will
show detailed information
Unpaid Invoice: Due invoices, clicking the link will show detailed information
Completed Projects: Total number of projects that has been Completed, clicking the
link will show detailed information
In Progress Projects:The projects that are still being worked on, clicking the link
will show detailed information
Paid amount:Total paid amount till date
Due amount:Due Amount
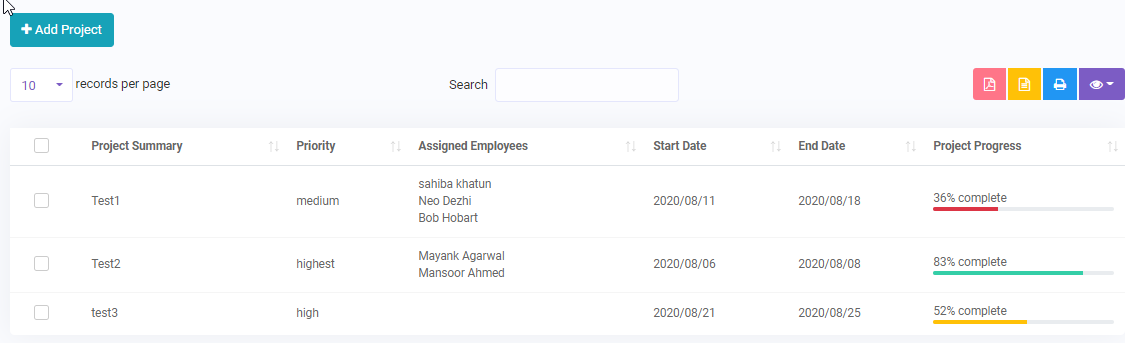
Client Project
Client can view and track prject details and add new project request with project details. The admin
will be notified about the project
request.
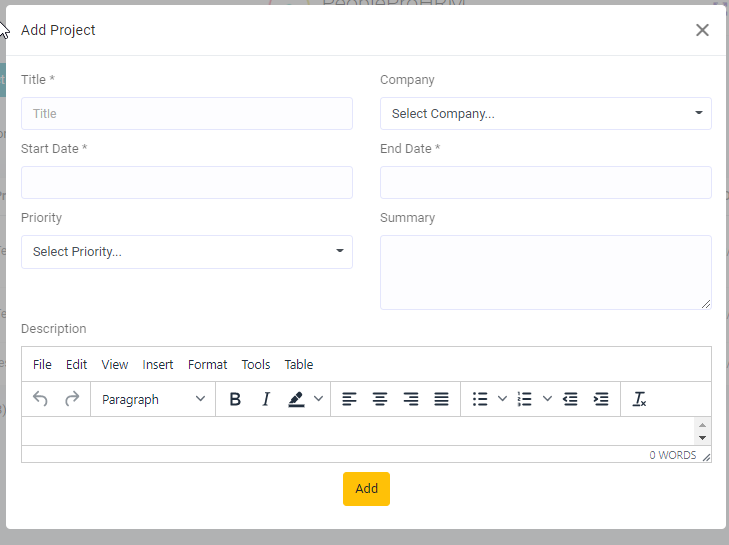
Add Project
Client Task
Client can view and track task details and add new task under a project. S/he can edit/update task
details.
Add Task
Client Invoice
The due/unpaid invoices can be seen here. Click(1) to see details.
Details
Client Paid Invoice
Paid invoice and their details(1).
Details
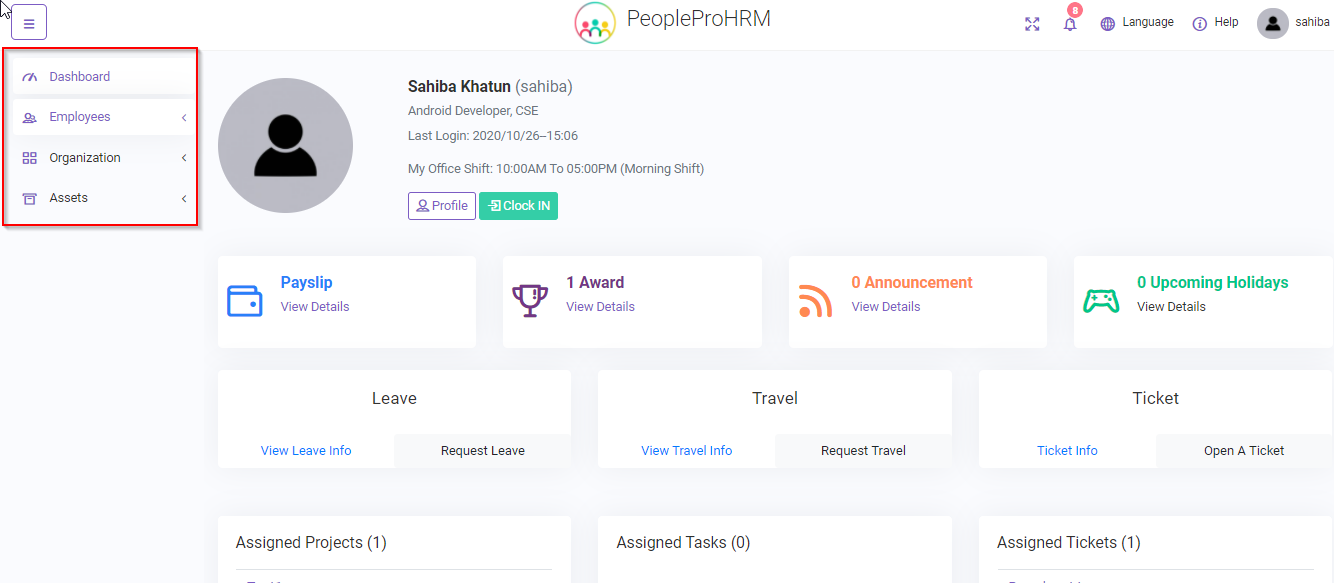
Employee DASHBOARD
The system offers an interactive, easy to use employee dashboard.
employee can view all of their relevant information at a glance in the dashboard.
The sidebar will only show the module that the employee is permitted to access or us by the admin.
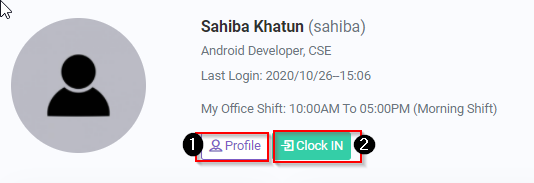
Profile: Employee can go the profile page and update profile info if needed
Clock In: Employee can clock in to mark his/her attendance. As soon as s/he
clocked in their will be a
clock out button to clock out. The system will record both the clock in and clock out time
Employee can view their payslips, awards and if their is any recent announcements or holidays.
All of them are clickable and will show detailed information.
Employee can view their leave info, travel info and ticket info till date by clicking on the link. They
can also request for
new leave, travel or open a ticket if there is any issue.
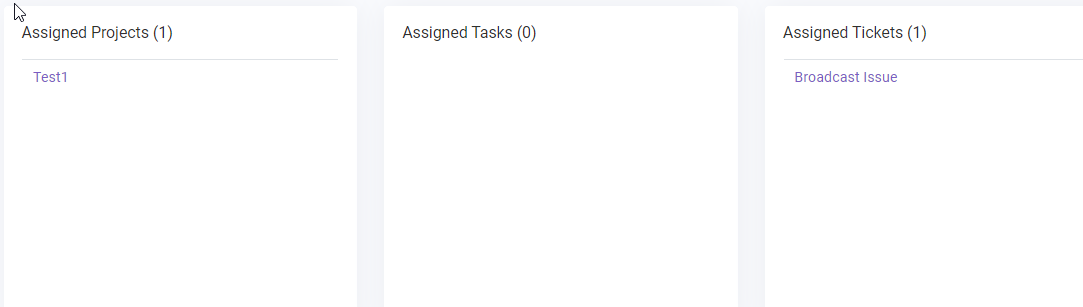
Assigned projects, tasks and tickets of to the employee will be listed here.
Employee can click on them for more details.
General Error
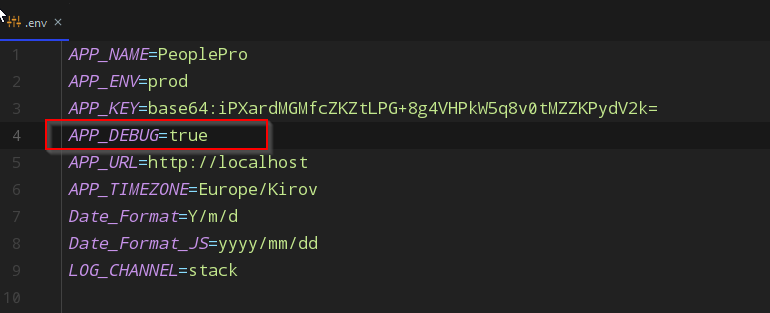
If You face any error like- 500 server error or 403 server error, please first go to your project root folder and open the .env file and set APP_DEBUG=true. Then go to the page where you faced the error and reload the page.
Now you should take a screenshot and send it to us at Support : support@lion-coders.com, It will us to quickly resolve the error.
VIDEO TUTORIAL
Auto Update Feature
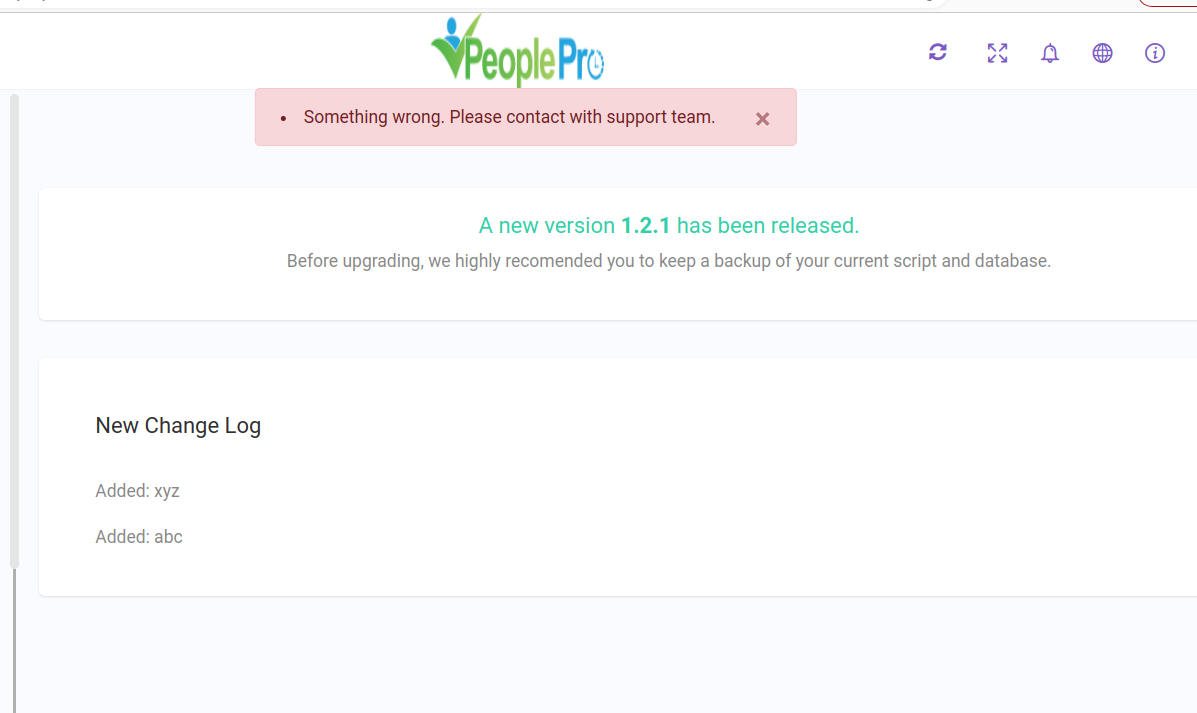
1.New version release
Notification -
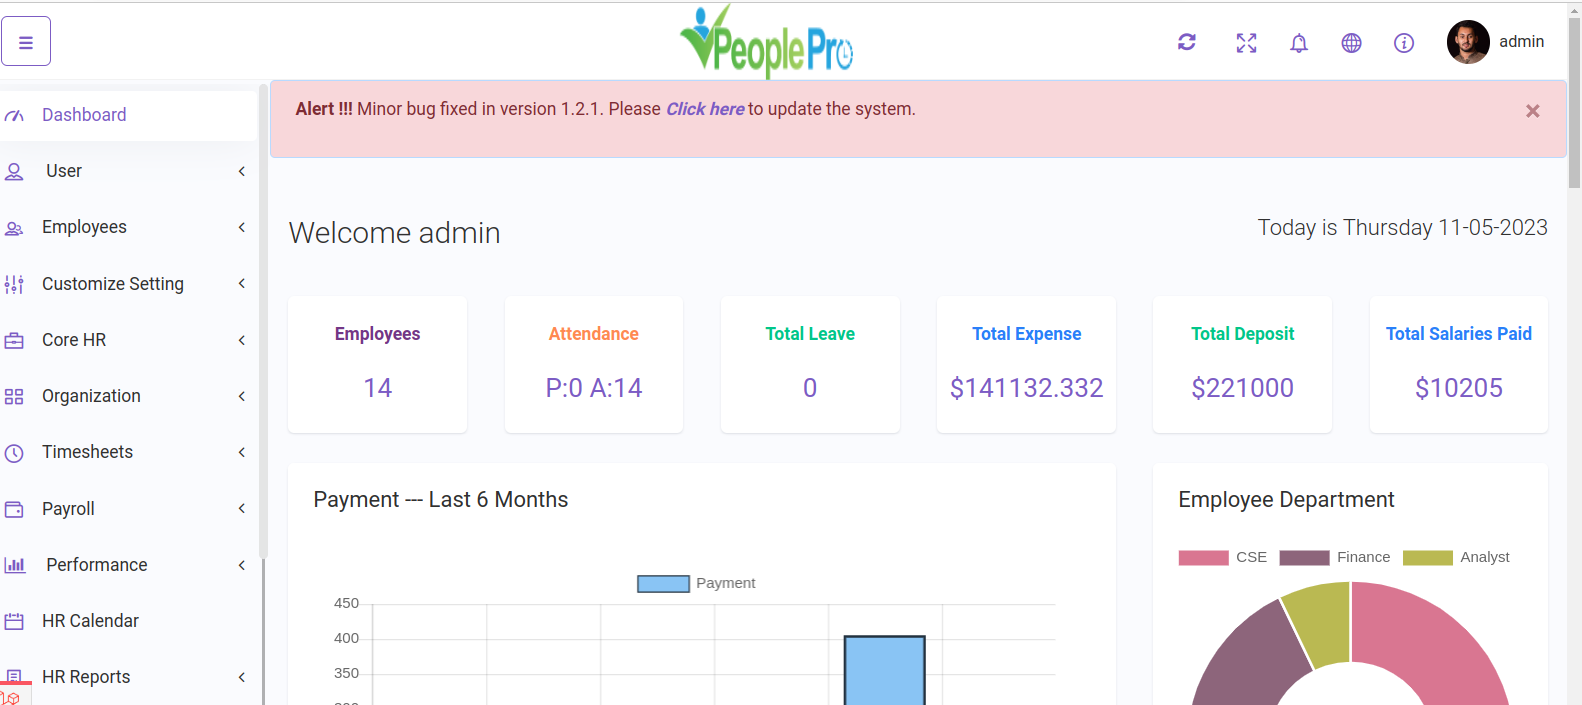
When a new version is prepared for releasing, a notification message in dashboard will be shown.
Procedure -
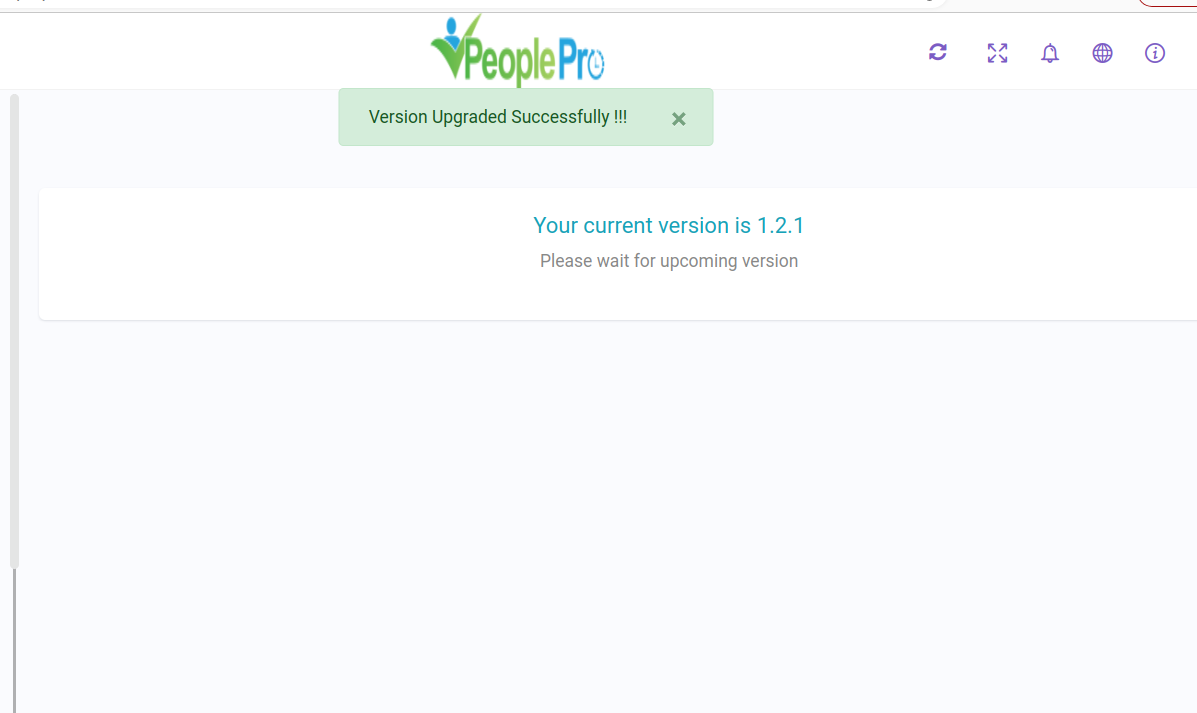
After clicking, it'll redirect to this page you will see the change log details & update button. Click the Upgrade button.
After upgrading, it'll redirect to you here.
Error -
If you see this notification during upgrade, please contact at Support Panel.
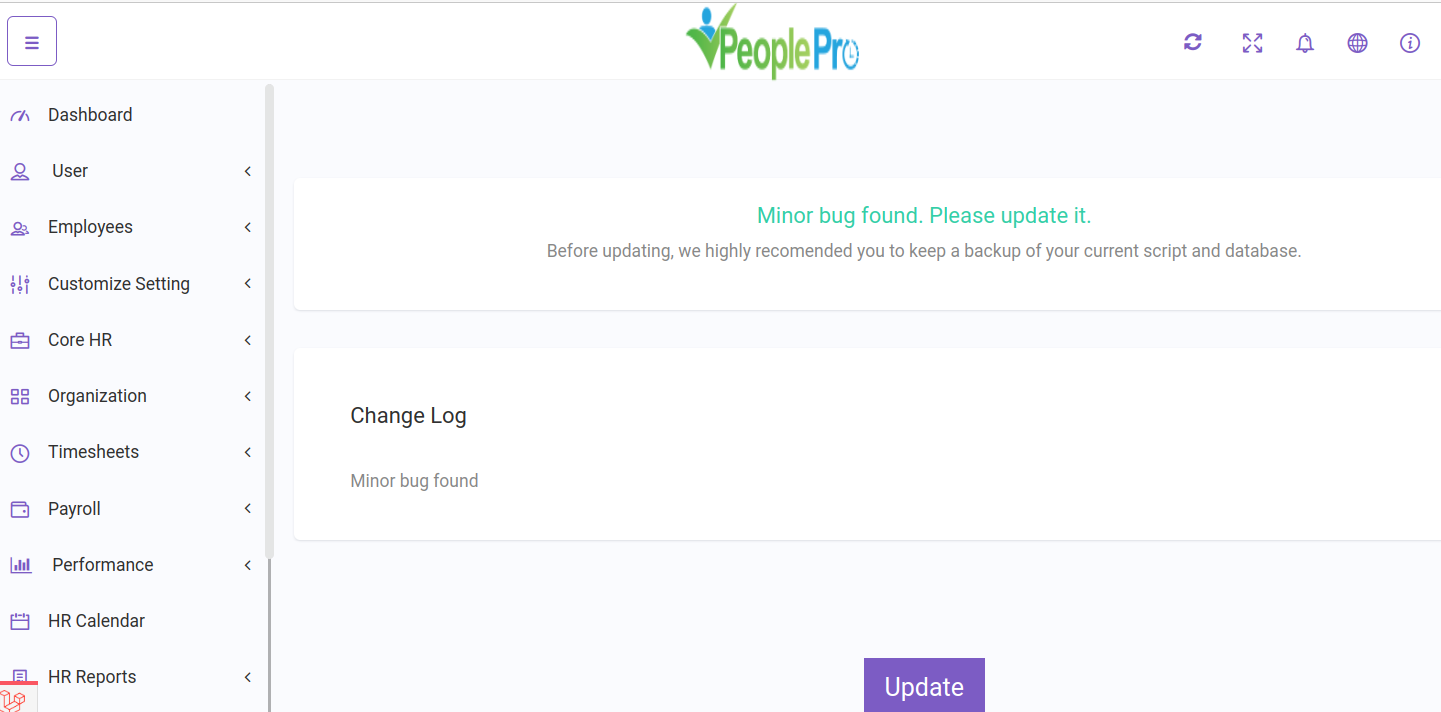
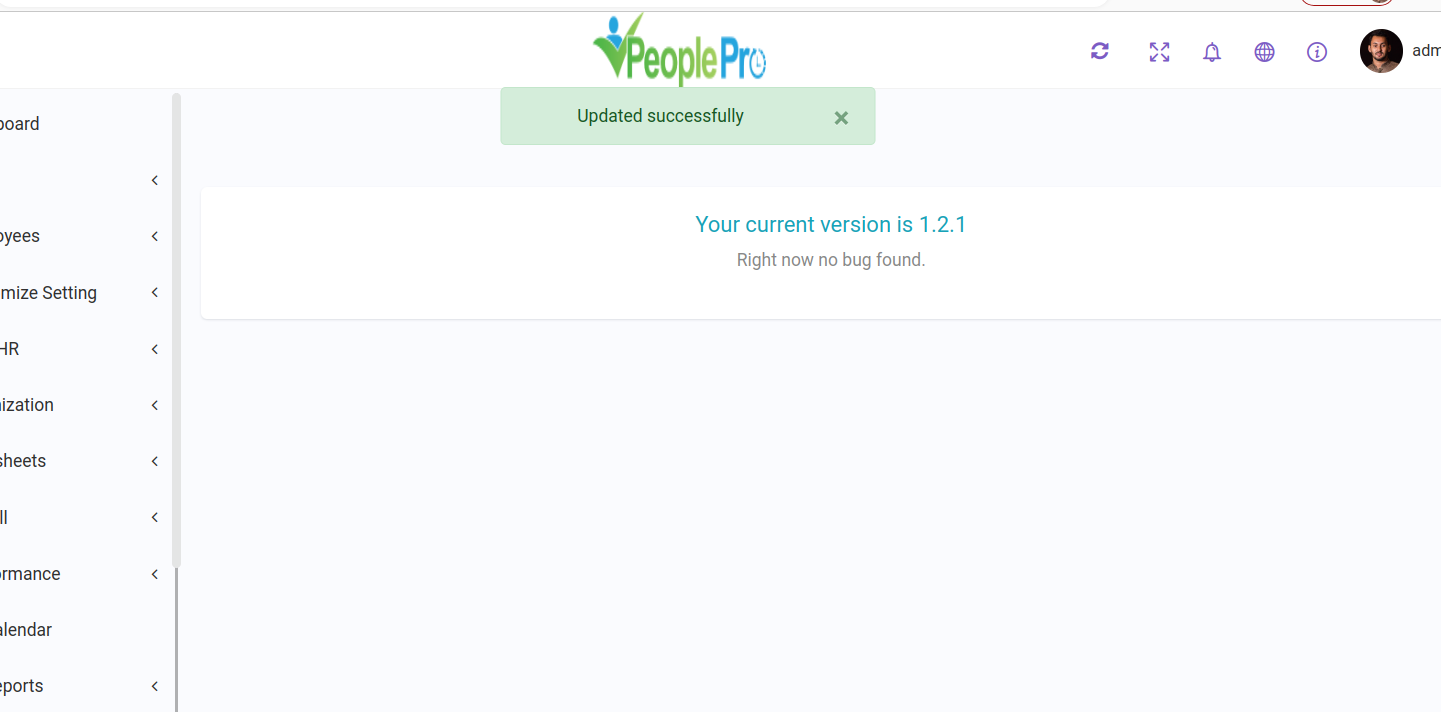
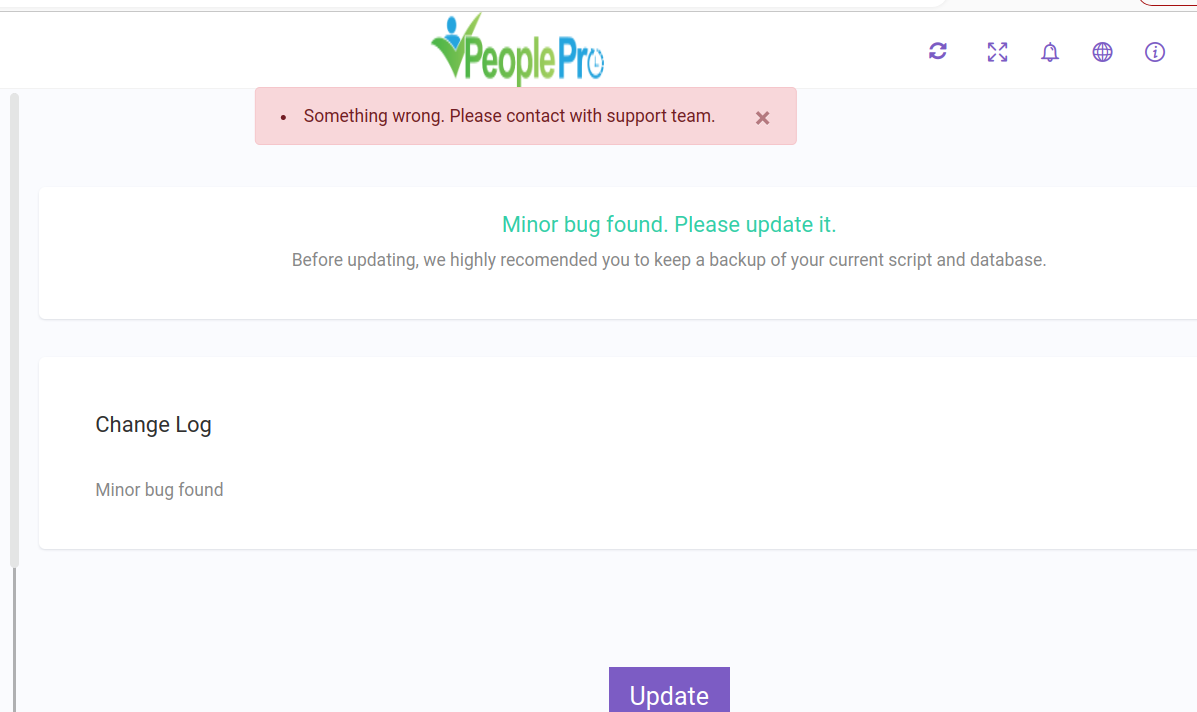
2.Bug Update
Notification -
If any bug found, a notification message in dashboard will be shown.
Procedure -
After clicking, it'll redirect to this page you will see the change log details & update button. Click the Update button.
After updating, it'll redirect to you here.
Error -
If you see this notification during update, please contact at Support Panel.
SUPPORT
We are happy to provide support for any issues within our software. We also provide customization service for as little as $15/hour. So if you have any features in mind or suugestions, please feel free to knock us at lion-coders.com/support. Please note that we don't provide support though any other means (example- whatsapp, remote platform, comments etc). And if any client modify/add any code of our script and then face problem, we don't provide the support on that specific feature where he/she face problem. We only fix the bugs/issues if it's exists from previous. So, please refrain from commenting your queries on codecanyon or kocking us elsewhere.
Also, in case of any errors/bugs/issues on your installation, please contact us with your hosting details (url, username, password), software admin access (url, username, password) and purchase code. If your support period has expired, please renew support on codecanyon before contacting us for support.